I guess I should have expected it, considering it IS a post about using AI to do things I don’t want to do, like futz around with Xcode itself. But I gotta say… does this site really look AI generated? Any of it?
The thing is, I’m very clear with people about what I use AI for and what I don’t use it for. I do use it to write utilities and apps. I do use it to do research for me, for all kinds of things ranging from work to personal interests. I do use it to create me reports of information and summarize things for me. I do use it for, honestly, a lot of my website coding now (the plumbing of this site). I just throw it at Claude Code. What interests me is the stuff ON my site, and that’s what I write.
Oh yeah, I even use Claude Code to edit videos for me now. I don’t use AI to create the videos, but I do have it edit them and generate show notes for them, with heavy direction from me on both.
I am extremely transparent about all of this.
But still, AI did not write this post, or the previous post, or any of the posts on this website, because I did. I’m a literate man who’s been around a long time and I have my own thoughts on how to write, and one thing Claude does NOT do well is capture my tone. And even if it did, it doesn’t actually know what I’m thinking.
Anyway, my guess is the only reason my blog post was noticed at all was thanks to John Voorhees of MacStories boosting it for me. Thanks, John! Also thanks, John, for not accusing me of having AI write the post! 😄
Lately, I’ve heard several Apple related podcasters talk about how bad Xcode is, and how Apple needs to make vibe-coding Mac and iOS apps better by making Xcode less inscrutable. They’re not wrong, but also I don’t understand why they’re even opening Xcode in the first place. With a little bit of pre-work, you can vibe code Mac and iOS apps to your heart’s content without looking at Xcode anymore.
And if you’re ever in doubt about how to make any of the following work, point Claude Code or your LLM coding tool of choice to this blog post, and let it figure it out. That’s literally its job, figuring out things you don’t want to have to.
TL;DR
Xcode.app must be installed, but it never has to be open.xcodebuild, notarytool, stapler, and devicectl all live inside Xcode and run fine from a shell.
A few one-time steps do need the GUI (or an interactive terminal): sign into your Apple ID, create a Developer ID certificate, store a notarization password. After that, builds and deploys are fully headless.
The Mac app ships via one script — scripts/release.sh — which you write once. It runs the whole chain: archive → Developer ID sign → notarize → staple → install to /Applications.
Signing is certificate-and-keychain based. The signing key lives in the login keychain; xcodebuild finds it automatically. No secrets in the repo.
The one-time setup is the only part with any friction, so let’s get it out of the way first.
Install Xcode
You do have to have Xcode installed, there’s no getting around that, because build depends on tools that live inside Xcode.app.
Once Xcode is installed, make sure it’s the selected command line toolchain, and not /Library/Developer/CommandLineTools. If the output of the check is /Applications/Xcode.app/Contents/Developer, you’re in good shape:
Terminal window
1
❯xcode-select-p
2
/Applications/Xcode.app/Contents/Developer
If it DOES return the path for the standalone CommandLineTools instead, point it to Xcode.
NOTE: The name “Command Line Tools” can be confusing.
This is because there’s a standalone Command Line Tools package, available with xcode-select --install, which is the /Library/Developer/CommandLineTools version. This contains clang and git, but not the iOS SDK, notarytool, devicectl, and other items needed for full app development.
The complete toolchain is inside Xcode.app, at /Applications/Xcode.app/Developer, and it has everything you need. If you have Xcode installed, you don’t need the standalone Command Line Tools.
Install XcodeGen
Xcode and its command line tools aren’t enough to generate and manage Xcode projects automatically. For that, you’re going to need XcodeGen. You can download it from Github or install it using homebrew:
Terminal window
1
brewinstallxcodegen
Long story short, Xcode projects are actually folders that macOS makes appear as files, and they contain everything about your project needed to create and compile your app. Xcode constantly modifies the files and file references constantly, and it creates issues for git repositories.
Xcodegen creates a project.yml (YAML) file with all your project settings, and then on every build, it recreates the entire .xcodeproj folder using that project.yml file. Only the YAML file has to be committed to git, and the whole .xcodeproj can be ignored from git’s perspective.
Configure Xcode, Once
You do need to setup Xcode initially in order to never have to look at it again.
Xcode License and Additional Components
First, either accept its license and install its additional components, or do it through the command line:
Terminal window
1
sudoxcodebuild-licenseaccept
2
sudoxcodebuild-runFirstLaunch
Setup Your Apple Developer Account in Xcode
Next, open Xcode, click on Settings → Accounts and click on + to add your account.
NOTE: You have to have a paid Apple Developer account in order to distribute and notarize your apps.
And you will want them notarized in order to install them on you Mac and iOS devices and not have the OSes decided they’re malware and delete them.
Create a Developer ID Application Certificate
Once that’s done, create a Developer ID Application certificate (Settings → Accounts → your Apple ID → Manage Certificates… → + → Developer ID Application), which creates a cert for signing the shipped .app bundle.
Please note that a Developer ID Application certificate and your Apple Development certificate are two separate things.
The Apple Development identity is for building and running on your own devices — pushing to your iPhone, local debugging. The Developer ID Application identity is for the notarized .app that survives Gatekeeper and runs on someone else’s Mac. The release script wants that second one.
Creating the certificate in Xcode installs both the certificate and its private key into your login keychain. That private key is what actually does the signing, and it cannot be re-downloaded — so don’t delete it, and back up your keychain.
When in doubt, ask your LLM of choice about them and have it help you get set up. It’s the one that’s going to be using Xcode for you anyway.
And finally,
Store a Notarization Credential – Once, in Terminal
Notarization uploads your signed app to Apple for a malware scan. notarytool authenticates using a stored keychain profile that you create once, interactively — it prompts for an app-specific password, and there’s no way around the prompt:
Name the profile after the app. Don’t borrow another app’s profile — it’ll work on your machine and then silently break on someone else’s.
The app-specific password is not your Apple ID password. Generate one at appleid.apple.com → Sign-In & Security → App-Specific Passwords.
These passwords go stale silently whenever you change your Apple ID password. A 401 invalid credentials out of notarization almost always means “go make a fresh app-specific password,” not “your setup is broken.”
Confirm it’s stored:
Terminal window
1
xcrunnotarytoolhistory--keychain-profileApp-Name
Side topic here, I store my app-specific passwords in a 1Password vault that Claude Code has access to. That way whenever I’m creating a new app, I can tell IT to create the notarization credential for me, and it knows to check its 1Password vault for the password. The whole point of using the LLM in the first place is to avoid doing things manually that you don’t want to do.
Setup a Local.xconfig File and Add It to .gitignore
Real signing needs your team ID and bundle prefix, and I put those in a Local.xconfig file:
Terminal window
1
cpLocal.xcconfig.exampleLocal.xcconfig
2
# then edit Local.xcconfig to set:
3
# BUNDLE_PREFIX = your.real.prefix
4
# DEVELOPMENT_TEAM = YOUR-TEAM-ID
Again, if in doubt, ask Claude Code or your LLM of choice to create this for you.
Set up the Agent Tools
Create the Deploy Script
Deployment on my apps is handled via a script called release.sh that lives in a scripts folder inside the repo. Without it, I don’t have an automated build pipeline.
I had Claude Code create mine: I told Claude, more or less: I want to archive, Developer ID-sign, notarize, staple, and install this app to /Applications without ever opening Xcode. Write me a script that does the whole chain and fails loudly if any step breaks.
It didn’t need me to explain the pipeline, because the pipeline isn’t a secret — archive with xcodebuild, export with -exportArchive and an ExportOptions.plist, submit with notarytool --wait, attach the ticket with stapler, check with spctl. That’s the documented, conventional way to ship a Developer ID Mac app, and the model knows it. What it needed from me was the project-specific stuff: the scheme name, the team ID, what to call the notary profile, where to install the result.
Then it wrote a first draft, we ran it, it broke, and we fixed it. That loop is not a failure mode, it’s just the process. I always look at AI workflows as works in progress, but it doesn’t take long before you can stop tweaking things and just start working.
This is the actual script from one of my app repos:
1
#!/usr/bin/env bash
2
# scripts/release.sh — produce a Developer ID-signed, notarized MY-APP-NAME.app and
3
# install it to /Applications.
4
#
5
# Requires (one-time): Xcode signed into your Apple ID, the paid Developer
6
# Program, and a notarytool credential profile. Defaults to the "MY-APP-NAME"
7
# profile; override with MY-APP-NAME_NOTARY_PROFILE=<name>.
It looks more complicated than it is, but it is a series of steps that you’d have to know need performed. Again, this is why you talk to your LLM, tell it what you want, and have it help build your workflow.
Some things to note:
set -euo pipefail halts the script on any failing command immediately instead of blundering forward. There’s no half-finished state that looks like success.
cd "$(dirname "$0")/.." means the script hops to the repo root regardless of where you invoked it from, so ./scripts/release.sh works whether you’re in the repo root or three directories down.
The pre-flight block checks that xcodegen exists and that the notary profile is actually stored before spending five minutes on an archive that’s doomed to fail at step five.
And the last two steps re-verify the installed bundle, not just the exported one. Belt and suspenders, but I’ve had a copy step silently mangle a bundle before and I’d rather find out from the script than from Gatekeeper three days later when it deletes my app for me.
Create CLAUDE.md or AGENTS.md
release.sh gives you a one-command deploy. CLAUDE.md (or AGENTS.md for basically every other model under the sun) is what makes the agent actually use it without being told every single time.
I had Claude create my CLAUDE.md itself after going back and forth about the build process. Now whenever I create a new app, I tell it to reference the repo for one of my other apps and use the same methodology.
CLAUDE.md
1
## Build commands
2
3
```bash
4
# Regenerate the Xcode project after changing project.yml or adding source files
5
xcodegengenerate
6
7
# Unit tests (YOUR-APP-NAMEKit only; fast, no Xcode build required)
The `xcodebuild` commands above use `CODE_SIGNING_ALLOWED=NO`, which produces an
22
**ad-hoc** build: fine for CI and quick local checks, but Gatekeeper rejects it
23
and the iCloud KVS / App Group entitlements don't bind (no team prefix). For a
24
real menu-bar build that survives quarantine and lets iCloud sync work, use
25
`scripts/release.sh`. It signs with Developer ID, notarizes via the `YOUR-APP-NAME`
26
notarytool keychain profile, staples the ticket, and installs to
27
`/Applications/YOUR-APP-NAME.app`.
That’s It
And that’s the whole one-time setup. From here on, nothing needs a mouse.
How the build actually runs — no GUI in the loop
Everything below is plain command-line invocation. Xcode.app never launches; these tools live inside it but run standalone. This is exactly what Claude Code executes through its shell.
Fast, Unsigned Checks
For “does it compile / do the tests pass,” you don’t need signing at all:
Terminal window
1
# Unit tests — pure SPM, no Xcode build at all
2
swifttest
3
4
# Compile the macOS app (ad-hoc, unsigned — fine for CI/local sanity)
CODE_SIGNING_ALLOWED=NO gives you an ad-hoc build: it compiles and runs in a simulator, but Gatekeeper rejects it and entitlements like iCloud KVS and App Group don’t bind. That’s the fast inner loop.
The Mac Release Pipeline
One command does the entire shippable chain — the script from Part two:
Terminal window
1
./scripts/release.sh
Archive, Developer ID export, notarize, staple, verify, install. If any step fails it stops and tells you which one broke. Need a different notary profile? Override it: TZED_NOTARY_PROFILE=<name> ./scripts/release.sh.
Deploying to a Real iPhone, Headless
iOS has no notarization step — that’s a Mac-distribution concept. Getting a build onto a connected iPhone is xcodebuild plus devicectl, both inside Xcode’s toolchain:
Terminal window
1
# Build & sign for a real device (uses the Apple Development cert + provisioning)
# Install the built .app onto the connected device by its UDID
8
xcrundevicectldeviceinstallapp\
9
--device<DEVICE-UDID>build/ios/…/TZed.app
devicectl list devices lists connected and paired devices with their UDIDs. Device builds sign with the Apple Development identity (not Developer ID) plus a development provisioning profile, which -allowProvisioningUpdates fetches for you.
How code signing works when there’s no GUI
If you’ve only ever signed apps by ticking a box in Xcode, it’s worth understanding what’s actually going on under there, because none of it needs the GUI at build time.
The private key does the signing. When you created that Developer ID Application certificate, Apple issued a certificate and your Mac generated a matching private key, both landing in your login keychain. codesign (which xcodebuild calls) uses the private key to sign the binary; the certificate — which chains up to Apple’s root — gets embedded so anyone can verify it.
Automatic signing picks the identity for you. The release script uses signingStyle: automatic, so xcodebuild selects the right identity by team ID and pulls any needed provisioning profile from Apple on the fly. No profiles checked into the repo.
Entitlements bind at sign time. Each target has a .entitlements file (sandbox, network client, iCloud KVS, App Group). These only take effect when the app is signed with a real team identity, which is the other reason ad-hoc builds can’t ship: the iCloud and App-Group entitlements quietly don’t bind without the team prefix, and you get to spend an hour wondering why your key-value store is empty.
Notarization isn’t signing. Signing proves who built the app. Notarization is a separate step where Apple scans the signed app for malware and issues a ticket; stapling attaches that ticket so Gatekeeper trusts the app offline. For a hidden-UI menu bar app (LSUIElement), notarization is what keeps XProtect from flagging it.
The secrets never touch git. The signing private key lives in the login keychain. The notarization app-specific password lives in the notarytool keychain profile. Neither ever gets written into the repo.
You can verify any signed build by hand:
Terminal window
1
codesign-dv--verbose=4/Applications/TZed.app# who signed it, with what cert
2
spctl-a-vvv-texec/Applications/TZed.app# would Gatekeeper allow it?
3
staplervalidate/Applications/TZed.app# is the notarization ticket attached?
What the agent actually uses
There’s no magic here. Claude Code drives all of this through a plain, non-interactive shell — there’s no special “build” MCP server or plugin doing something clever. It’s xcodebuild, xcrun notarytool, xcrun stapler, spctl, codesign, devicectl, xcodegen, and swift. Standard CLI tools, the same ones we’d use ourselves.
The glue is the CLAUDE.md from Part two. It tells the agent the notary-profile convention, the two build paths, and that shipping means release.sh. The result is Claude just runs the thing, without me re-explaining it every session.
The one step that stays interactive is notarytool store-credentials, and that’s a choice rather than a limitation: you could pass --password and script it, but that means putting an app-specific password in your shell history. Type it once by hand, let the keychain or 1Password hold it, and everything downstream is automated.
Why Xcode never needs to be open
Put the GUI workflow next to the headless one and the whole thing just lines up:
JOB
GUI WAY
HEADLESS WAY
Generate project
Xcode manages .xcodeproj
xcodegen generate from project.yml
Build
⌘B / Run button
xcodebuild … build
Archive
Product → Archive
xcodebuild … archive
Export signed app
Organizer → Distribute
xcodebuild -exportArchive
Notarize
Organizer upload
xcrun notarytool submit --wait
Staple
(automatic in Organizer)
xcrun stapler staple
Install to /Applications
drag-and-drop
cp -R + lsregister
Deploy to iPhone
Run on device
xcodebuild archive + devicectl device install
The GUI is only ever needed for that one-time credential setup. After that, the entire lifecycle is scriptable, which is exactly what release.sh finalizes, and exactly why the agent can own it end to end while I go do something more interesting than watching a progress bar.
If you want to try it yourself, the order is: install Xcode and xcodegen, do the credential setup, then sit down with Claude and build your own release.sh and CLAUDE.md. That last part is the actual work, and it’s an hour or two at most. After that, “ship a new build” becomes one sentence. After the first app setup, Claude Code can copy the same setup to apply to future apps.
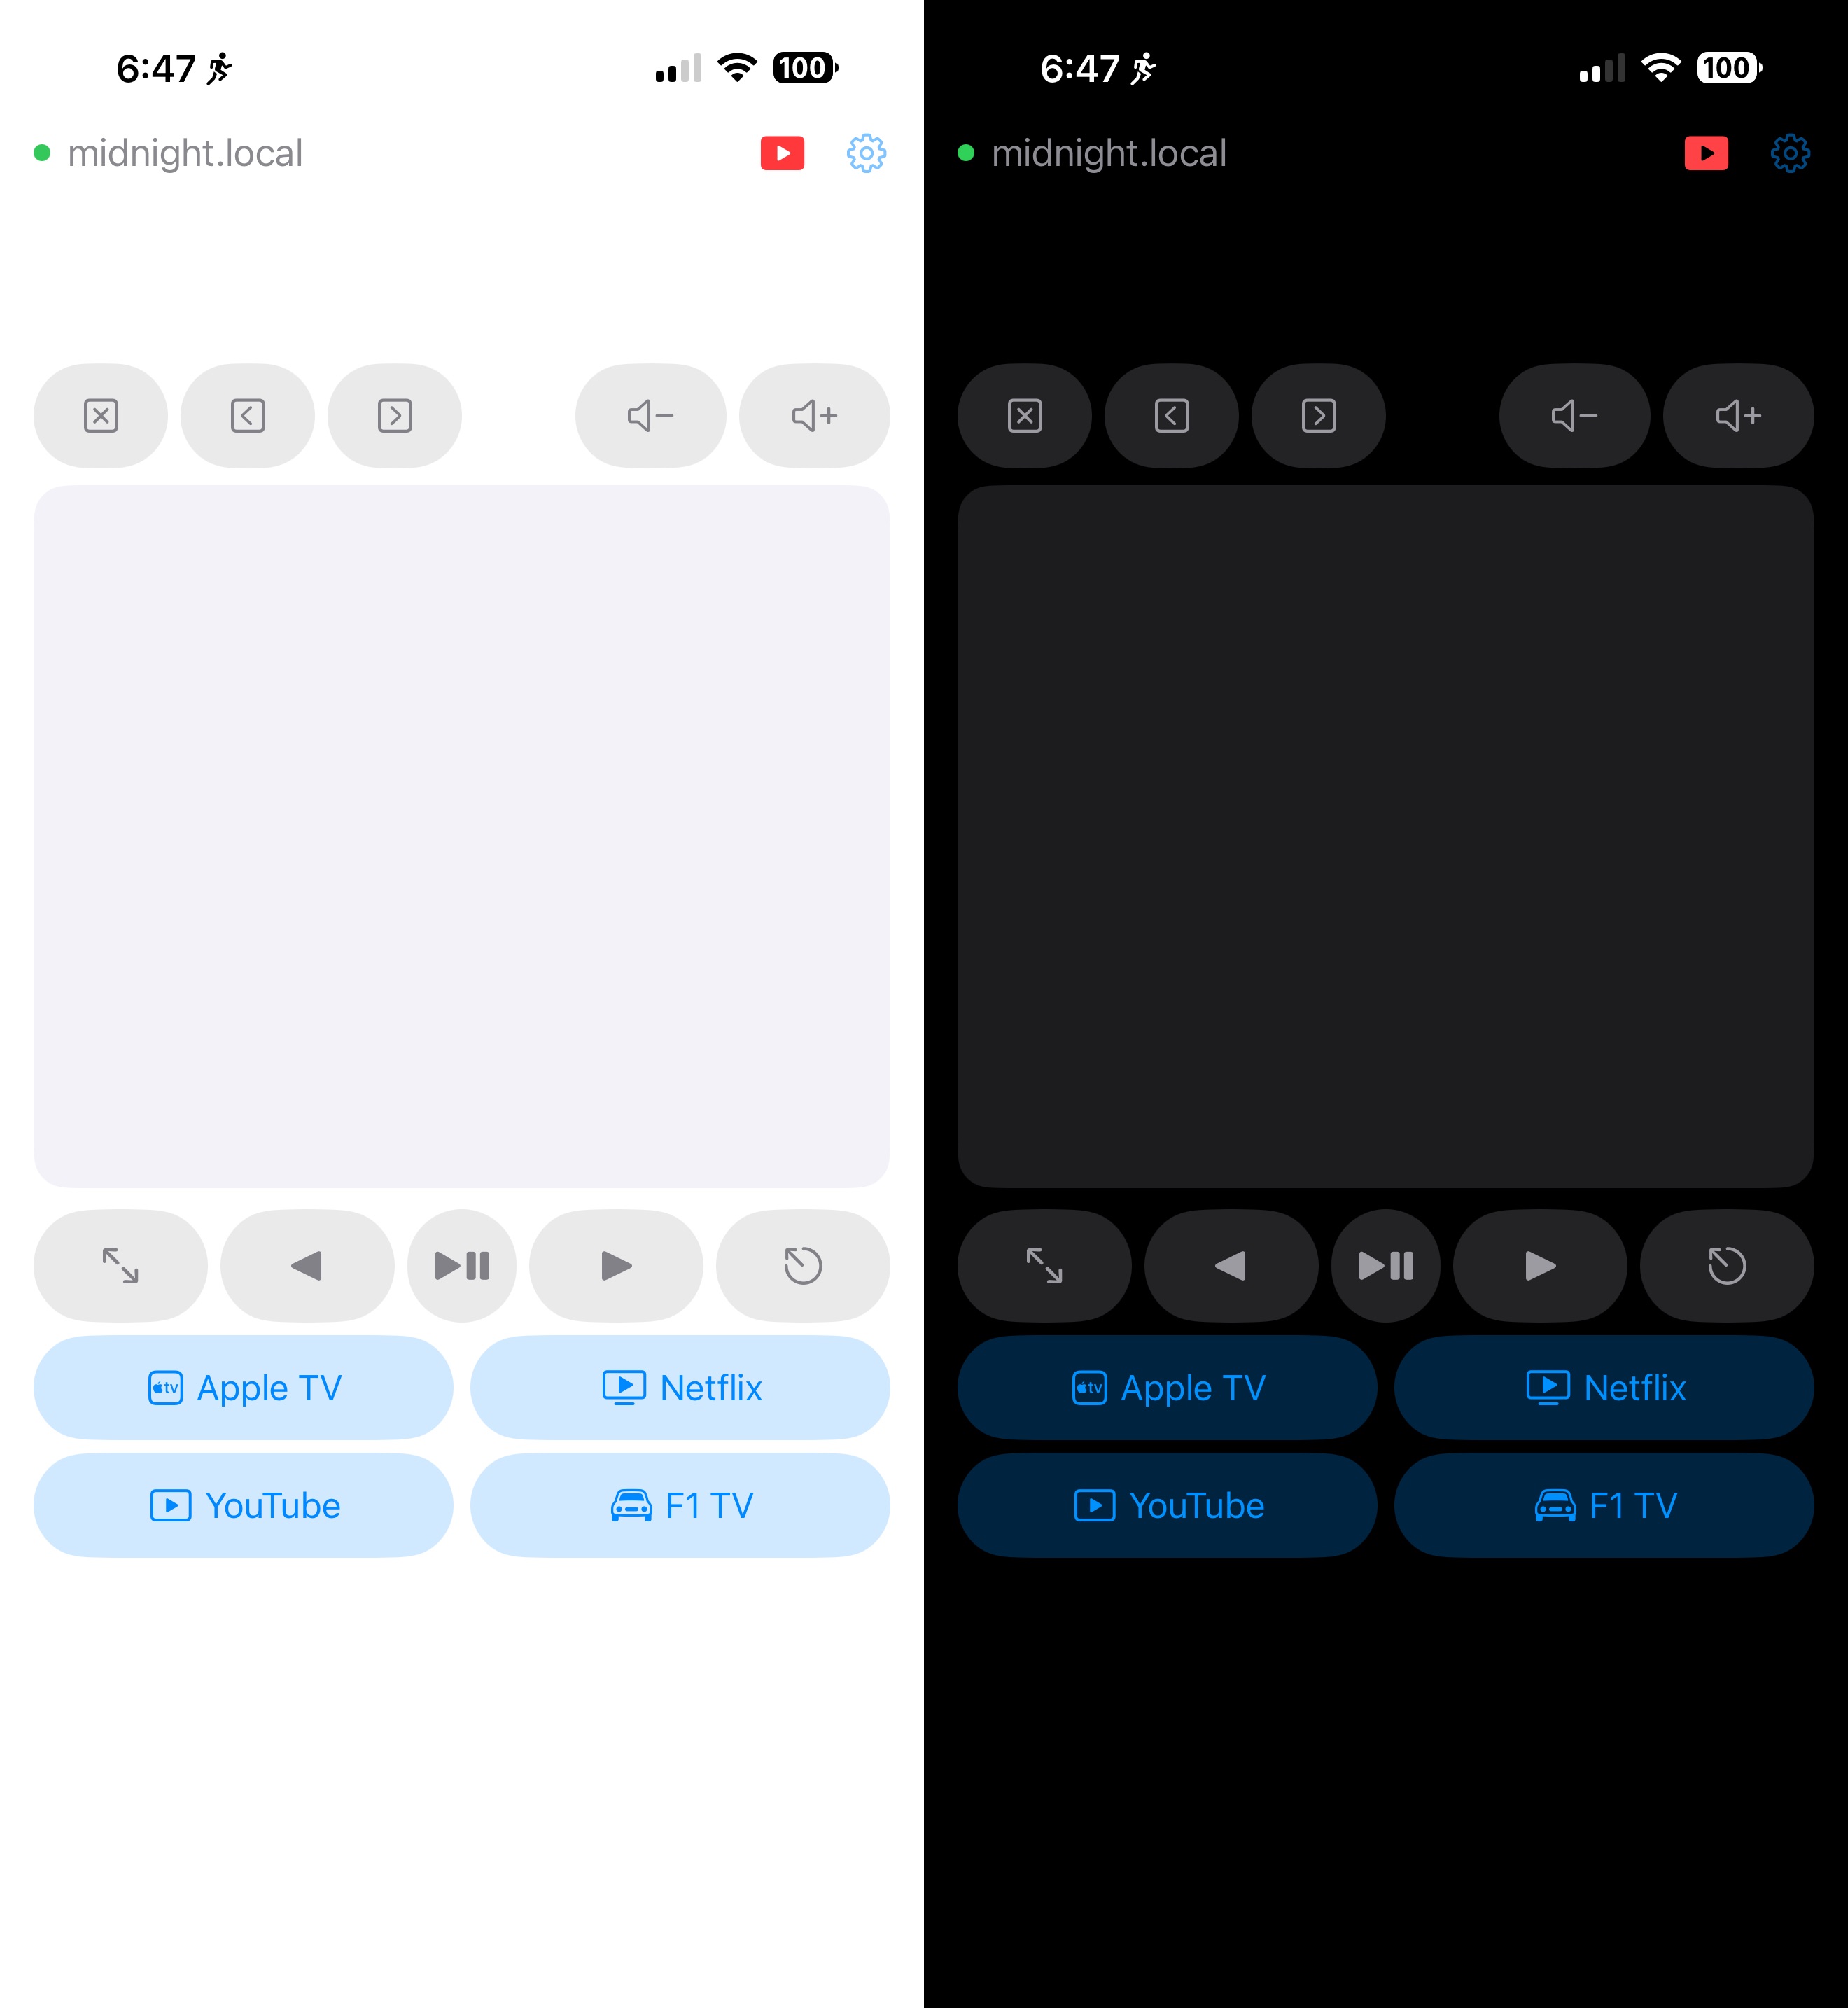
In case my announcement of my MikanRemote utility app for Mac wasn’t exciting enough, I’ve added yet another screen – the utilities screen. It consists of exactly TWO utilities at the moment: Take a Screenshot, and Open URL on Mac.
Take a Screenshot won’t be useful to most people, but it IS useful to me when I want to use the remote and capture what it looks like on the Mac end of things. For example, voila, you can see the cursor overlay that appears on the Mac screen that appears when mousing around on the MikanRemote iOS app’s trackpad.
You can also see a guy kissing a snake, but that’s not under my control.
Open URL on Mac basically AirDrops the URL to the Mac, where it opens in the browser, which is pretty cool. You can copy a URL, hit the utilities tool icon at the top right of MikanRemote, hit the “Paste” button, and BAM! The page opens on your Mac.
Even cooler: on iOS, from any web page, tap the Share button to share the URL, choose the MikanRemote icon, and it opens straightaway on the Mac.
Sharing from the browser to MikanRemote on iOS:
And POOF! Appearing on the Mac!
If you haven’t already checked out MikanRemote on Github, download it, build it in Xcode (both server and client apps), and have some fun!
I often exercise on a stationary bike a few feet from my MacBook Pro connected to a Studio Display. The display is a perfect TV for watching video on if I’m not doing an Apple Fitness bike workout, like those times when I’m doing a light session or just warming up for an interval workout.
My Mac, unfortunately, is inaccessible while I’m on the bike. My video watching options are using AirPlay from the phone, which has issues of its own depending on the app in question, or starting something before getting on the bike, and then being stuck with it.
I used to use AirPlay for YouTube and Apple TV pretty consistently in the past, but there were always annoying issues with those, and things like Netflix just wouldn’t let you do that at all. Also, I like to be able to access the fitness app, food app, and some other things while spinning away on the bike.
Truthfully, I just wanted a fat trackpad and a few labelled buttons to control video directly on the Mac.
So I built that.
The solution
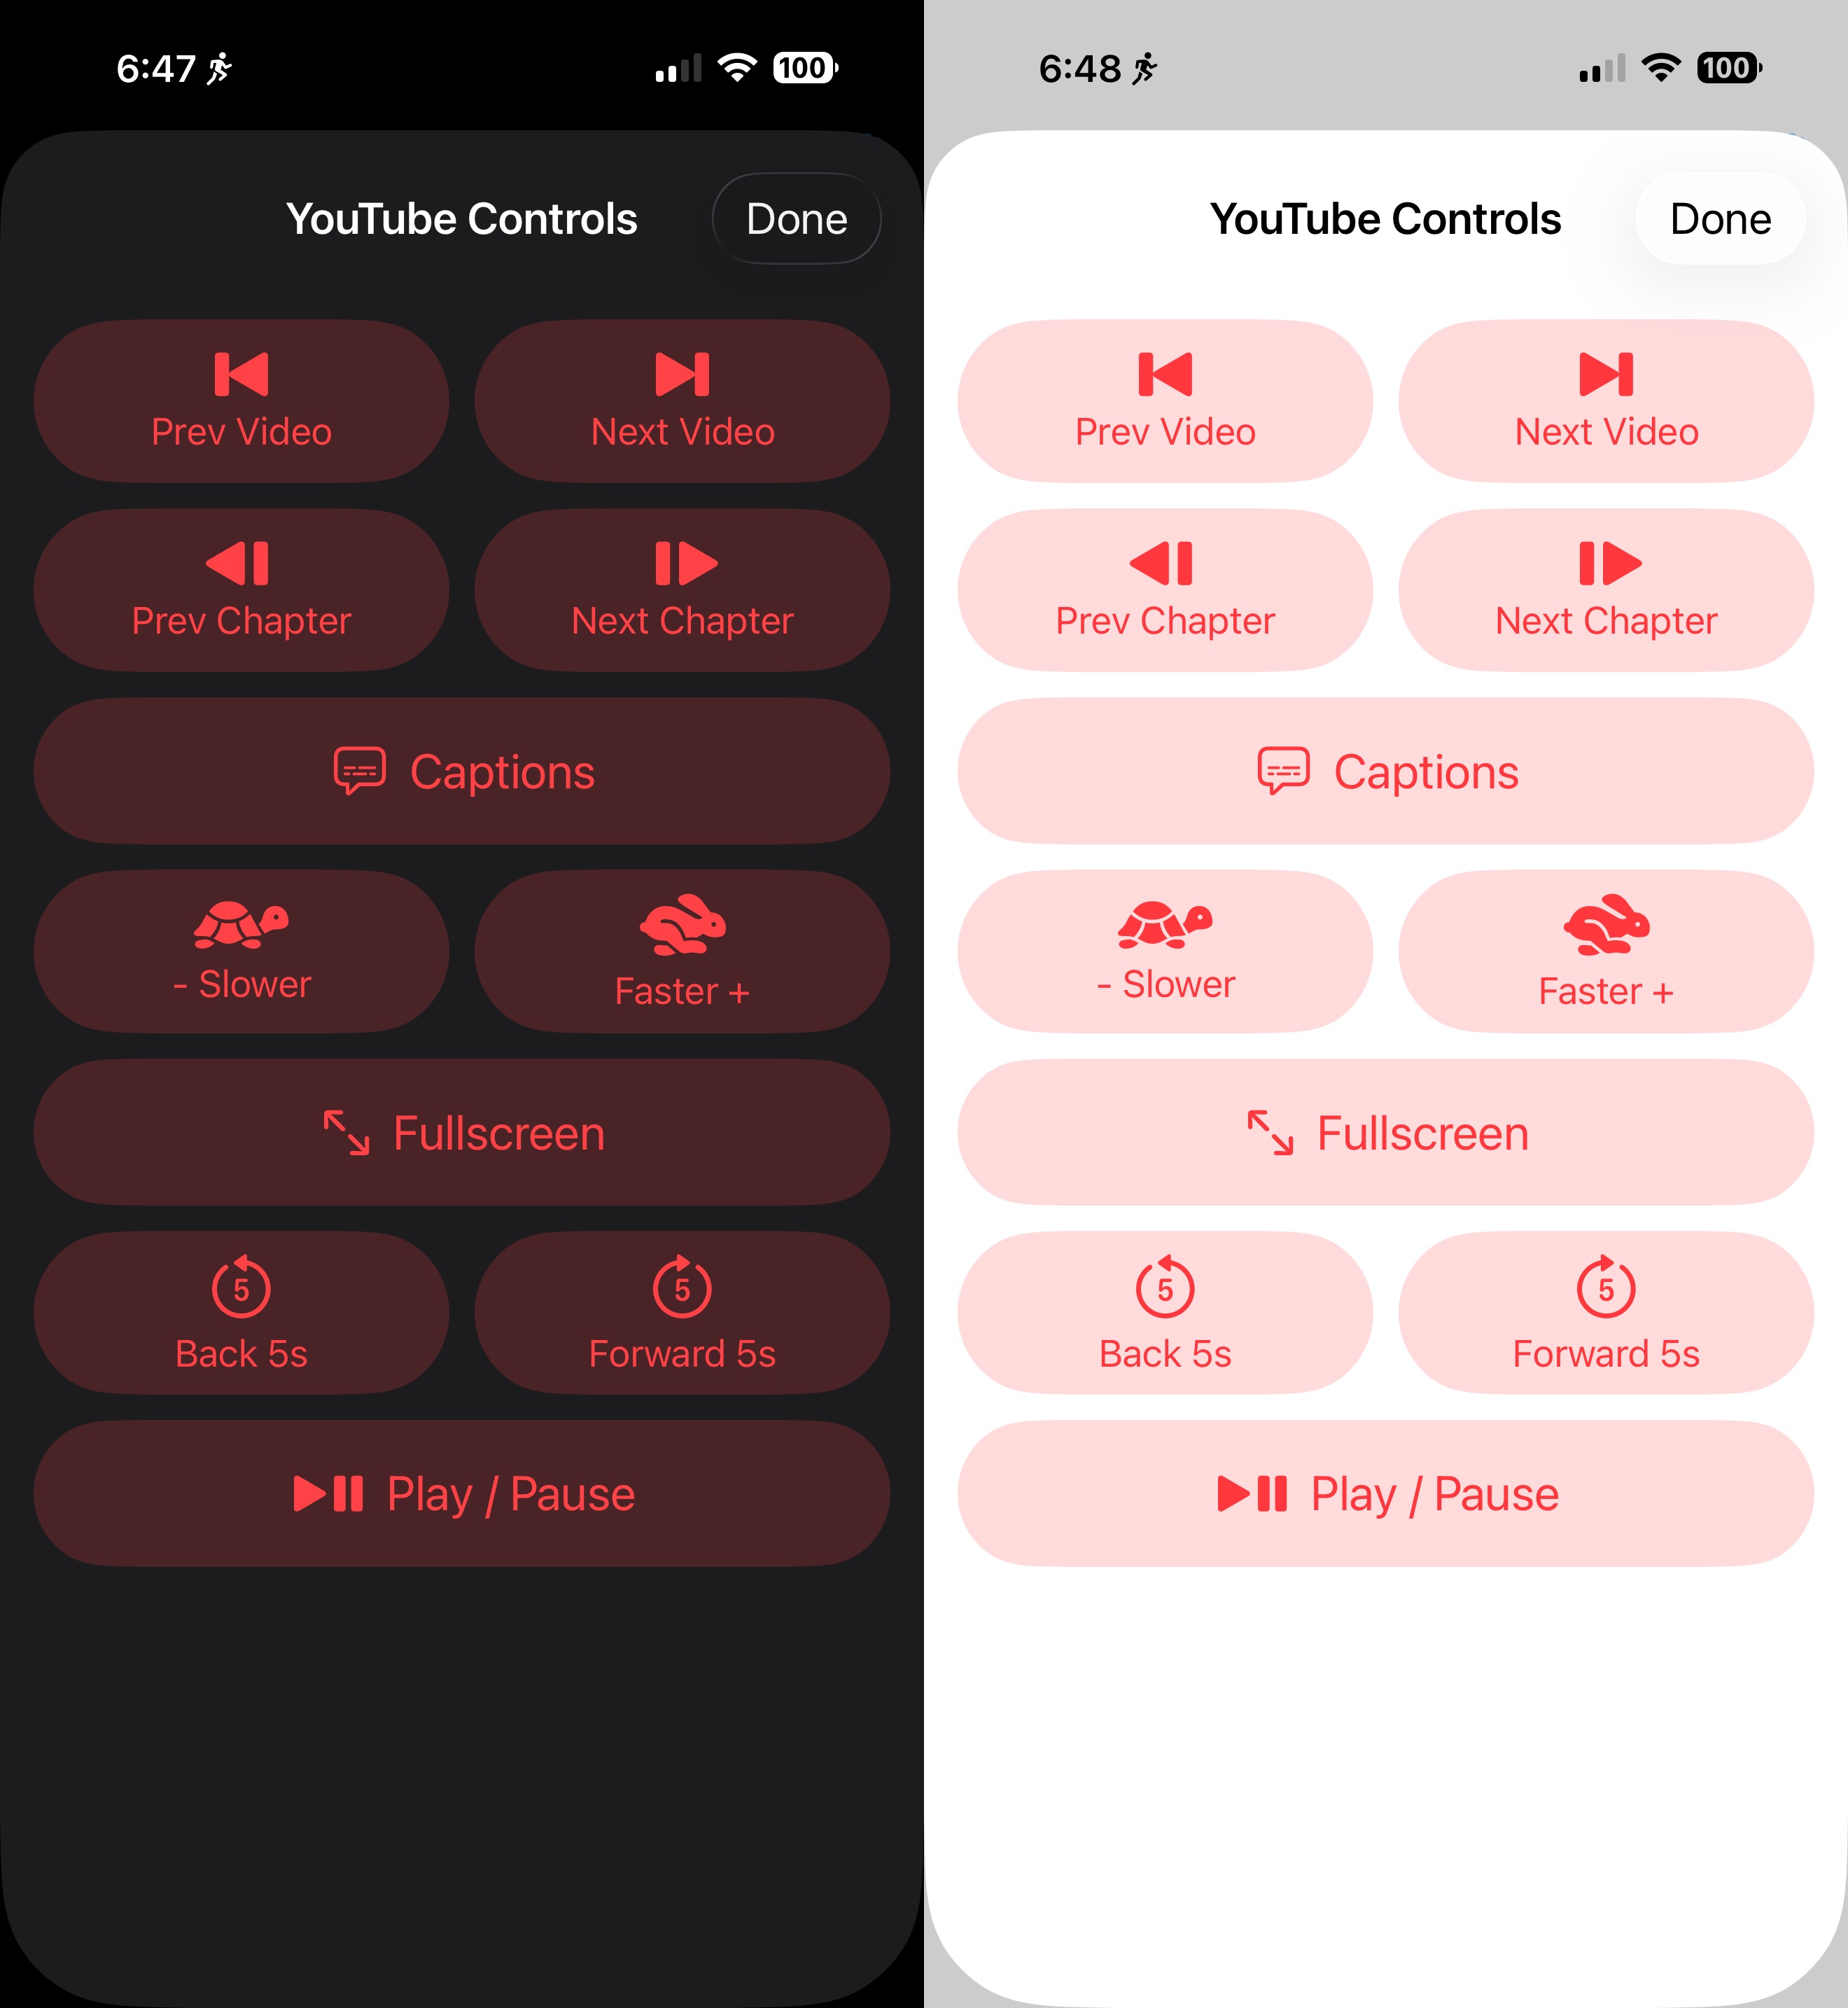
MikanRemote is a two-app project: a tiny menu bar server on the Mac, and a thin client iOS app on the iPhone, talking over WebSocket on the local network. It does mouse, scroll, click, media keys, browser tab shortcuts, configurable launcher buttons (Netflix, YouTube, Apple TV…), and a dedicated YouTube controls sheet for chapter skip and playback rate.
Features
Trackpad-style mouse control — drag to move the cursor, tap to click. (No right-click — single-purpose tool, fewer mistakes.)
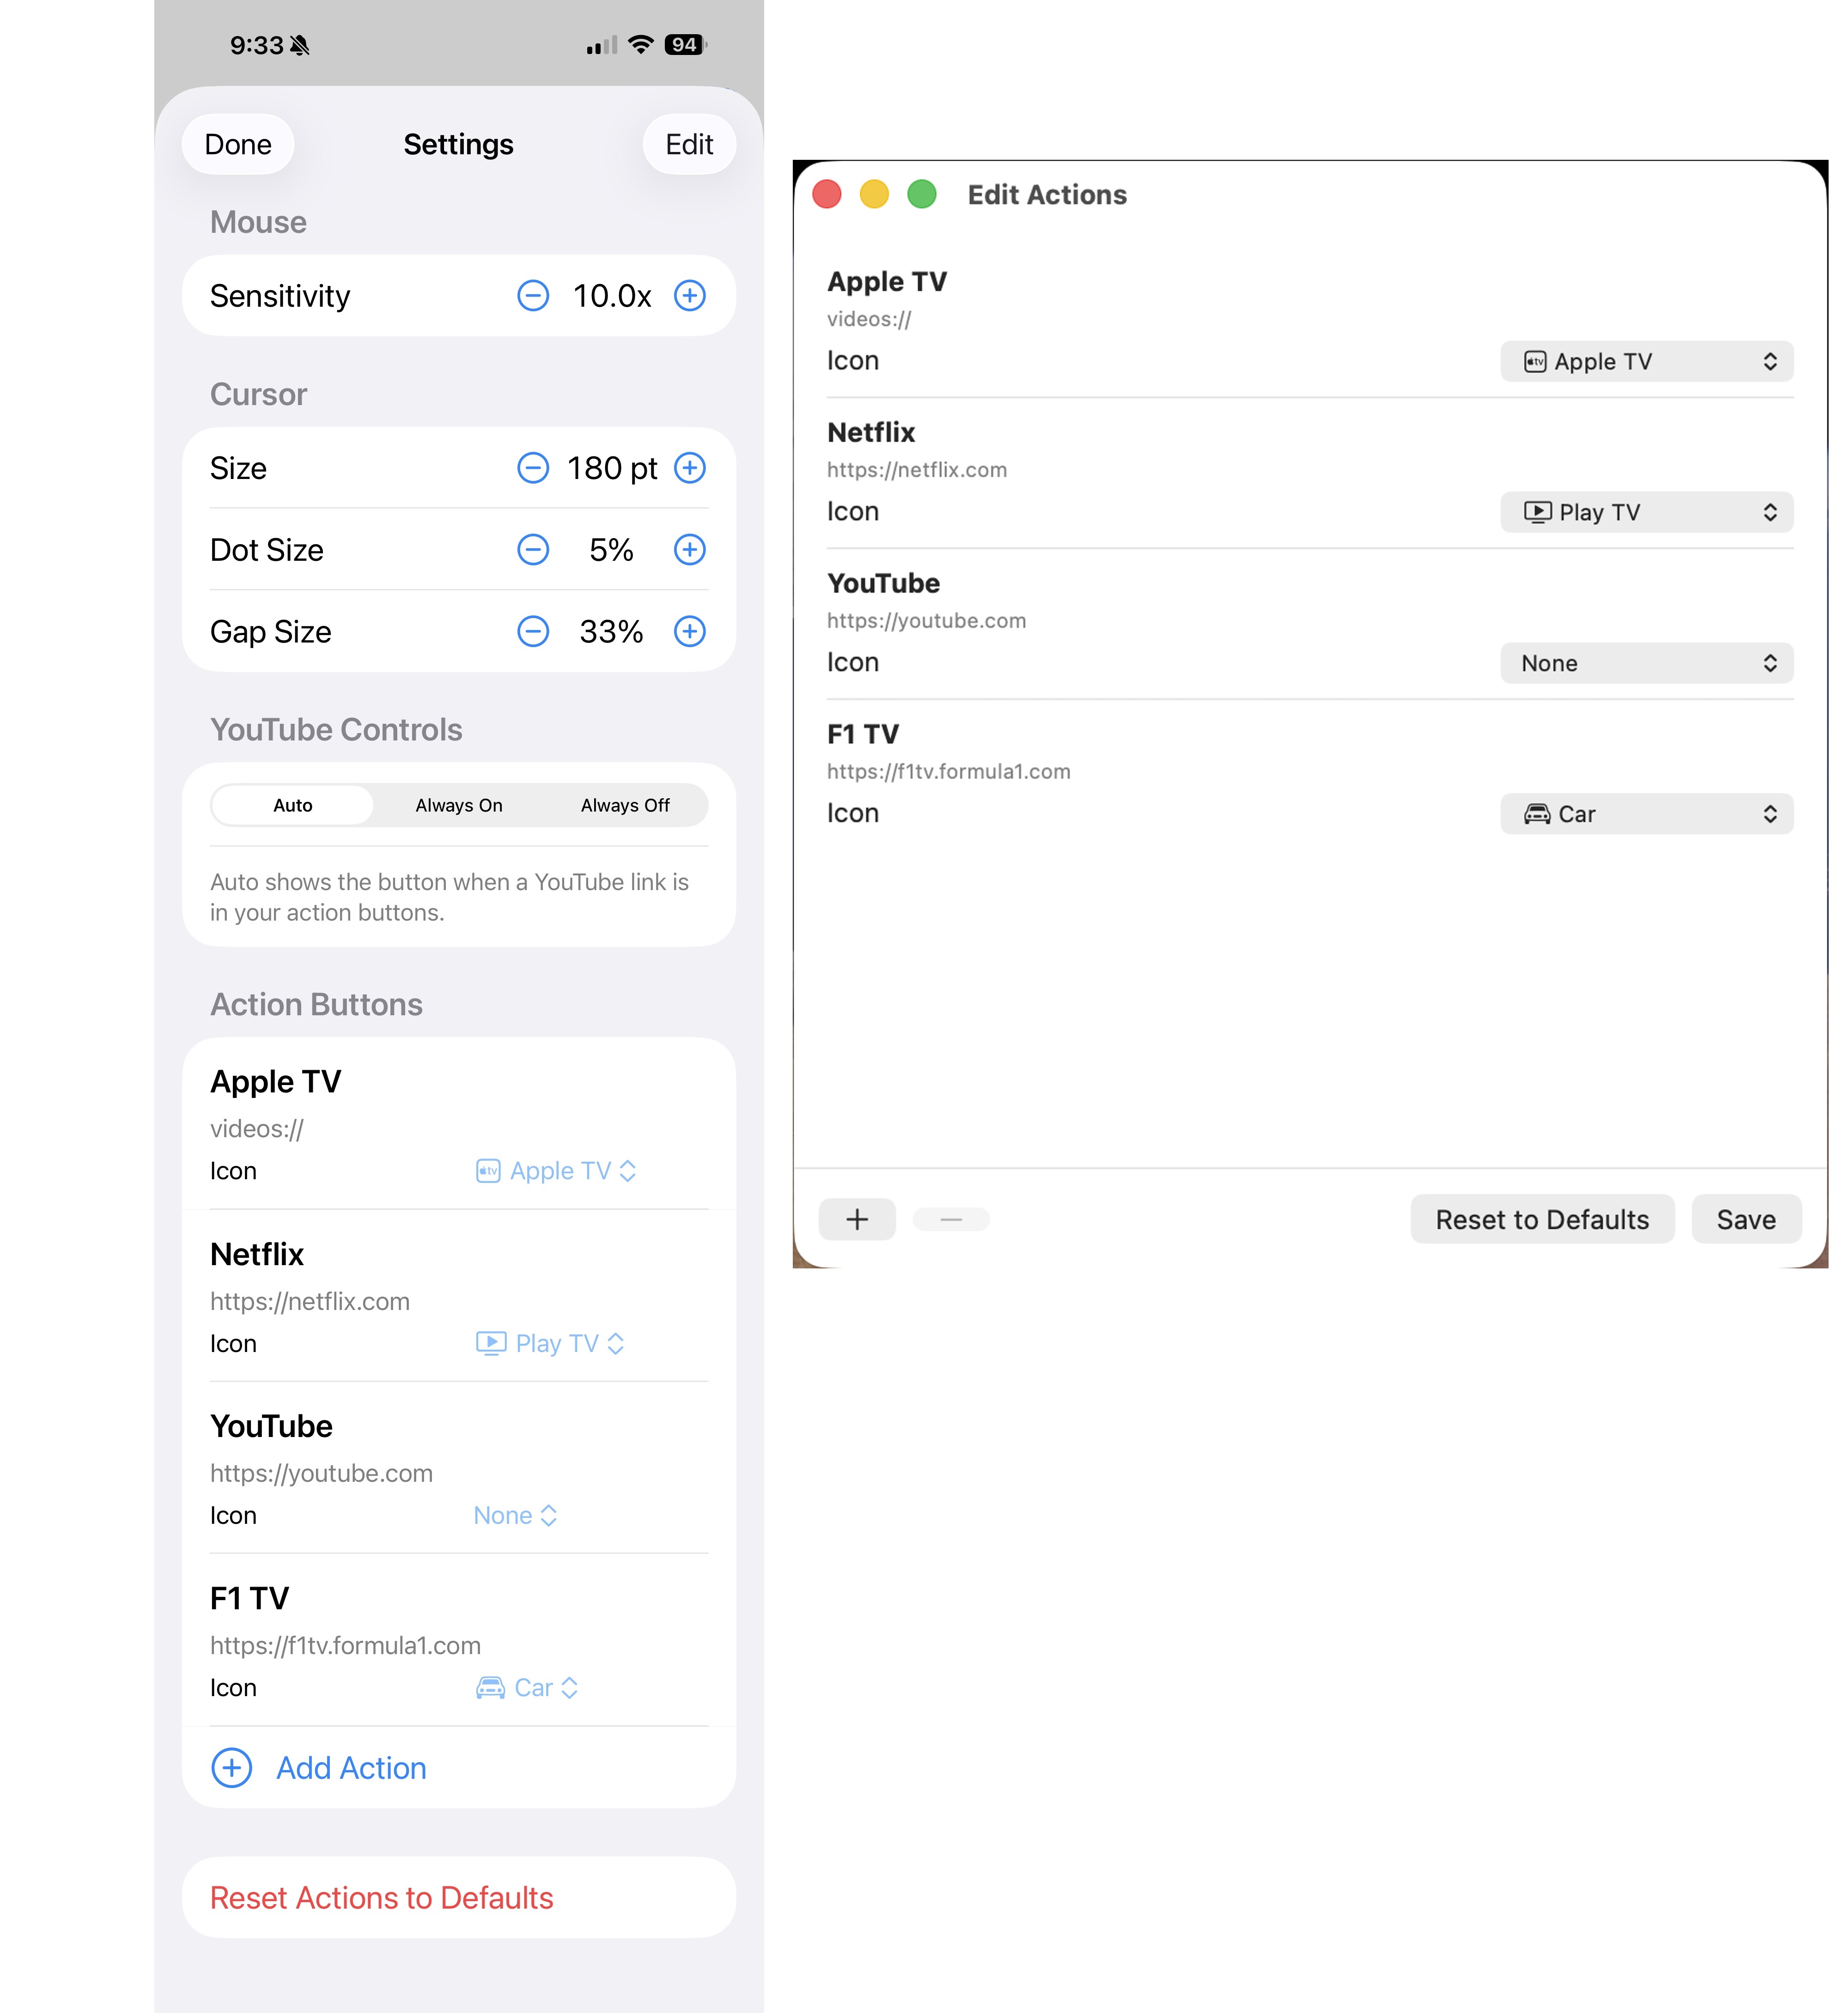
Quick-action buttons — up to six configurable buttons that open URLs (https://netflix.com) or app schemes (videos:// for Apple TV, music://, podcasts://, etc.).
Media keys — volume up/down, play/pause, fullscreen, escape, arrow keys.
Browser tab shortcuts — close tab, prev/next tab.
YouTube controls popup — a dedicated sheet that maps to YouTube’s keyboard shortcuts: prev/next video in playlist, prev/next chapter, captions, slower/faster playback, ±5s seek, fullscreen, play/pause.
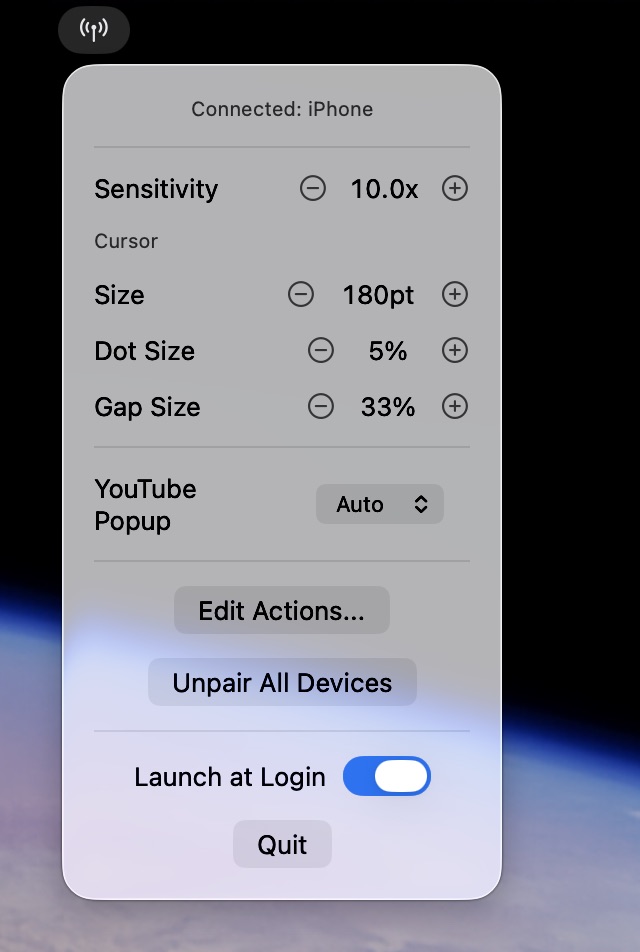
A custom cursor overlay on the Mac that fades in on movement and out after 10s — useful when you’re glancing at a 27” display from across the room.
All settings configurable from the iPhone — sensitivity, cursor halo size, action buttons, YouTube popup visibility. The Mac is the single source of truth; the iPhone is a pure thin client with zero local state.
The cool thing about the YouTube controls popup is that you can set the app to automatically show the button for this popup if you have or create an action button with the url “https://youtube.com” as the action, and automatically remove the button for it if you don’t have or if you remove YouTube from your list of action buttons.
Architecture
Three pieces, in one repo:
MikanRemoteServer — macOS menu bar app. Advertises itself on the local network via Bonjour, runs a WebSocket server with Network.framework, controls mouse and keyboard via CGEvent, simulates media keys, draws the cursor overlay, opens URLs via NSWorkspace.
MikanRemote — iOS thin client. Discovers the Mac via Bonjour, connects over WebSocket, handles multi-touch on a UIKit trackpad surface, renders the action buttons, exposes a settings sheet behind a deliberate gear icon (you do not want a swipeable settings menu when you’re sweating).
MikanProtocol — a small Swift Package shared by both apps. All wire messages are Codable types with a type discriminator field, so JSON over WebSocket stays trivial to parse on both sides and impossible to drift between client and server. Add a message type once, both sides see it.
Both Xcode projects are generated by xcodegen from a project.yml — so the source of truth lives in YAML and the .xcodeproj is regenerated, never hand-edited.
Some design decisions worth noting
Server is the single source of truth. Sensitivity, cursor size, action buttons, and YouTube popup visibility are all stored on the Mac. Either side can edit them; the change is sent over WebSocket, persisted on the Mac, and pushed back to the iPhone. The iPhone has no UserDefaults, no local cache, nothing to drift. Re-install the iOS app and your settings are still there because they never lived on the iPhone in the first place.
Pairing. The first time an iPhone connects, the Mac generates a 4-digit code in a floating window and refuses commands until the iPhone submits it. Paired UUIDs are persisted to ~/Library/Application Support/MikanServer/paired-devices.json. There’s an “Unpair All Devices” menu item to nuke the list. Same network = trusted-ish, but I wanted at least a barrier to one of our cats triggers Netflix from across the room, or someone slightly more “human” deciding to prank me while I’m working out.
WebSocket keepalive. MikanRemoteServer pings every 5 seconds. No pong → drop the connection immediately. The iOS app reconnects automatically on foreground. This keeps the “I killed the app and came back” loop tight and reliable.
Settings UI is behind a tap, not a swipe. Everything mode-changing lives behind the gear icon. The bike is a hostile UX environment — sweat, motion, glances, not focus. Anytime you have even slight constant body motion, playing with gestures and poor targets become really frustrating really fast. Right now the settings icon and the YouTube controls icons are small, but in my experience, easily hit.
The stack, summarized
MikanRemote is Swift end-to-end. SwiftUI on the Mac for the menu bar and editor windows, UIKit on the iPhone for the multi-touch trackpad surface (@Observable and SwiftUI everywhere else). Network.framework for the WebSocket server (no third-party deps). Bonjour for discovery (_mikan._tcp). CGEvent for cursor and key simulation. NSWorkspace for URL opens. xcodegen for the project files. Codable JSON for the wire protocol.
Repo
MikanRemote’s git repo is at github.com/scottaw66/mikan-remote and is MIT-licensed. The README walks through build and install for both apps, including the Accessibility permission step (without it, every CGEvent silently no-ops, which is its own special kind of debugging adventure).
If you’ve got an iPhone, a Mac, and a reason to control one from the other across a room, it’s a 15-minute build-and-go. And if you don’t — maybe the architecture notes above are useful: the Bonjour + WebSocket + Codable-protocol pattern scales down to “one device controlling another over a trusted LAN” remarkably cleanly.
The namesake
And that’s MikanRemote! The name is Mikan (a Japanese mandarin orange) because I needed something to call it, and I’ve already used our cat Midnight’s name on several projects, so I used our second cat’s name (yes, he is an orange boi).
At some point, sanitize-html started breaking when htmlparser2 was updated (and sanitize-html apparently wasn’t). I started getting the following compilation error:
My temporary solution was to pin htmlparser2 to version 8, which I didn’t love, especially since I have multiple Astro sites, and since it would be hard to know when an update would fix the issue.
However, after this problem persisted for awhile, I started wondering what was going on. Surely it must be affecting other people making Astro sites too, but I didn’t see any mention of it at all in the Astro Discord. I posted a question about it and got crickets until today, when a contributor named Armand responded with several helpful bits of information.
He went on to test my issue and pointed out that my code was calling the async function post.compiledContent() without await, and this was breaking htmlparser2 as it received a Promise object from sanitize-html, which was passing it on after receiving it from me:
I’m not 100% sure why this wasn’t breaking in htmlparser2 8.0 and prior, but in fact it WAS resulting in the expected content not being output at all. Instead, where the full-text content should have been for each post in the RSS feed, was an empty <content:encoded /> tag. So the fact that I was not awaiting the return result of the async post.compiledContent() already WAS causing me issues, and I hadn’t even noticed.
At any rate, by the time he informed me of how stupid I was (he didn’t phrase it that way, but I am), I’d already implemented ultrahtml and moved on.
The bottom line is, if you are doing full-text RSS feeds in Astro and you do use sanitize-html or ultrahtml, don’t be like me and send a Promise to things that want the Promise’s returned object instead.
I clearly need a change in 2026. It’s obvious no one cares about any of the things I write here, which is fine. It’s also clear that I don’t care about a lot of them anymore either, which is also fine. So the question is, what should I write about on this blog that I will continue to care about and that other people might care about too?
I think 2026 is going to be the year of honesty. That doesn’t mean I’ve been dishonest, far from it. It just means that I’m going to focus on things that actually matter to me on this site, in terms of technology, rather than coming up with topics that I think I should write about for some reason. Clear as mud, right?
This site has, in recent years, been solely focused on my use of technology, mainly Mac and web related. I doubt that’s going to change much. I don’t want to write about personal stuff or politics or Tonkatsu recipes here (even though writing about Tonkatsu recipes really is a winner in any situation). I think what I need to do is quit trying to write series about topics, like replacing Raycast with Spotlight, and write more one-offs. When I do write follow-up articles, I’ll try to handle it differently than making big official series of articles.
In fact, I’ve quietly rid the site of lists of series and all post frontmatter referring to series. It’s gone. I don’t need it. YOU don’t need it.
Maybe it’ll turn out I still have nothing of interest to say, and you still don’t care, and then I’ll just quietly quit posting and no one will notice or care. I don’t know. But mainly I think I need to figure out what I really enjoy writing about, in terms of technology,1 and do that.