I’ve spoken a couple times about my Sessions Raycast script command, both when I originally set it up, and then again when I updated it to use Moom as my window manager. Well, I’m back to using Raycast as my window manager, and I also use a Raycast focus mode for my podcast session. So here’s your updated Session Raycast script command, 2025 edition.
You may recall that the purpose of this script command is to just set up my environment in a way that’s suitable for a specific task. It always closes all apps, then opens some core apps, and then opens other apps specific to the session type.1 It also sets audio output and input based on the session type, arranges app windows in a specific way, and either sets Coffee for Raycast to Caffinate mode (keep the screen on) or Decaffinate mode (let it sleep when it wants).
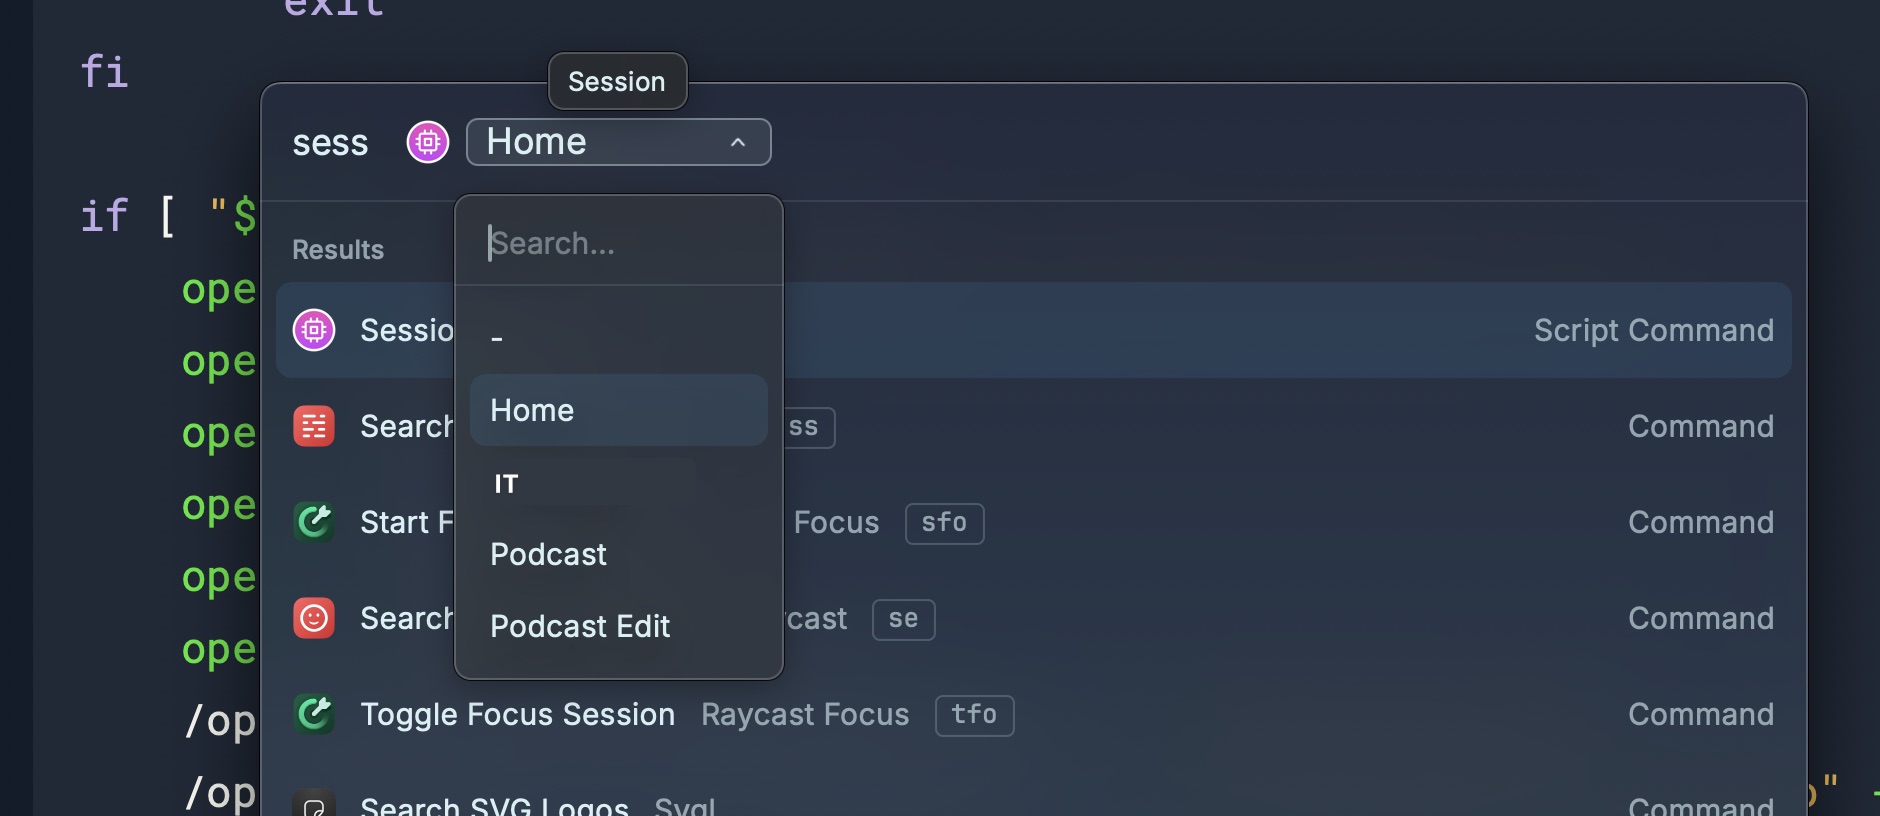
When I run the Sessions script command in Raycast, I just choose the session type. The nice thing about Raycast dropdowns is they pre-select the option you chose last time. In the case of the Session script command, that’s not as convenient as it is for some other script commands, but that’s life.
Anyway, if you have any questions about this script command or Raycast script commands in general, you know how to find me (hint: Mastodon or Bluesky).
Footnotes
I should see if there’s a way to close all apps that aren’t in a list, instead of closing all apps and then re-opening all apps that are in a list. ↩
Last week or so, I started writing a blog post as I sometimes do, this one pertaining to my Automation Workflow for Media Reviews. Unfortunately, I wanted to preview it as I went along, so I copied it in progress to my git main branch of the local copy of the website.
You can see where this is going.
Yes, I updated something else on the website and published it, INCLUDING the partial draft of the blog post I was working on. This wasn’t a super huge deal, except that I use EchoFeed to automatically post to Bluesky and Mastodon whenever I post something new on the site.
Sigh.
The good news is that this finally pushed me to add drafts functionality to my site, so that I could have drafts render when running locally in development mode, but not actually get written when doing a site build. It’s a good, basic feature to have.
I’ve always wanted to be a writer, and I’ve always wanted to create drafts in Astro that won’t get published until I want them to.
10
11
[Now I can!](https://jacurtis.com/notes/astro-draft-posts/)
One more thing though – none of this keeps the post page itself from being rendered during a build. It just keeps anything from linking to it or showing it in a list of posts. This means that it will show up in your RSS feed unless you edit your RSS template to also filter it out.
The now page is a cool concept by Derek Sivers for talking about what you’re doing now in your life. I use my /now page slightly differently, to just list things I’ve been reading, drinking, eating, watching, listening to, and sometimes playing recently.
Initially everything on my now page was bullet lists of text links. This works, and it’s fine, but I also was a little envious of how nice some other people’s media logs looked with artwork for their movies and shows. I’m thinking of Robb Knight’s Almanac, Habib Cham’s Books page, and Cory Dransfeldt’s Music, Watching, and Currently Reading pages, for example.
As I was rolling how to improve my /now page around in the back of my mind, Matt Birchler release a neat little iOS app called Quick Reviews. Quick Reviews is based on a web utility he’s had for awhile now which lets you create little images with media reviews, complete with artwork, and share them with people.
As I played with the iOS app version of Quick Reviews and saw how it exported the images, I realized I could build a workflow around them for incorporating them into my /now page.1 Most importantly for any change to the page to make it look better was that it not take much more time to update on a regular basis. The text link version was easy – I have scripts that pull my Trakt history for the Movies and TV Shows portions of the page and return formatted markdown bullet list items. All I have to do is paste them where I want them.
Thanks to the power of scripting and the wonderful array of automation utilities for macOS, I’ve been able to find a way to make updating my /now page with Quick Reviews images equally quick and painless. So get ready, because the rest of this article exists to show you how it’s done.
By the way, I made a handy little video of the automation workflow in action which you can watch here or on YouTube, or jump to the detailed workflow description below to keep reading.
Automating Quick Reviews
Step 1: Quick Reviews
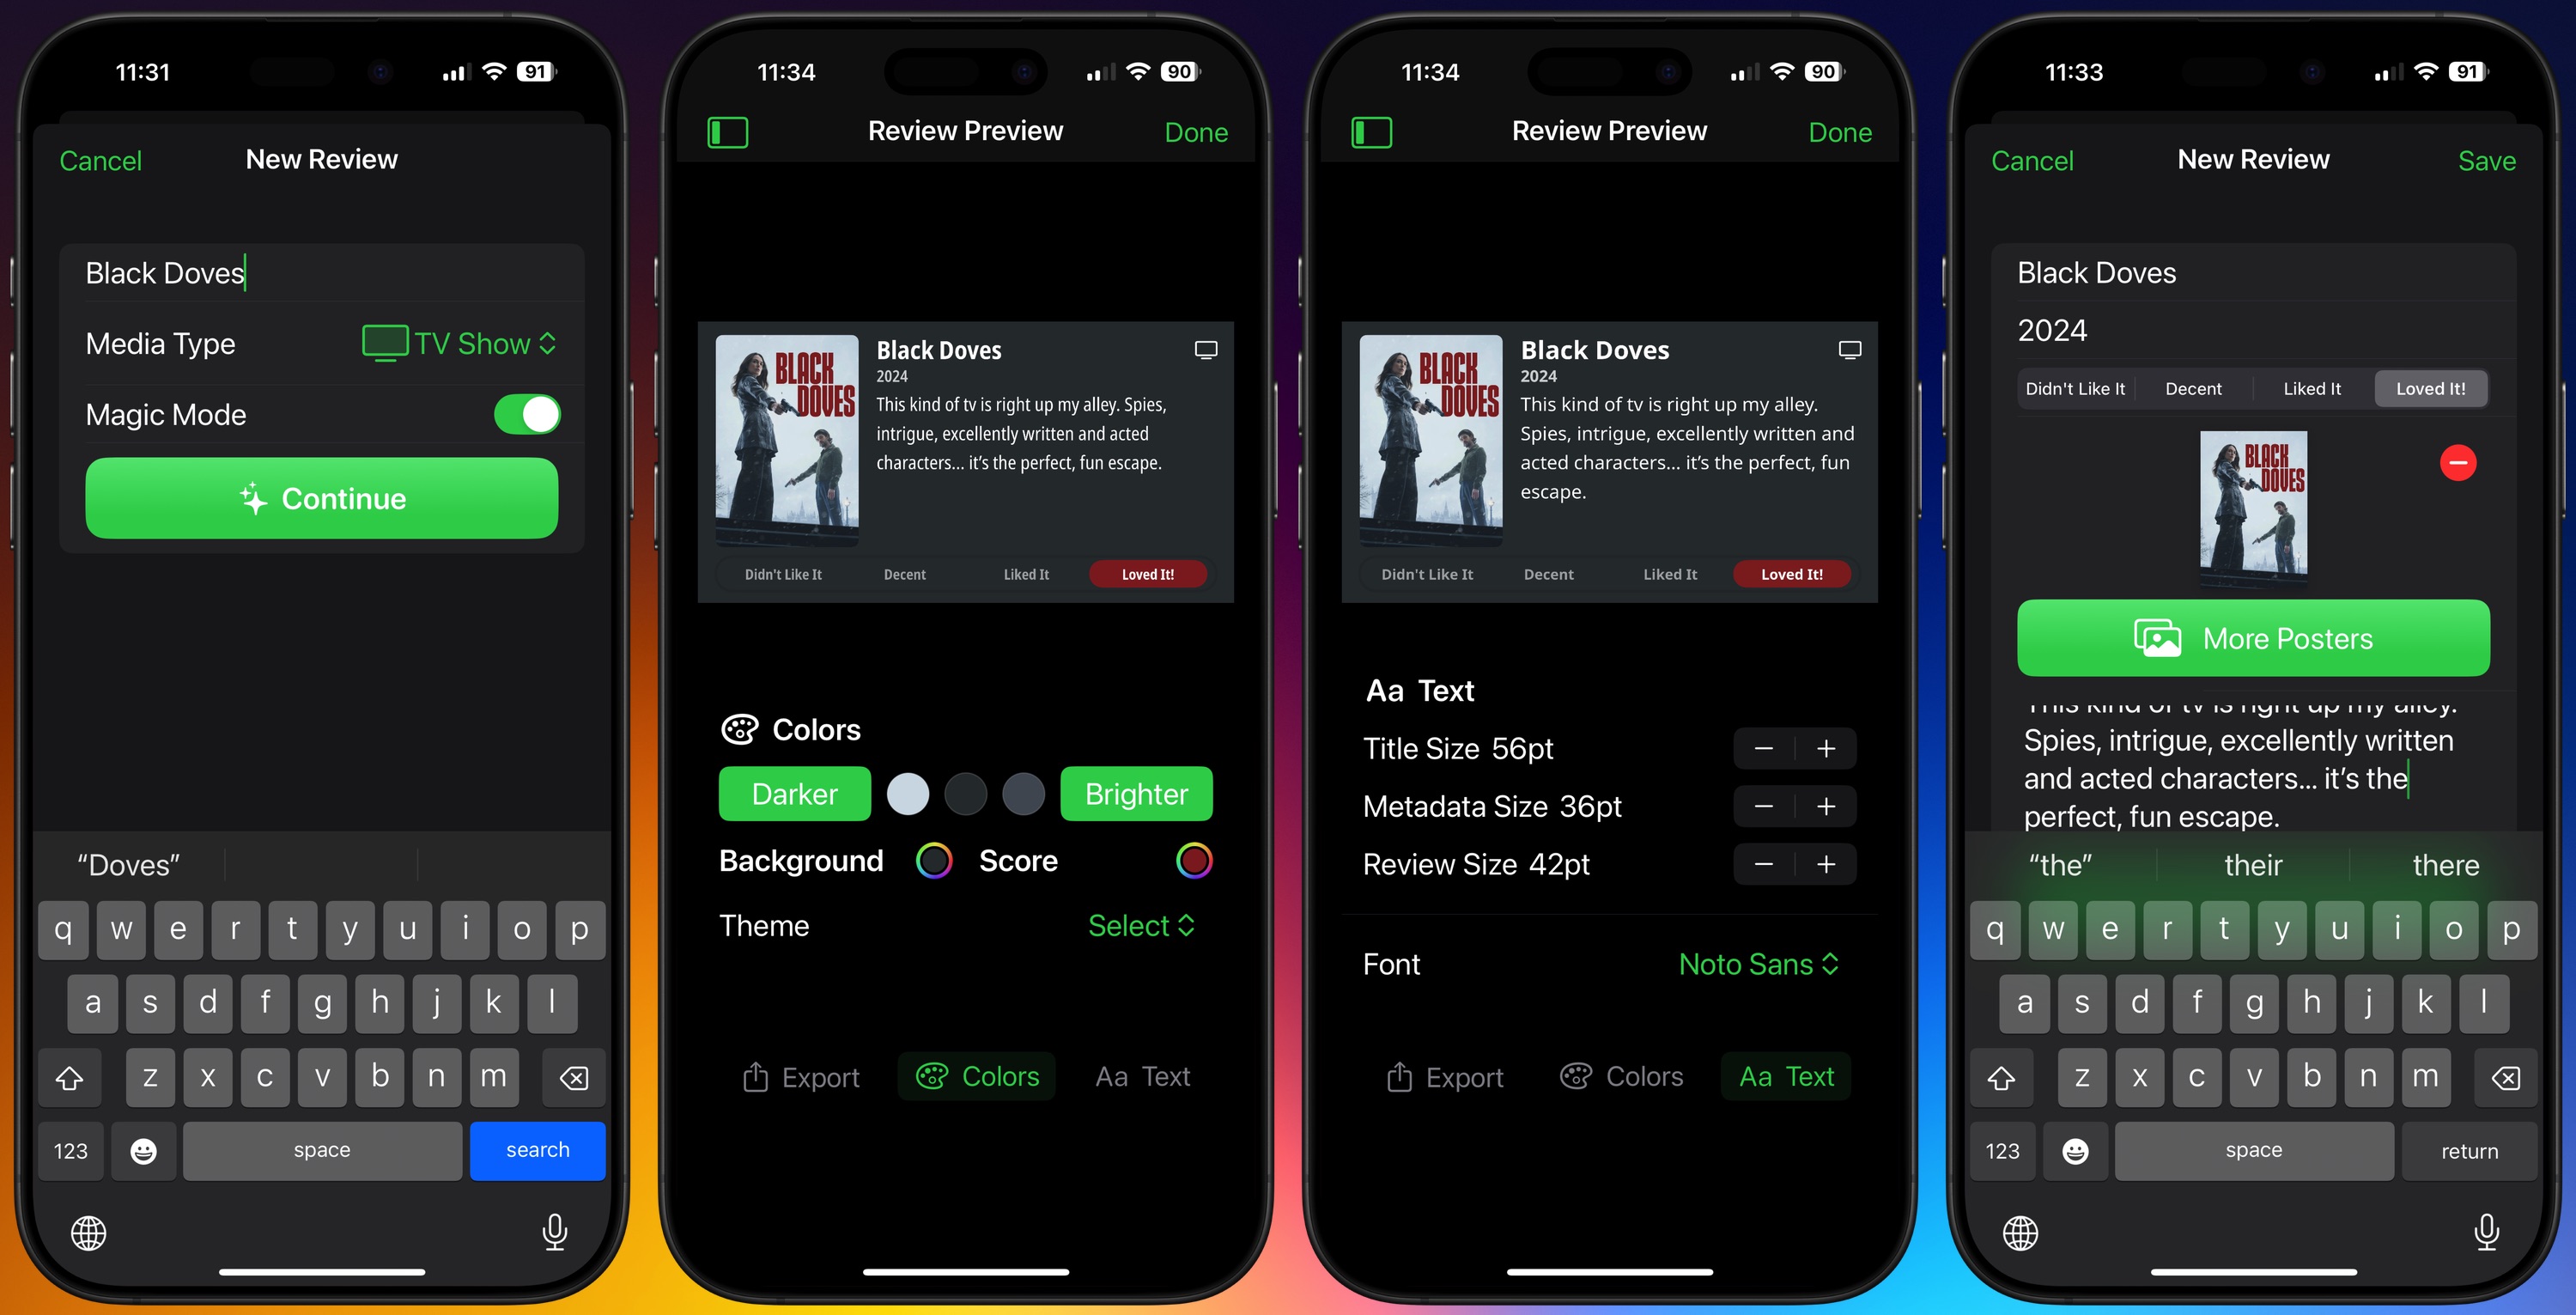
The first link in my automation chain is Quick Reviews by Matt Birchler. This is an iOS app that lets you choose a piece of media to review and allows you to add artwork, your rating, and your text review to a nicely formatted image.
First you choose a Media Type (Movie, TV Show, Game, Book, Music, or Other), give it the title of the media, and either add artwork or use Magic Mode to add one if it’s a Movie, TV Show, or Game, and then add your text review and choose a rating. You can customize the text that gets used for ratings to your own liking (⭐⭐⭐⭐⭐ use emoji stars if you want!) at an app level, by the way.
Next, edit the image colors for background and rating highlight, edit the font and font styles, and save or export the image. In my case, I use export and share and then AirDrop it to my Mac.
Step 2: Hazel
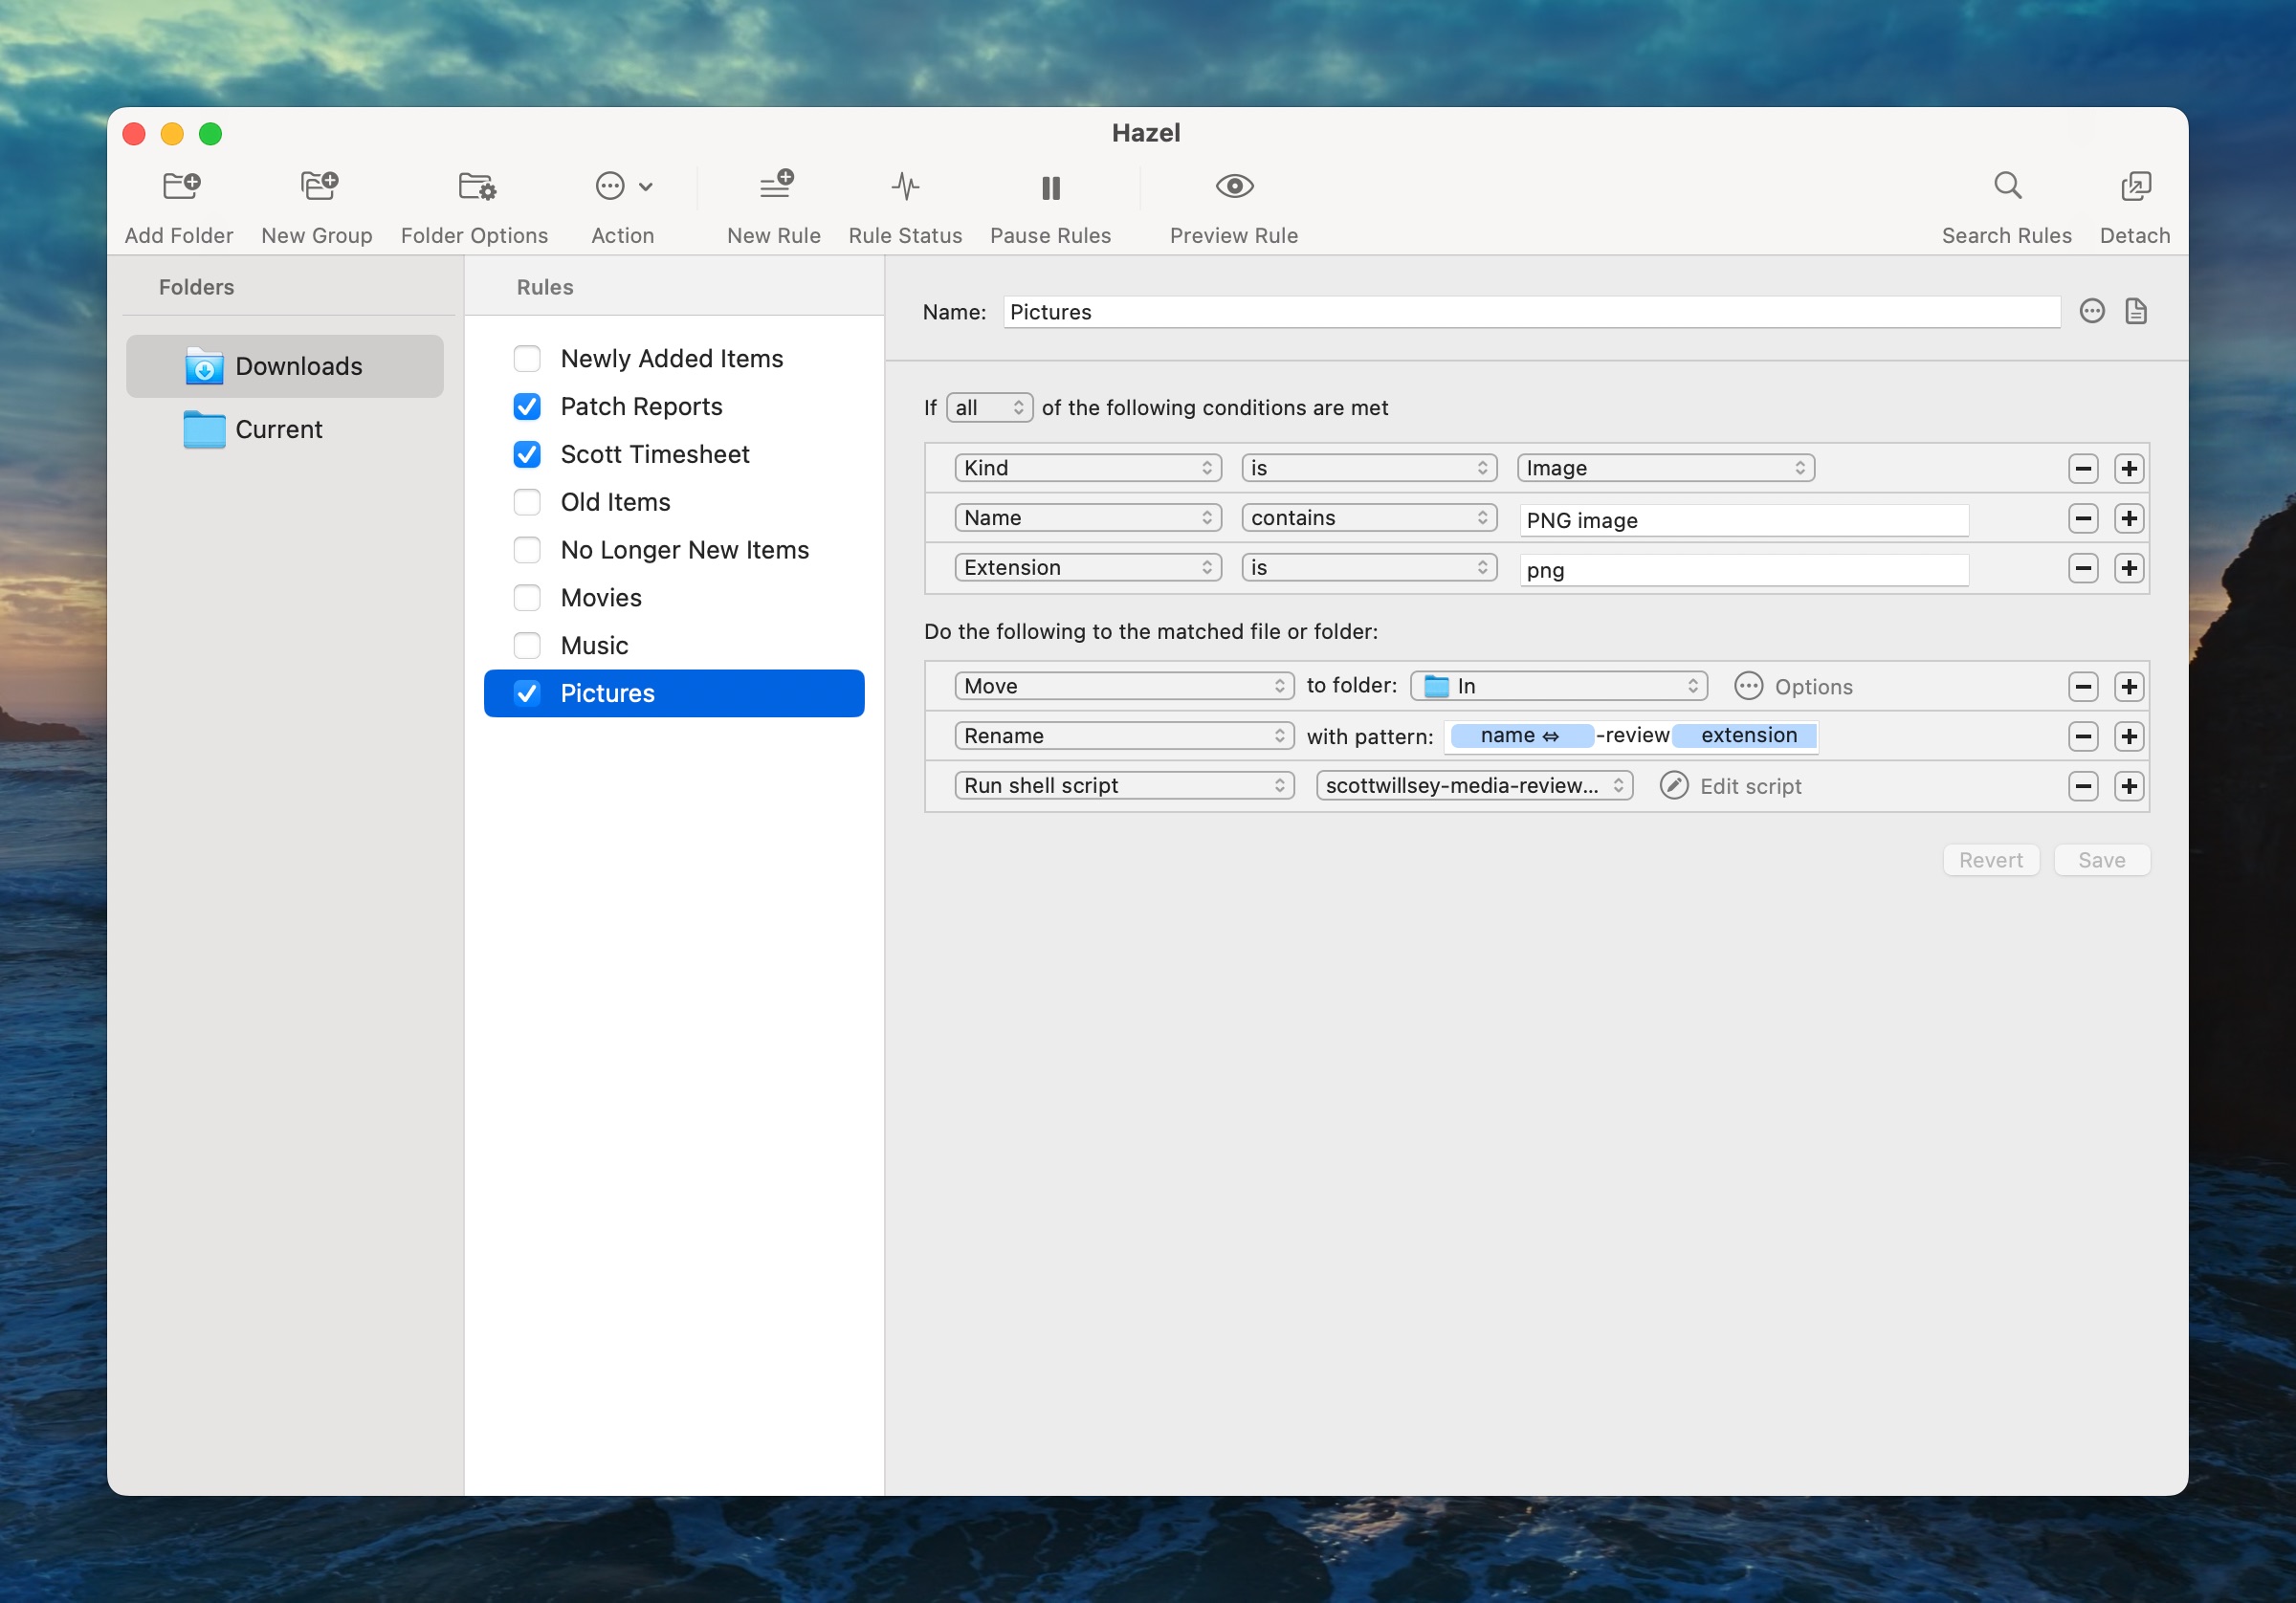
When I AirDrop the Quick Reviews image to my Mac, several things happen automatically, thanks in large part to a wonderful Mac utility called Hazel, by Noodlesoft. Hazel does one thing: it watches folders that you tell it to. But then it allows you to perform a ton of different actions on those folders, or files in those folders, based on triggers you specifiy.
In my case, I have Hazel watch my Downloads folder for incoming images that have the png extension and that have file names containing “PNG image”. These criteria are based on the exported Quick Reviews file name and type. If any files meeting those criteria hit the Downloads folder, they’re moved to /Users/scott/Scripts/scottwillsey/scottwillsey-images/In, renamed in a specific way, and then a Bash script called scottwillsey-media-review-images.sh is run.
Here’s the entirety of that script:
scottwillsey-media-review-images.sh
#!/bin/bash
# Required parameters:
# @raycast.schemaVersion 1
# @raycast.title ScottWillsey Media Review Images
# @raycast.mode silent
# Optional parameters:
# @raycast.icon ../icons/scottwillsey.png
# @raycast.packageName Website
# Documentation:
# @raycast.description Resizes and copies images for the ScottWillsey site's /now page media reviews.
You can see that it’s written as a Raycast script command, which is why all the weird comments are in there, but I don’t run it from Raycast because I let Hazel call it directly when I AirDrop the image.
First, it runs a Mac app called Retrobatch with a specific Retrobatch workflow, waits for that to finish, and then runs a Python script.
Which takes us to Step 3…
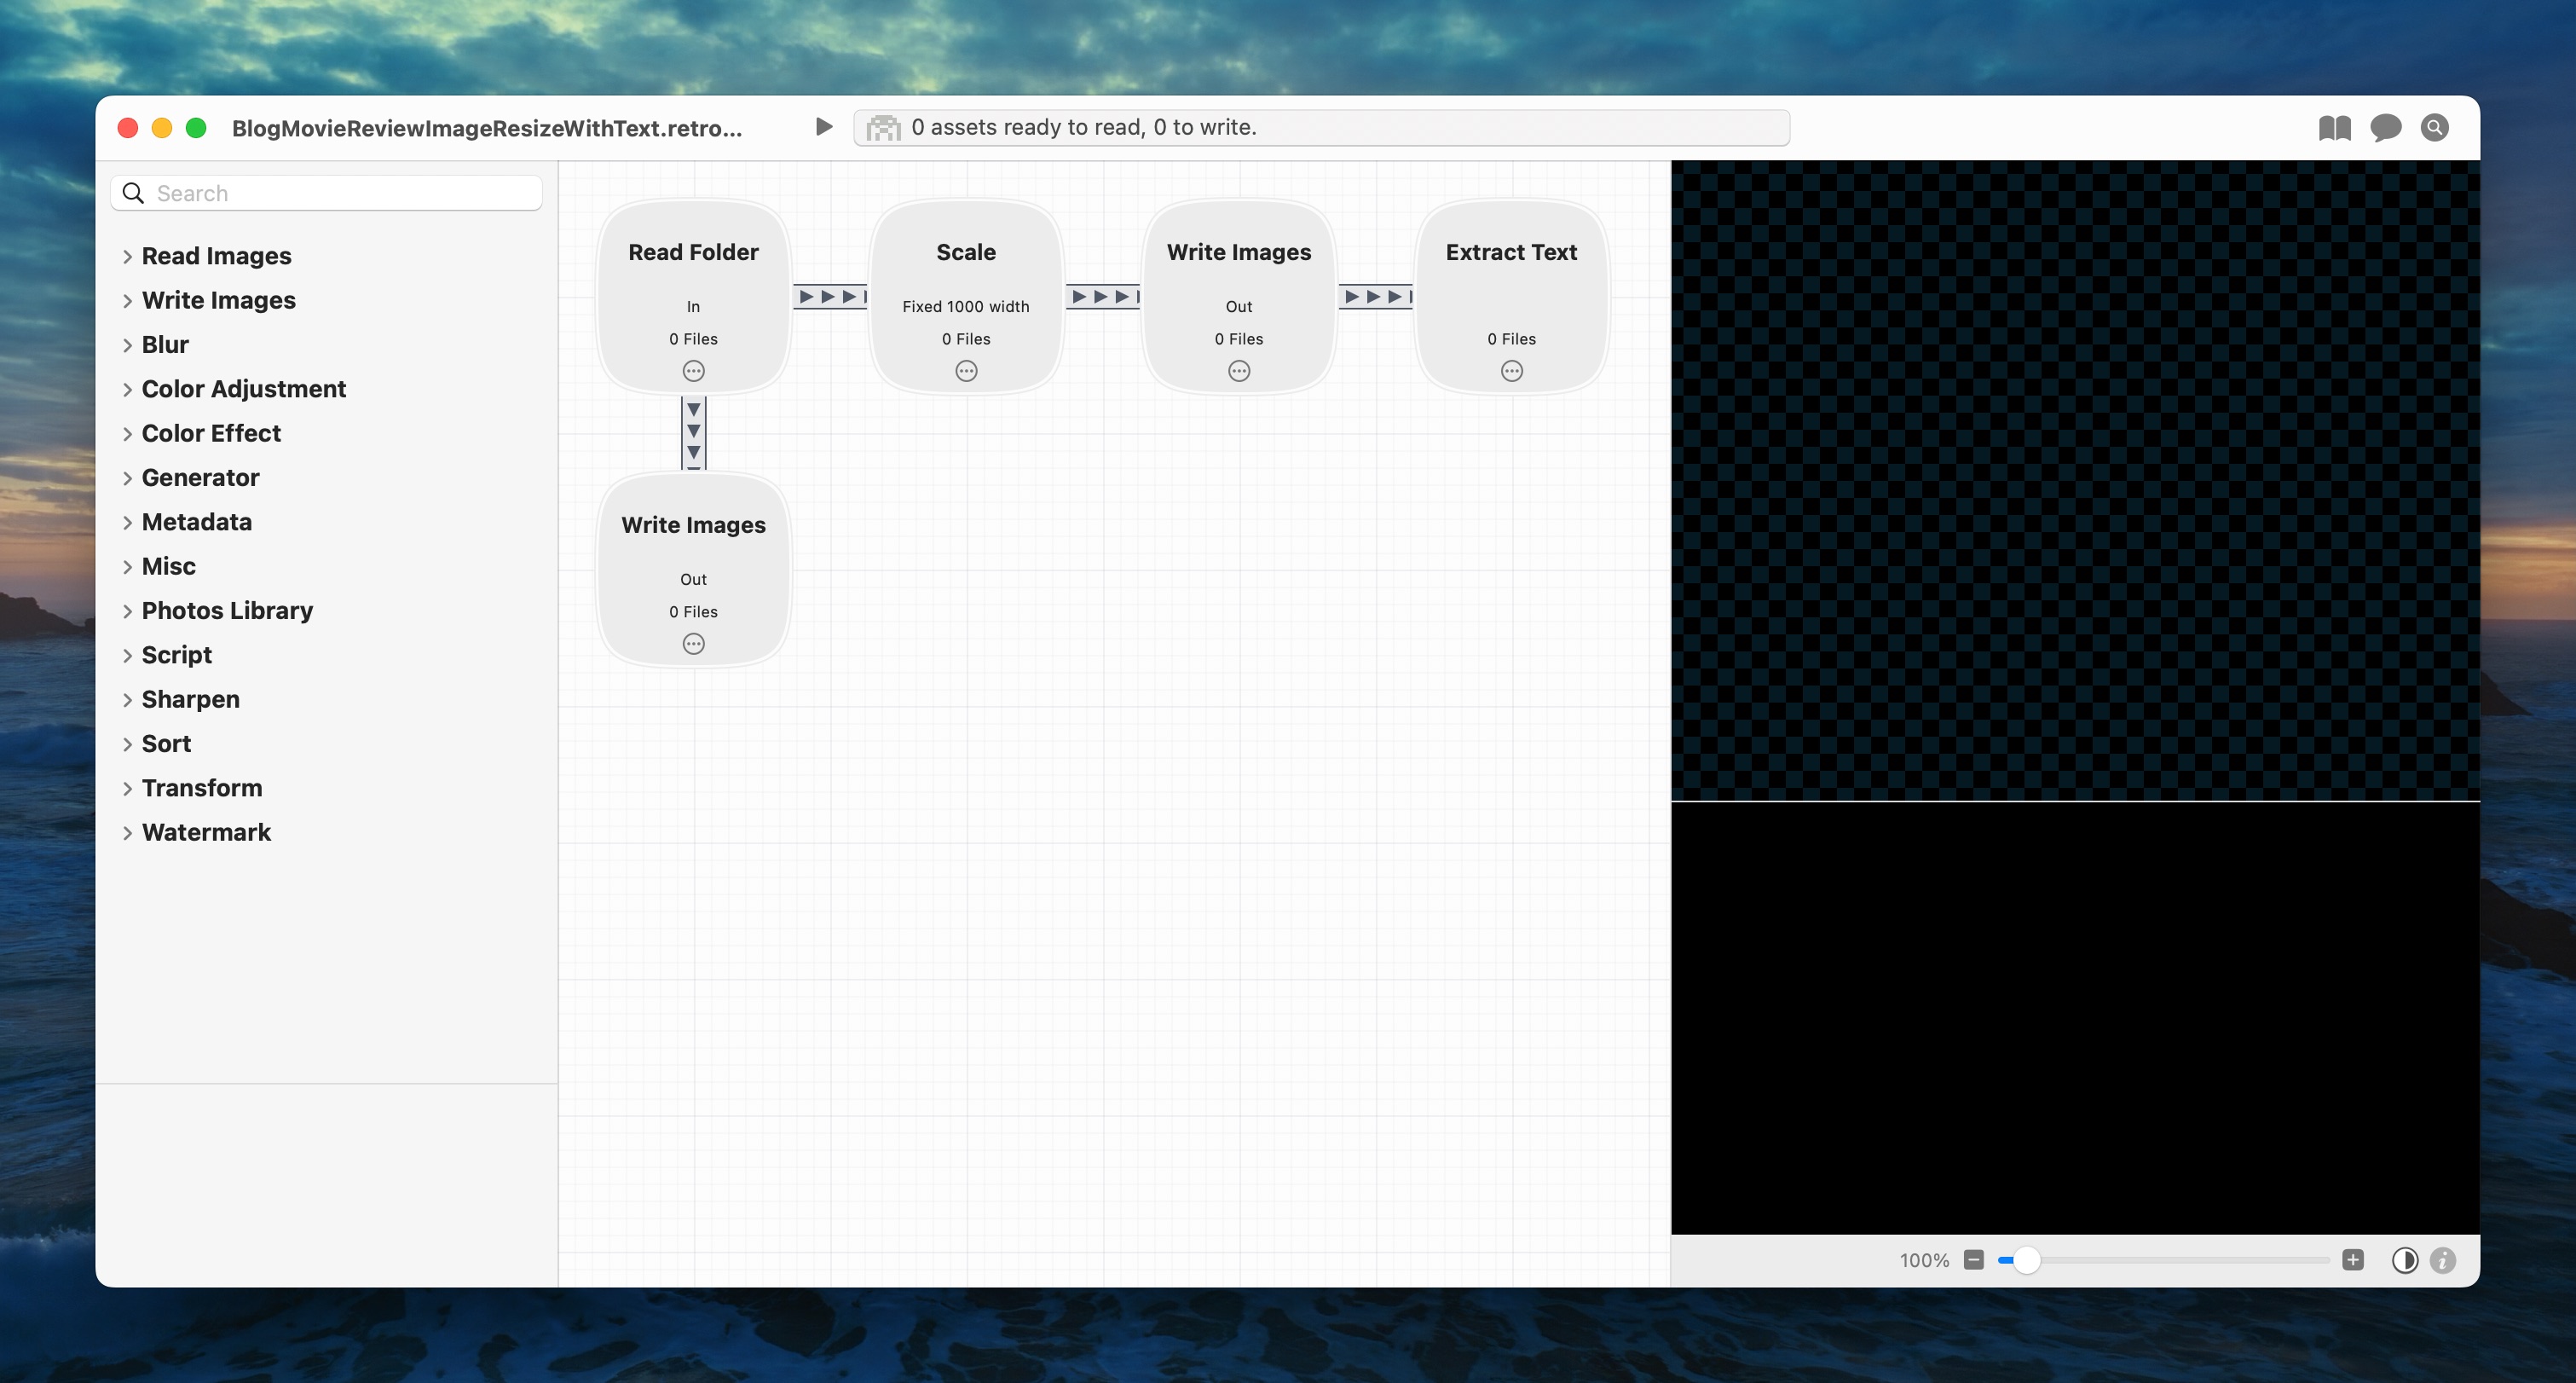
Step 3: Retrobatch
Retrobatch is a stupendously amazing image automation tool from Flying Meat Software. Its whole job is image batch processing.
The particular Retrobatch workflow that I run in this case takes images from /Users/scott/Scripts/scottwillsey/scottwillsey-images/In, where Hazel moved them, and creates two copies – one resized to 1000px wide and saved as a png, and the other full-sized but saved as a jpg. Both of these are saved to /Users/scott/Scripts/scottwillsey/scottwillsey-images/Out.
The purpose of having two copies is so that I can display an optimized version in my articles and have those link to the full-sized image if the reader clicks on them – more on this later.
One other important thing this Retrobatch workflow does is to extract the text from the resized image and save that text in a file in the Out folder with the same file name as the corresponding image, except with a .txt extension.
I need the text from the image to create my image link alt text for the website, and the fact that Retrobatch can extract this for me makes the fully automated nature of this process possible. I don’t have to make a copy of the text while typing my review on the phone and send it to the Mac somehow. It’s literally delivered in the image and extracted on the Mac by Retrobatch. It’s beautiful.
Now Retrobatch is done. For each review image in /Users/scott/Scripts/scottwillsey/scottwillsey-images/In, there is now a corresponding resized png, full-sized jpg, and text file with the text from the image saved in /Users/scott/Scripts/scottwillsey/scottwillsey-images/Out.
When Retrobatch finishes, the scottwillsey-media-review-images.sh script that started the Retrobatch workflow moves on to the next step – running a Python script called scottwillsey_review_images.py.
Step 4: Python Script
The Python script is much more involved than the Bash script was. I’m just going to show you the whole thing and then walk though it.
This creates a UUID to add into the image file names. Then it looks at every file in the Retrobatch output directory (/Users/scott/Scripts/scottwillsey/scottwillsey-images/Out), checks to see if it’s a png, and gets its base file name if so.
After getting the png file base name, the script looks for a corresponding txt file, which will contain the extracted review text. If it finds one, it reads the contents of the file to use as image alt text.
Next, it creates a markdown link for the png image complete with alt text, and a link to the larger jpg image. Then it appends this markdown link to the file_links variable.
Finally, it copies the complete file_links variable to the clipboard. This results in markdown for the images ready to paste into the /now page. The markdown basically looks like this, albeit with a few extra bits of text from the extracted text that I clean up:
[](/images/posts/PngImage42999A84080-review-6126286a-a138-4551-8892-ad278b0bfa5f.jpg)
Python Script Part 2: Archive All Images in the Retrobatch Input Folder
# Copy files to site public images directory and move files from input to review images directory
forfilein os.listdir(input_path):
# Get base name and extension
base_name, ext = os.path.splitext(file)
# Create new filename with UUID
new_filename =f"{base_name}-{new_uuid}{ext}"
src_file = os.path.join(input_path,file)
# Move file to review images directory
dst_file = os.path.join(review_images_path,file)
shutil.move(src_file, dst_file)
This part is simple. It just renames the images with the UUID included in the file name and moves them from the Retrobatch input folder to a review images archive folder. This is just a folder for me to keep copies of my reviews in, it has nothing to do with generating the website.
Python Script Part 3: Delete All Text Files in the Retrobatch Output Folder
# Delete all .txt files in output directory
forfilein os.listdir(output_path):
iffile.endswith(".txt"):
os.remove(os.path.join(output_path,file))
Again, very simple. This just deletes all the text files in the Retrobatch output folder. I don’t need them anymore as I have the text in the markdown links.
Python Script Part 4: Rename and Move the Image Files to Use on the Website
# Move files from output to site src assets images directory
This loops through all files in the Retrobatch output folder (since only images remain here) and does the following with each:
Gets the base file name and file extension,
Creates a new filename with the UUID added in between the base file name and extension,
Moves the image to /Users/scott/Sites/scottwillsey/src/assets/images/posts with the new UUID-included file name if it’s a png file,
Or moves the image to /Users/scott/Sites/scottwillsey/public/images/posts with the new UUID-included file name if it’s a jpg.
That’s the entirety of the script. Once it’s done, there are no images left in the Retrobatch input and output folders, there are jpg and png images in the correct website source folders for use on the compiled /now page, and there are corresponding Markdown links in the clipboard ready to paste into the /now page content source Markdown file.
Step 5: Profit
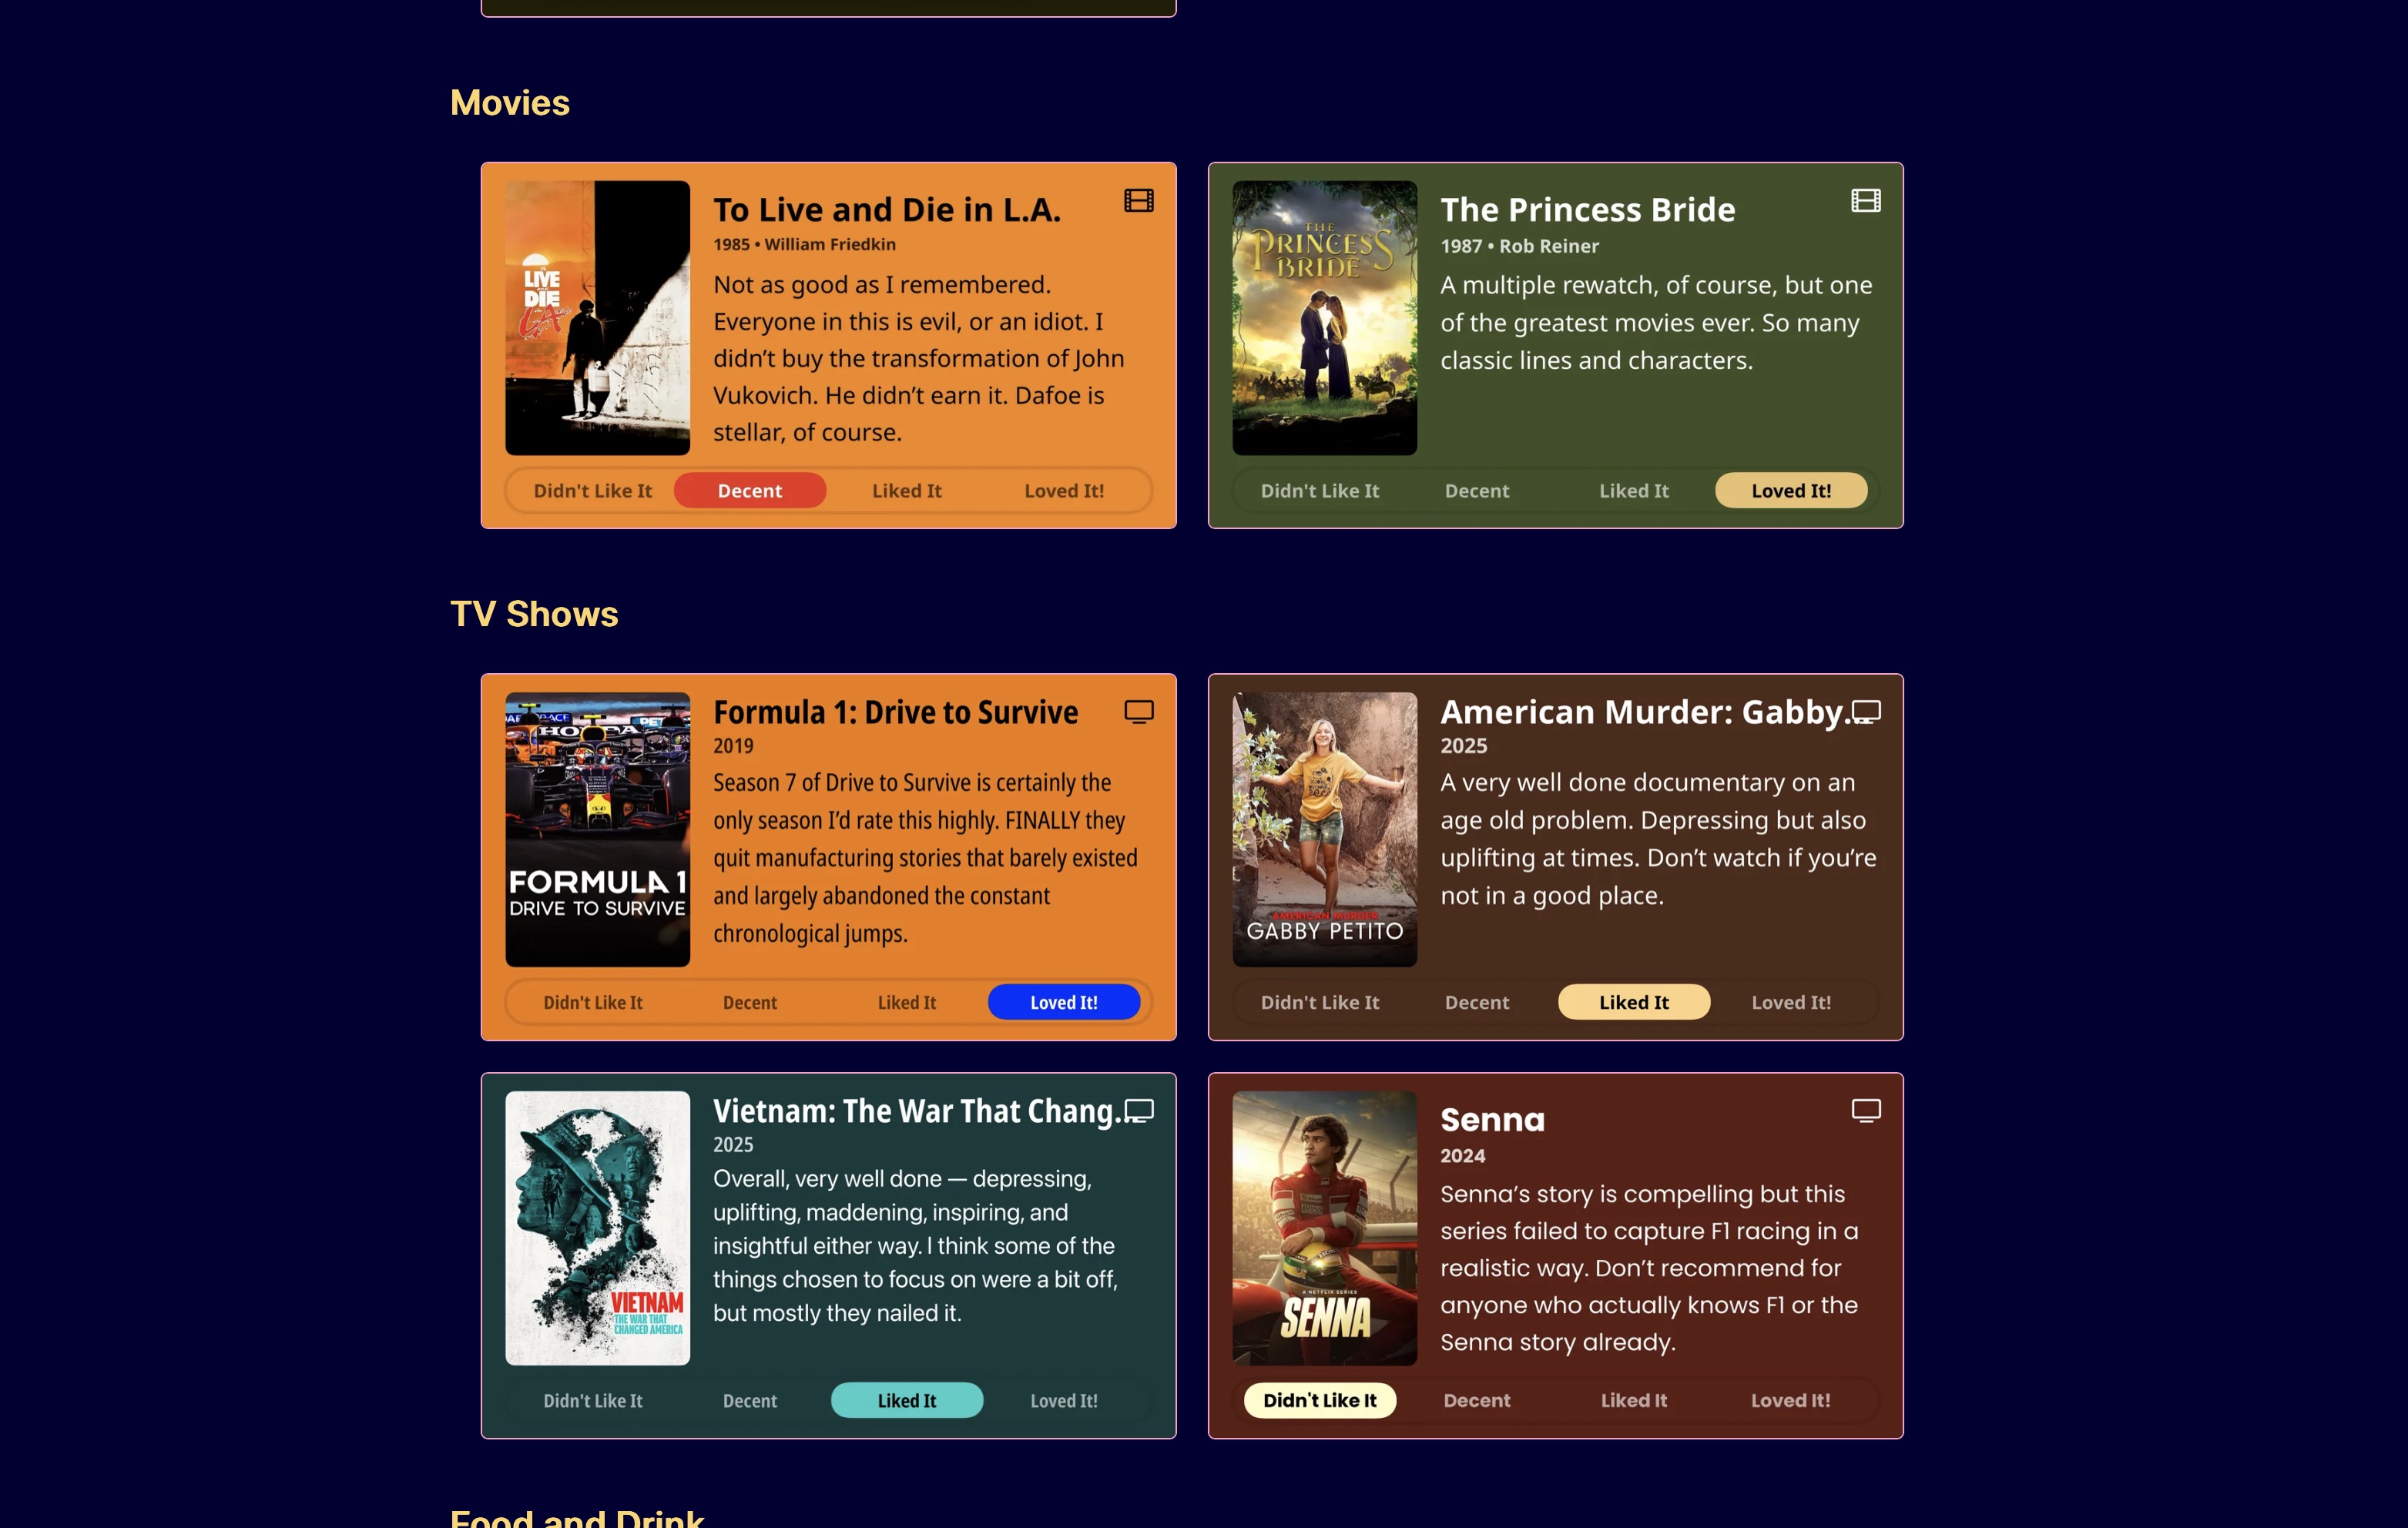
The results are something like the image below, or actually what you see if you click the link for the /now page on the site menu. It’s the one that looks like a clock.
There are definitely improvements that could be made, but this is a great start, and it’s proof that sometimes things that look like a very manual process can be automated, thanks largely to the great ecosystem of Mac indie programmers who make outstanding irreplaceable utilities like Hazel and Retrobatch.
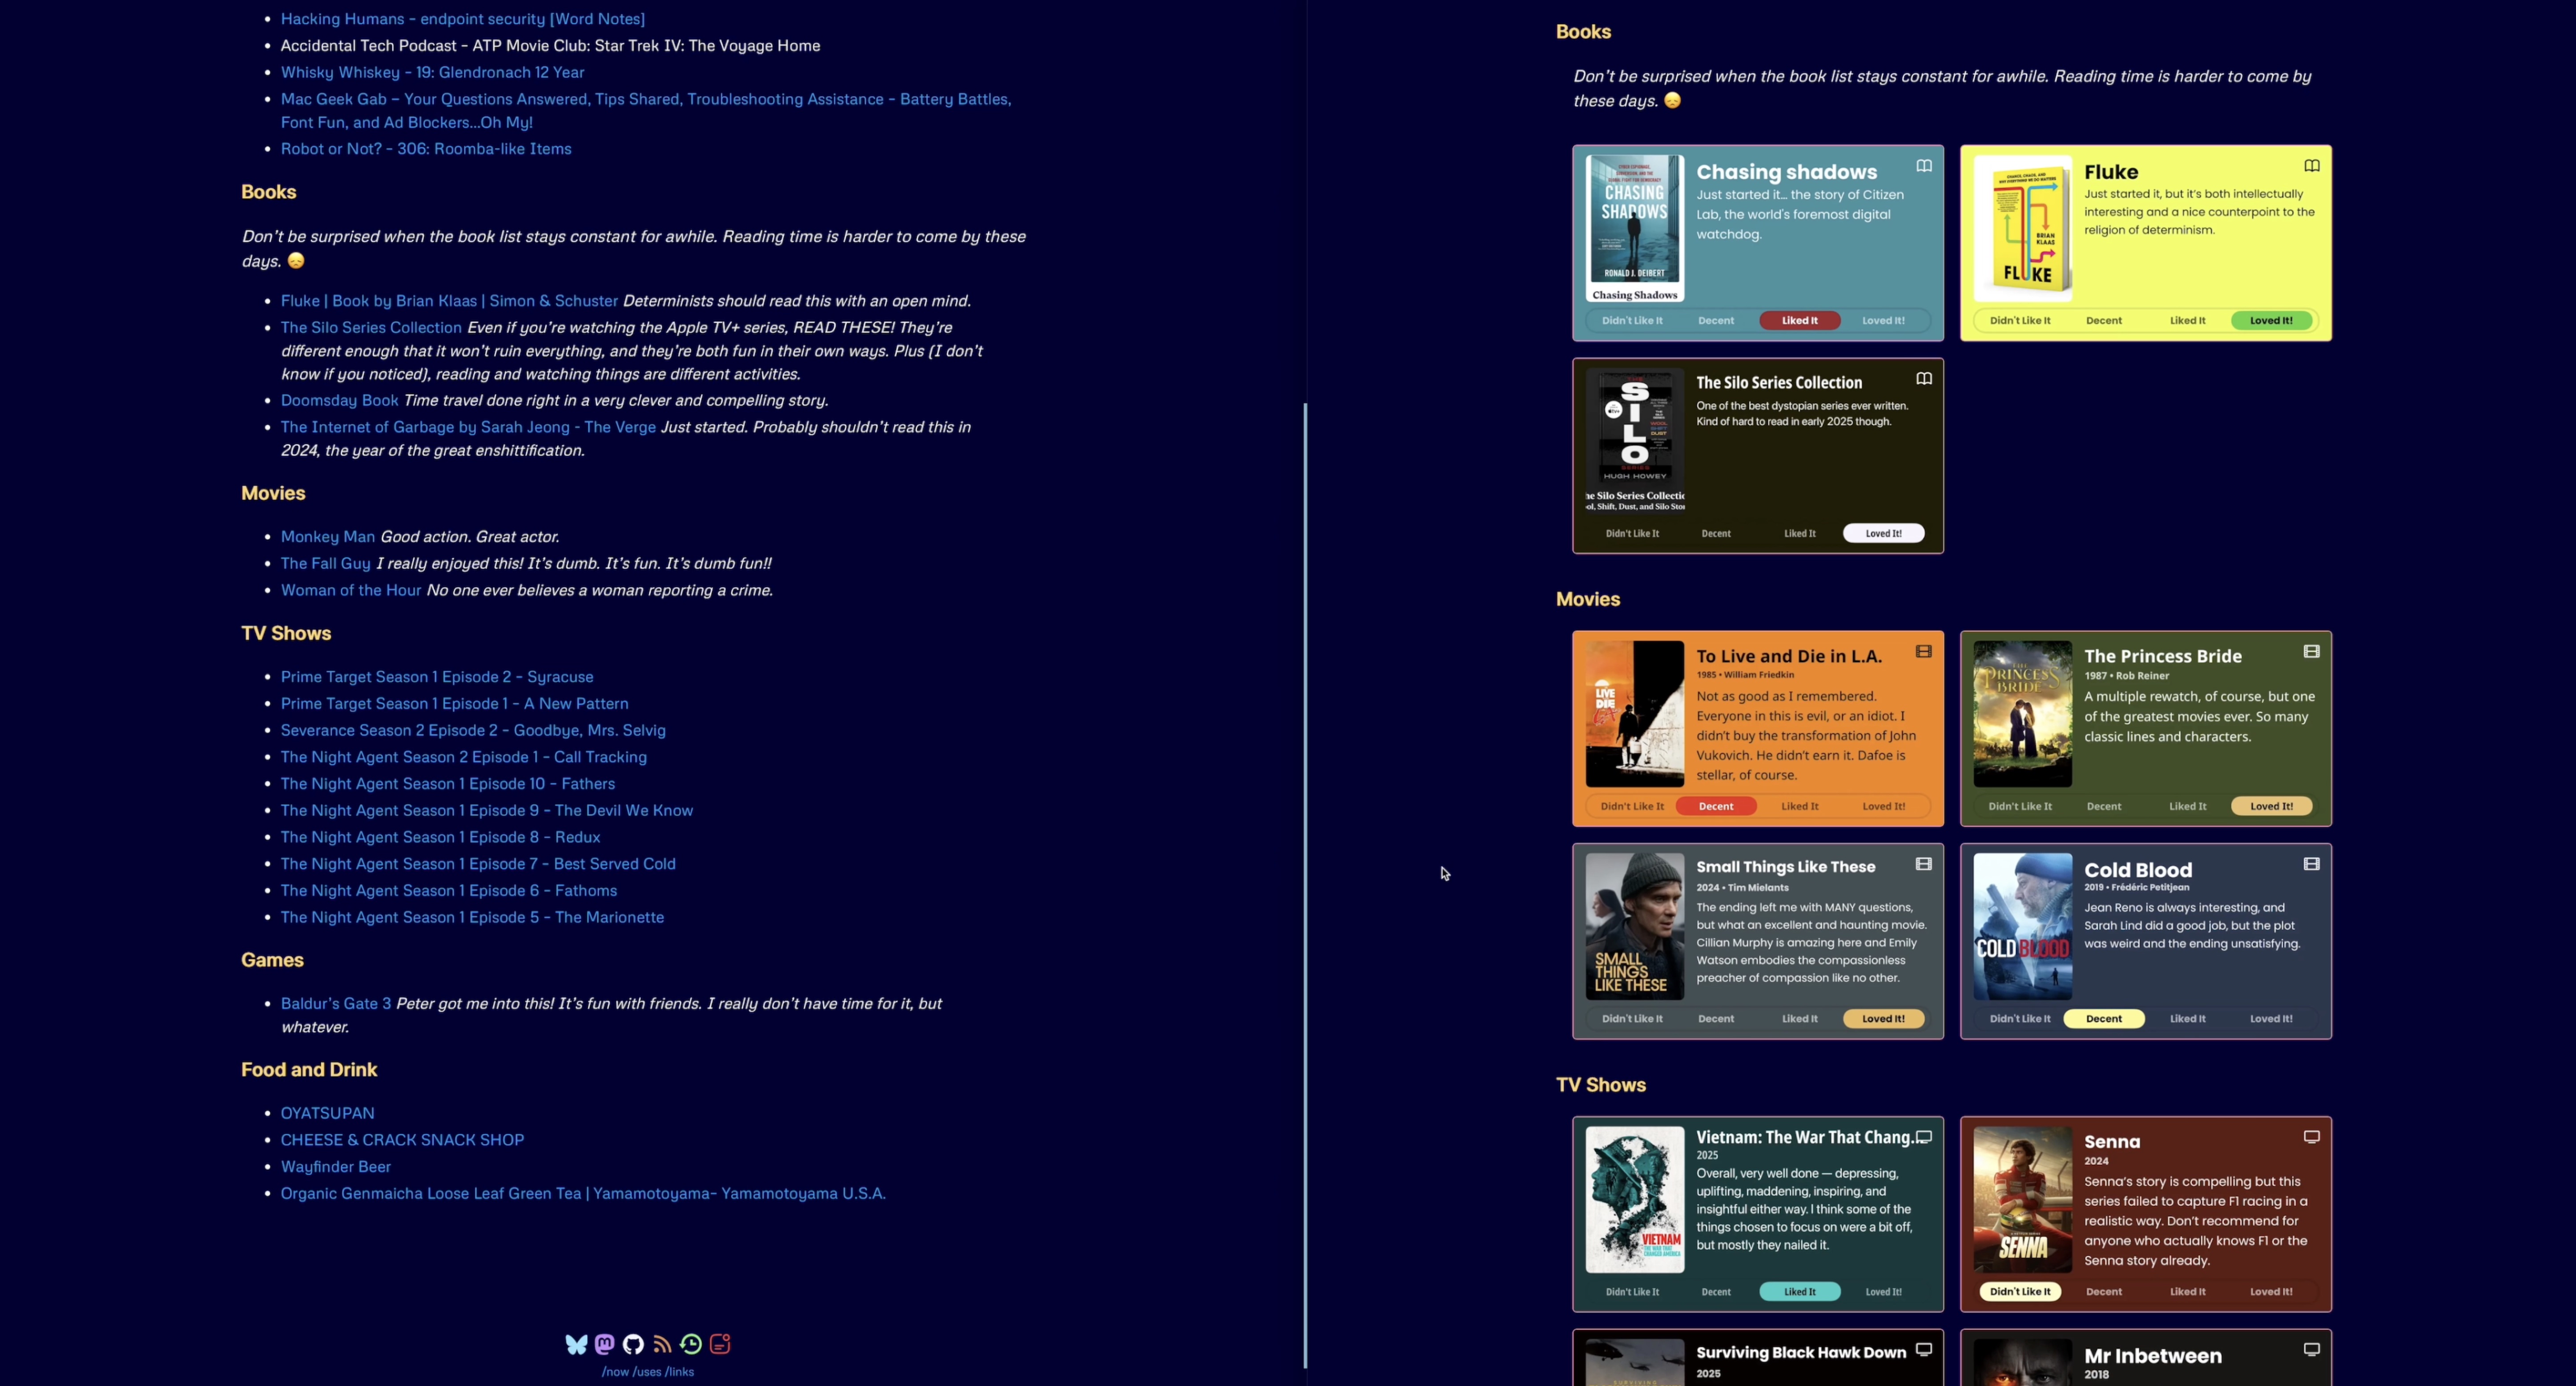
If you want to see a comparison of the old style, imageless /now page and the current beautiful one, just look at the image below. On the right is the new, Quick Reviews-ified version, on the left is the old one. Or, to put it another way, on the left is the before now, and on the right is the now now.
Summarium
That’s a lot of words, so let’s summarize the process here:
Scott Willsey creates a review in Quick Reviews on iOS,
Scott Willsey AirDrops it to his Mac,
Hazel renames and moves the image and runs a Bash script,
Bash script runs a Retrobatch workflow and waits for it to finish,
Retrobatch makes two copies of the image, a full-sized jpg and a smaller png, as well as a text file containing the extracted text from the image,
Bash script runs a Python script,
Python script constructs the Markdown links and moves the Retrobatch images into the correct locations for the site to compile and display on the /now page,
Scott Willsey pastes the Markdown links into the /now page source Markdown file,
Scott Willsey says “Damn, that is cool!” and goes to make another cup of coffee.
Footnotes
If you’re asking yourself right now “Is this guy going to make EVERY reference to his /now page a hyperlink to it?”, the answer is yes. Yes, I am. ↩
You may have noticed that the site menu has a couple new icons in it. One looks like a timer or stopwatch – that’s a link to the /now page, which I’ve had for awhile, but haven’t had a menu link to. The other looks like movie director clapper with a gear on it – that’s a link to a new page: my /reviews page.
You may look at both the /now page and the /reviews page and think “yeah, but they’ve both got these little reviews on them”, and that’s true, but there is a difference. The /now page reviews are the latest only, and some of them (TV series and books, for example) may be things still in progress. These are ephemeral – they’ll drop off as I move on to new stuff.
The reviews page is only items I’ve finished, and is ALL of the items I’ve finished that I’ve written reviews for. Nothing will drop off here. Eventually, then, I’ll probably need to break each category (Movies, TV Series, Books, Games) off into their own pages so it doesn’t take an hour and a half to load the page. 45 minutes I could live with, 90 minutes not so much.
I’m working on an article with an accompanying video about my workflow for creating and publishing these reviews. I think you’ll find it interesting to see how much of the process I’ve managed to automate.
I like to highlight different cool or interesting sites by featuring them in my Cool Site Spotlight on my links page. I put a new one up every one or two weeks, and put a link to the last one in the Cool Sites Archive section of the links page.
The data for the current one is a simple JSON file called spotlight.json, and it looks like this:
spotlight.json
1
{
2
"Site":"https://html.earth/",
3
"Title":"html.earth: Markdown to HTML Converter & Site Generator",
4
"Description":"html.earth is a free site generator that converts Markdown to HTML. It comes with a front matter editor, custom styling field, and import & export options.",
Up until now, when it’s time to spotlight a new site, I’ve been grabbing a markdown link of the site title and URL using Hookmark and then using the title and URL from that to put in the Title and Site property values. I then run a Raycast script command to rename, resize, and reformat the site screenshot and put it in the appropriate directories in my own site’s local Astro project. Once I have the image name, I can put it in spotlight.json in the Image property value, minus the file extension, for reasons I’ll write about someday in a separate post.
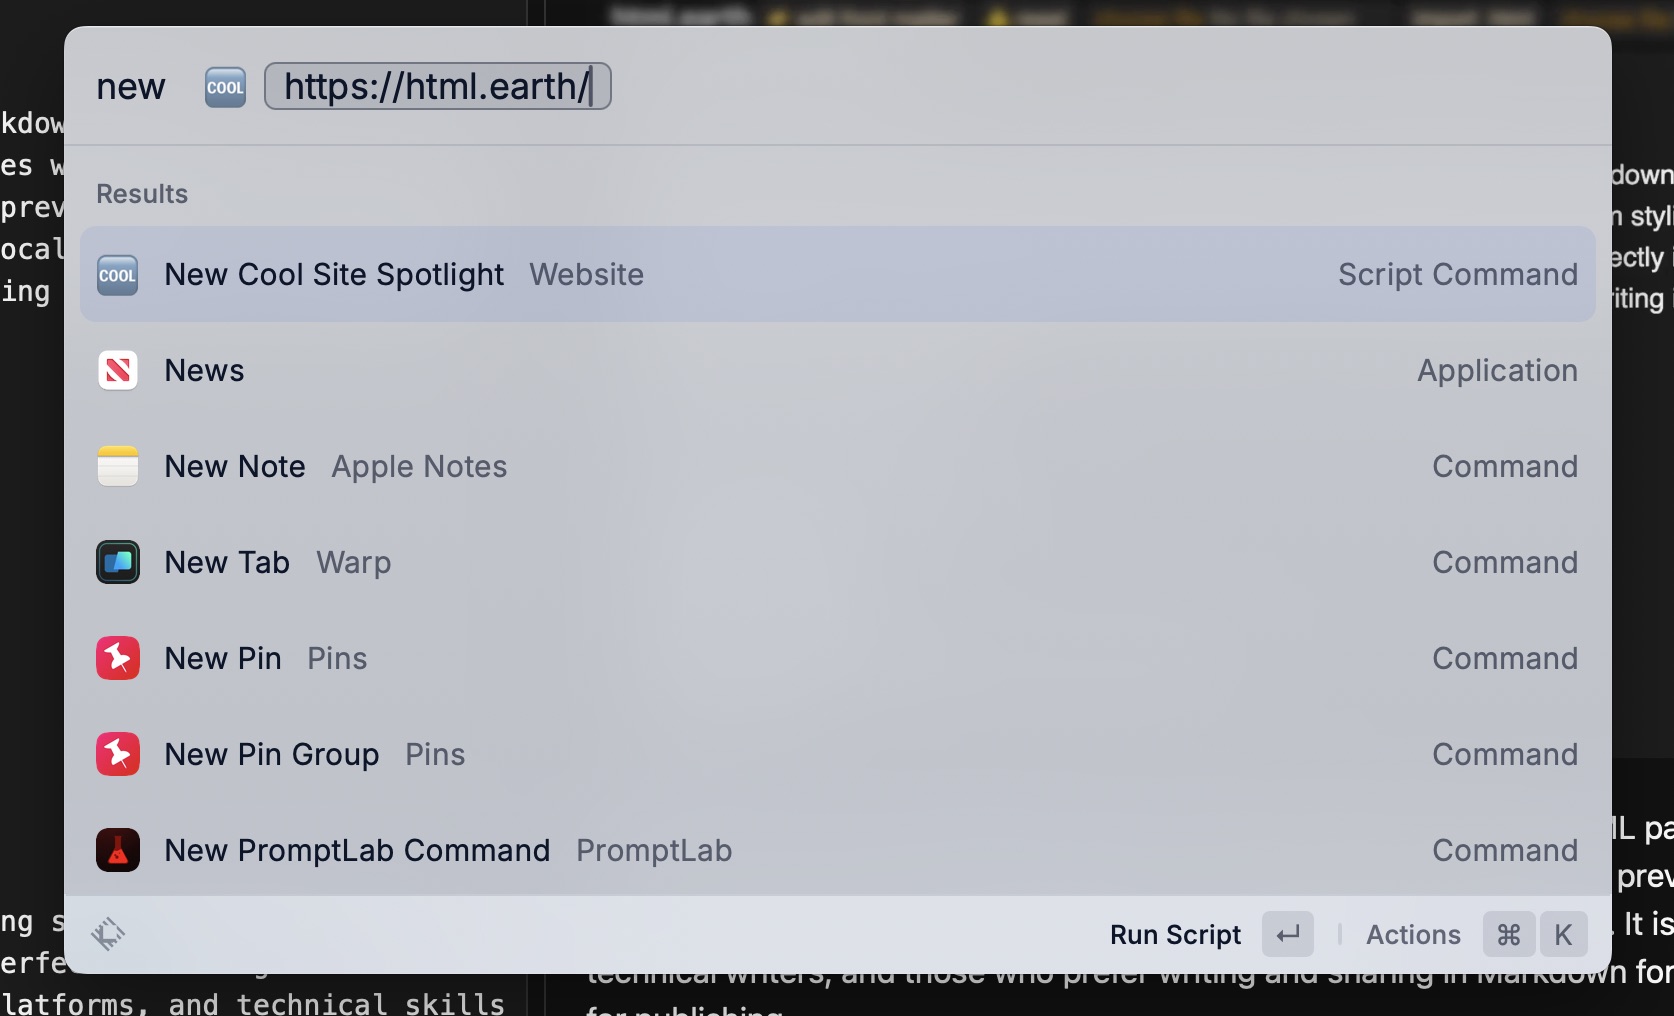
Anyway, it’s been a fairly manual process, and I finally got tired of it yesterday. So I wrote a Raycast script command called “New Cool Site Spotlight” to do it for me.
As you can see, the script command takes one parameter: the URL of the site I want to feature in Cool Site Spotlight.
The first thing the script command does is look at spotlight.json in its current state and grabs the title and URL of the current site, which it formats into a Markdown link and puts on the clipboard. It also sticks a dash in front of it for good measure, since the list of previous cool sites IS actually a list, and Markdown list elements start with a dash. This is all handled by a function called create_cool_site_archive_link.
png_file =next((f for f in os.listdir(IMAGE_DIR)if f.endswith('.png')),None)
6
if png_file:
7
png_file = os.path.splitext(png_file)[0]
8
entry ={
9
"Site": url,
10
"Title": title,
11
"Description": description,
12
"Image": png_file
13
}
14
# If all values are present, write the JSON to the file
15
ifall(entry.values()):
16
withopen(SPOTLIGHT_JSON_FILE,'w')as f:
17
json.dump(entry, f,indent=4)
18
return entry
One interesting thing you might notice is that it looks in /Users/scott/Scripts/scottwillsey/scottwillsey-images/In for any image file that ends in .png, which it then extracts the file name minus the extension from. Once it’s done that, it creates a dictionary named entry. If all keys in entry have corresponding values, it writes the dictionary as JSON into spotlight.json, replacing whatever was there previously.
Here’s the full New Cool Site Spotlight Raycast script command:
new-cool-site-spotlight.py
1
#!/Users/scott/Scripts/python/venv/bin/python
2
3
# Required parameters:
4
# @raycast.schemaVersion 1
5
# @raycast.title New Cool Site Spotlight
6
# @raycast.mode fullOutput
7
8
# Optional parameters:
9
# @raycast.argument1 { "type": "text", "placeholder": "Cool Site URL" }
10
# @raycast.packageName Website
11
12
# Documentation:
13
# @raycast.description Create the JSON for Cool Site Spotlight for scottwillsey.com from a URL
You may still have questions about the image file, such as how I create it, why it’s in a directory called /Users/scott/Scripts/scottwillsey/scottwillsey-images/In, and what I mean when I say I rename and reformat it first. You may also wonder why all that isn’t part of THIS script command intead of being something I do separately still. I’ll write about that soon.
In the meantime, I’ve gone from manually tweaking a JSON file with multiple copy and paste edits when I want to update Cool Site Spotlight to simply copying a URL from the browser and running a Raycast script command by executing a keyboard command. It’s so much nicer now!
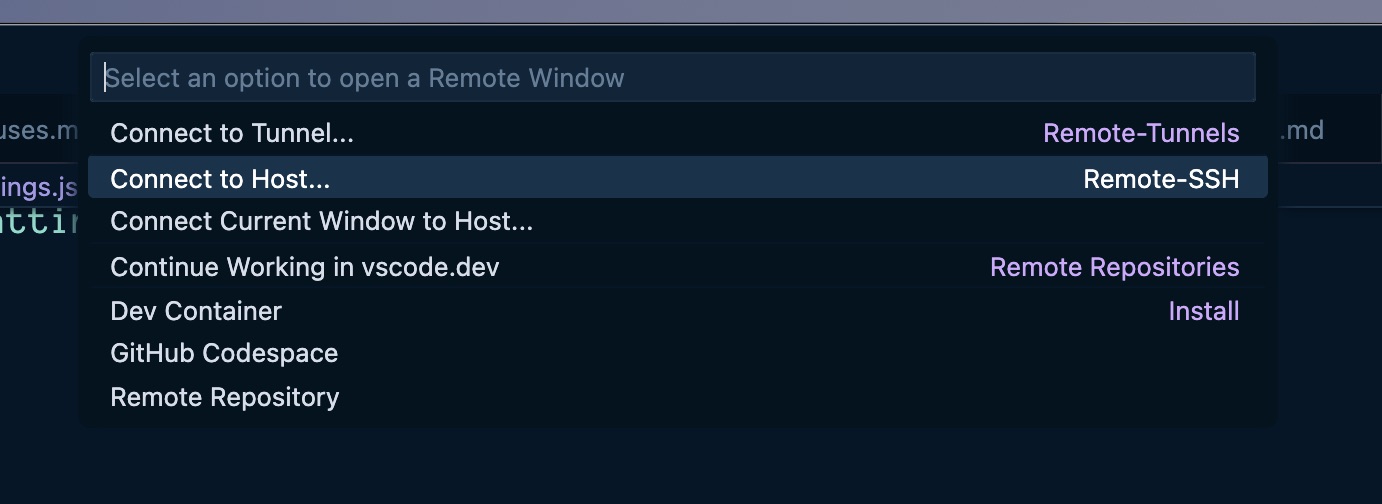
Recently I needed to work on some script files on a server and wanted to edit them in Visual Studio Code. Visual Studio Code supports remote connections, including ssh connections. Unfortunately, some of these files require root privileges, and I can’t and don’t want to be able to ssh into this server as root.
What about sudo su once you’re logged in, you say?
The good news about configuring ssh connections is that you can set up RemoteCommand entries in your ssh config that will be executed upon connection. sudo su is a command. And the good news about Visual Studio Code is that it lets you specify an ssh config file to use for its ssh connections, so you can customize your Visual Studio Code ssh connections to perform a sudo su upon connection, if needed, while keeping your normal ssh config file free of such silliness so that this doesn’t happen in your normal terminal ssh sessions.1
First create a copy of your ~/.ssh/config file and name it something obvious. Mine is named config_vscode.
Terminal window
1
ll
2
total168
3
drwx------@20scottstaff640BJan2108:47.
4
drwxr-xr-x@76scottstaff2.4KJan2109:02..
5
-rw-r--r--@1scottstaff6.0KDec182023.DS_Store
6
drwx------3scottstaff96BJan2108:471Password
7
-rw-------@1scottstaff1.7KJan1014:32config
8
-rw-------@1scottstaff1.7KDec2020:26config_por
9
-rw-------@1scottstaff948BJan1014:58config_vscode
Now edit your newly created created config_vscode (or whatever) file and add the following to the end of connections that need root access to files in Visual Studio Code:
Terminal window
1
RemoteCommandsudosu
This means a given connection that looks like this in ~/.ssh/config:
~/.ssh/config
1
Hostserver1
2
HostNameserver1.domain.com
3
Port22
4
Userserverperson
5
IdentityFile~/.ssh/server1
6
IdentitiesOnlyyes
Should look like this in ~/.ssh/config_vscode:
~/.ssh/config_vscode
1
Hostserver1
2
HostNameserver1.domain.com
3
Port22
4
Userserverperson
5
IdentityFile~/.ssh/server1
6
IdentitiesOnlyyes
7
RemoteCommandsudosu
Then in your Visual Studio Code user settings.json file, make sure to point to your custom ssh config and set enableRemoteCommand to true.
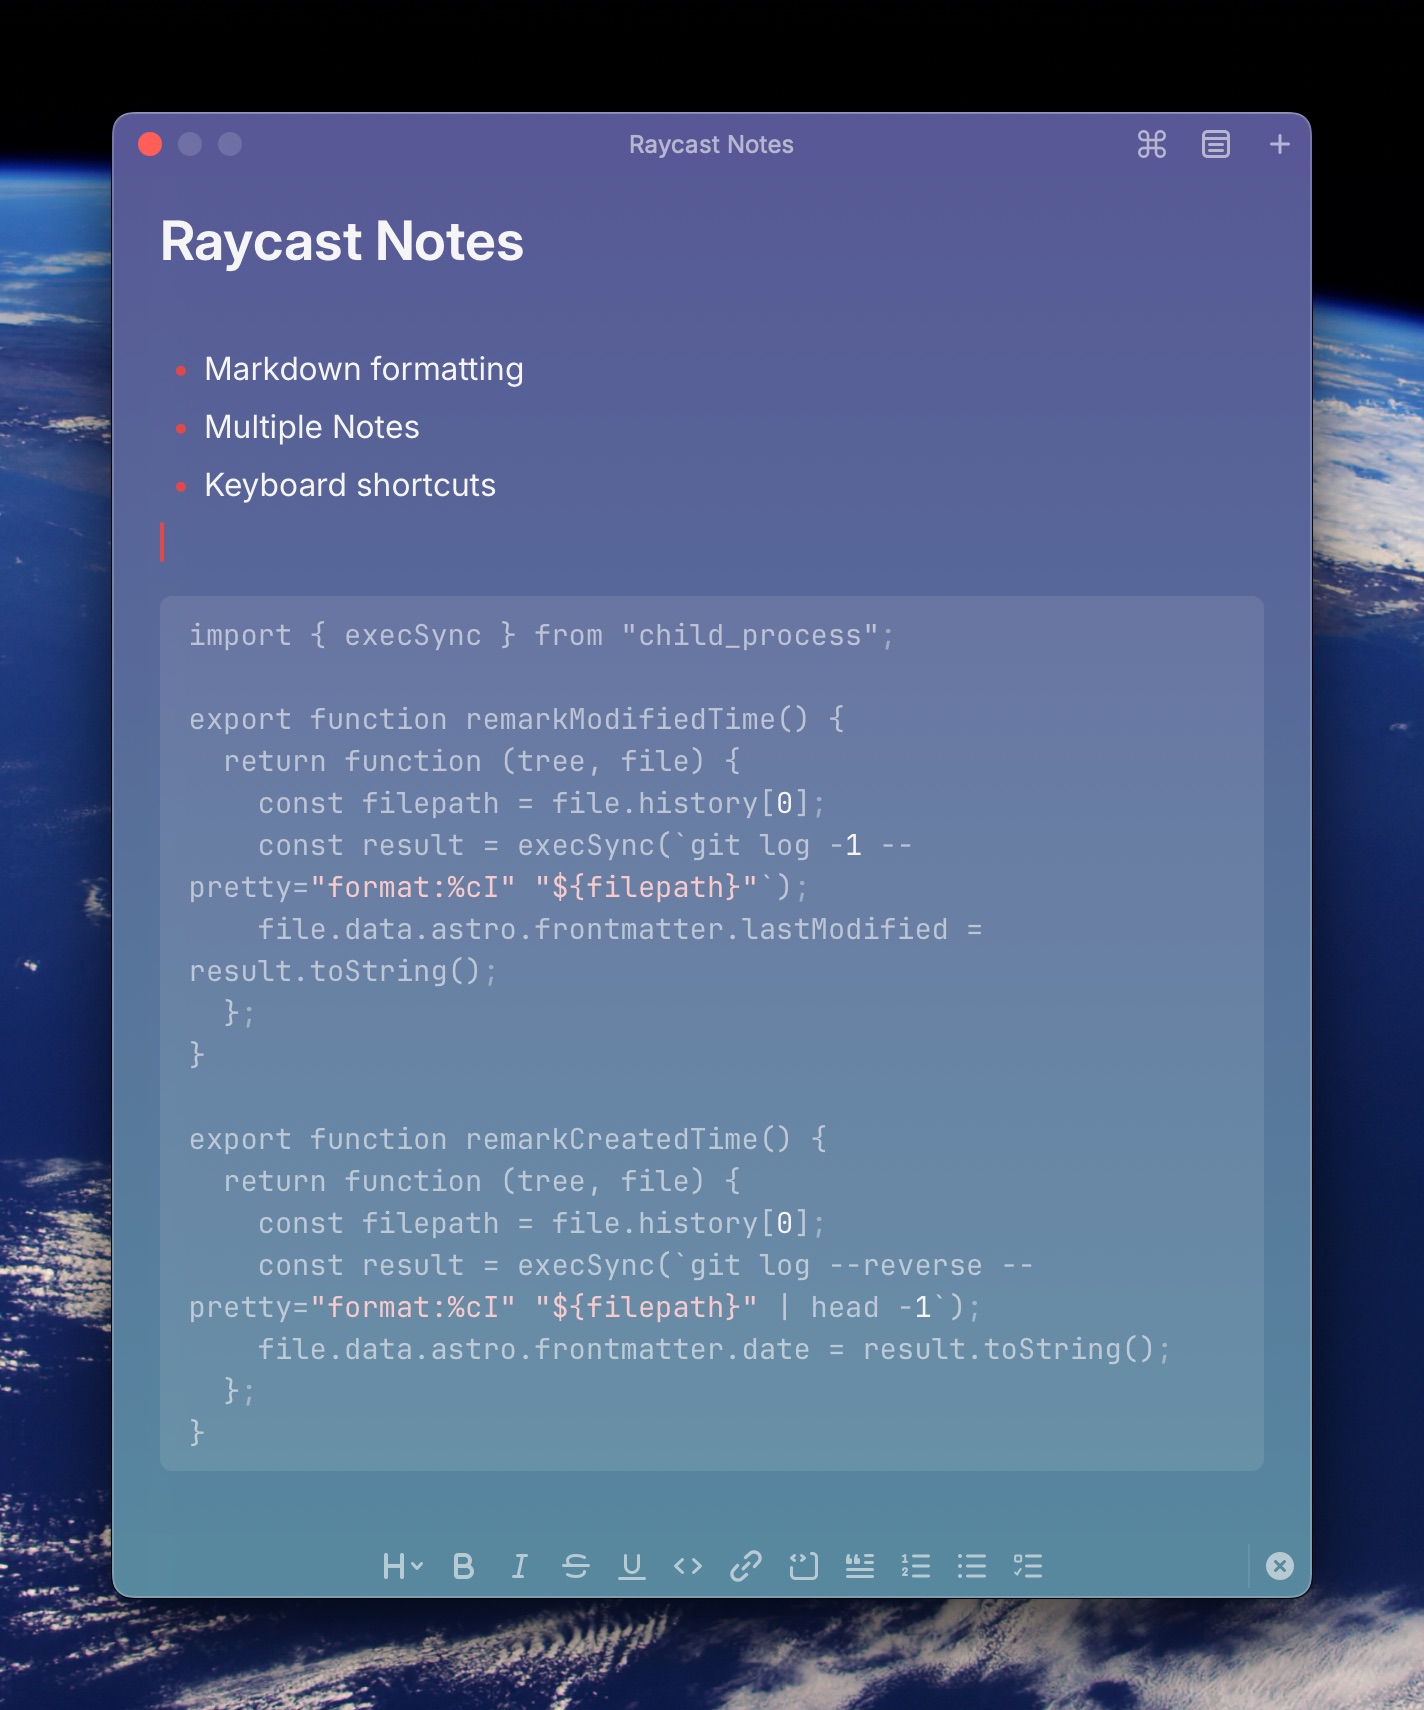
Raycast Floating Notes started off as a very simple text window you could dump stuff into. That’s all it was. One window, one note, and anything you put in there was always going to be there when you opened Raycast Floating Notes again. Then late last year, Raycast introduced Raycast Notes, a Floating Notes update and replacement (Meet the new Raycast Notes - Raycast Blog).
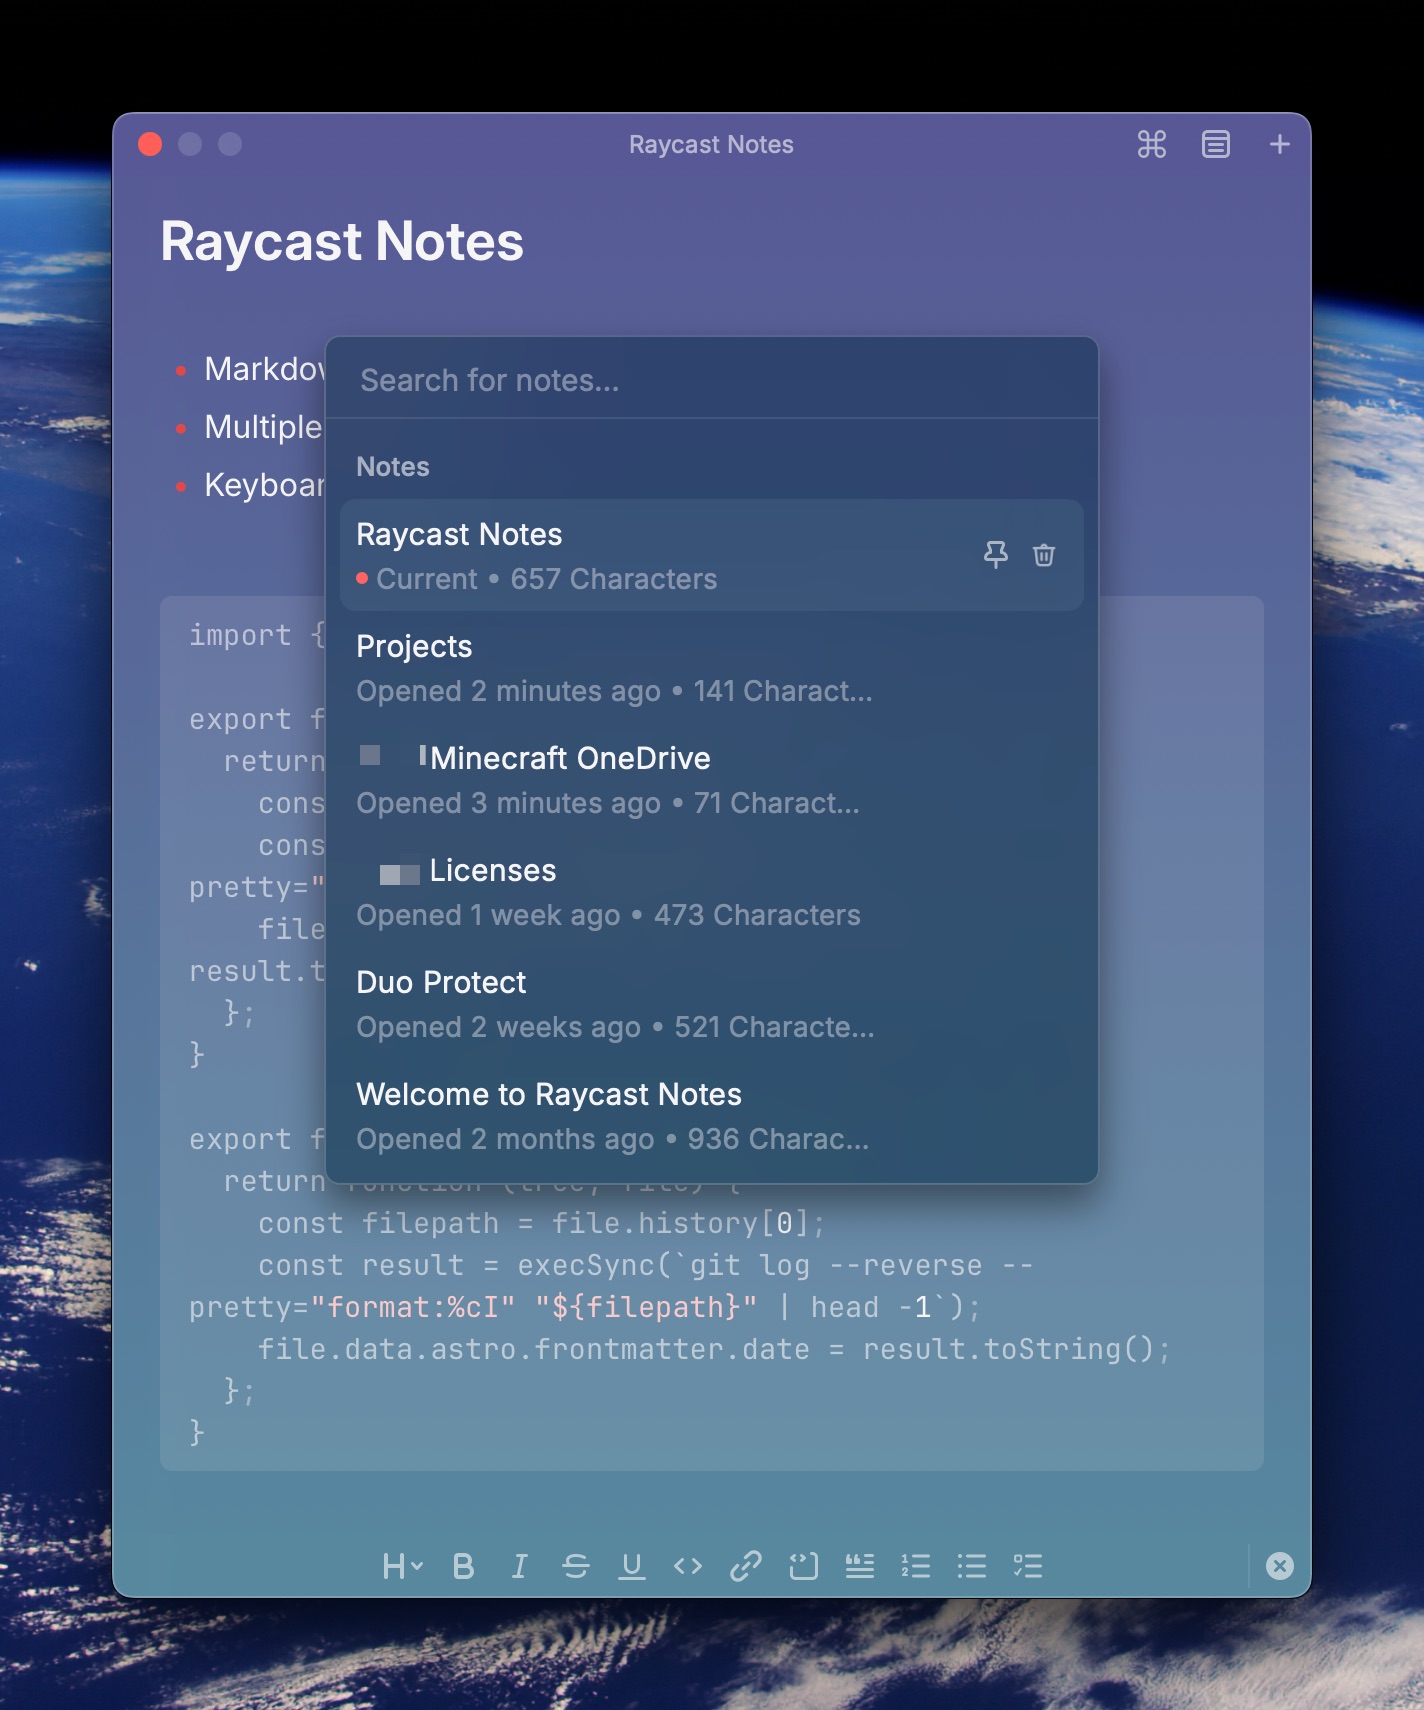
Raycast Notes is a big upgrade over Floating Notes for the simple reason that you can keep multiple notes… something Floating Notes just couldn’t do. Browse your notes and select the note to view using the menu icon at the top of the current note, or use ⌘P to pop up the list.
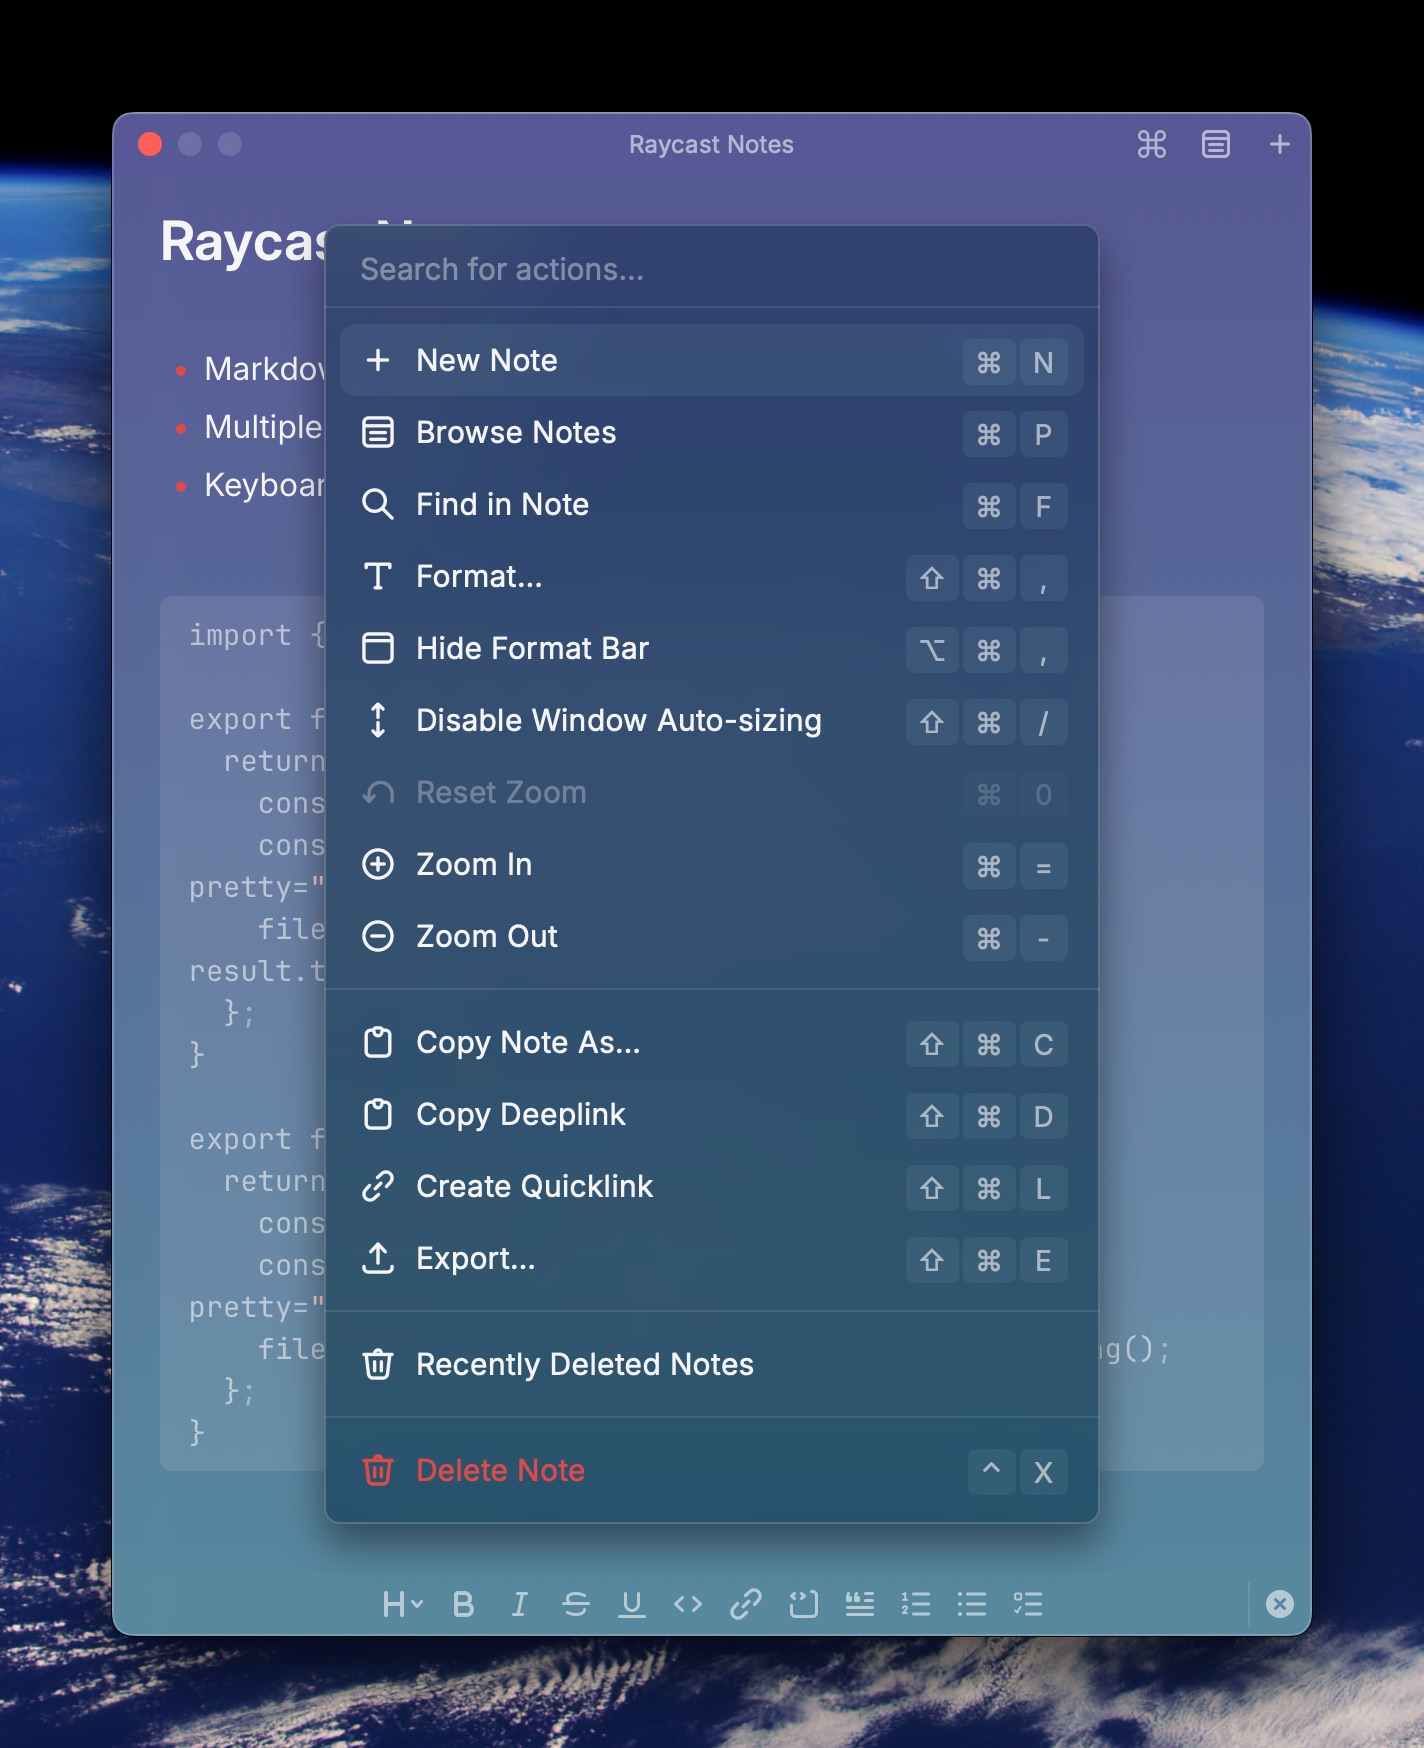
You can also perform a bunch of actions in/on notes, such as window auto-sizing, zoom, copying, formatting, searching, creating a quicklink to the note, all with keyboard shortcuts, by clicking the ⌘ icon or using the ⌘K keyboard shortcut.
Here’s the catch, though, at least for me – people who use Raycast want Raycast Notes to become the be-all, end-all of notes apps for them. There are people who genuinely want to replace Obsidian, Apple Notes, or Notion with Raycast Notes, and this has led to some minor annoyances for me. I don’t like the fact that pasting a URL into a note in Raycast Notes auto-formats it as a markdown link. Most of the time I just want a text link that I can see and copy as plaintext.
I understand why people want Raycast Notes to do all these things and have all these features, but honestly for me, I want a scratchpad, not a word processor. Raycast Notes is never going to replace Notion, Apple Notes, or Bear for me. It just can’t, and it’s going to be way too clunky if Raycast tries to do that.
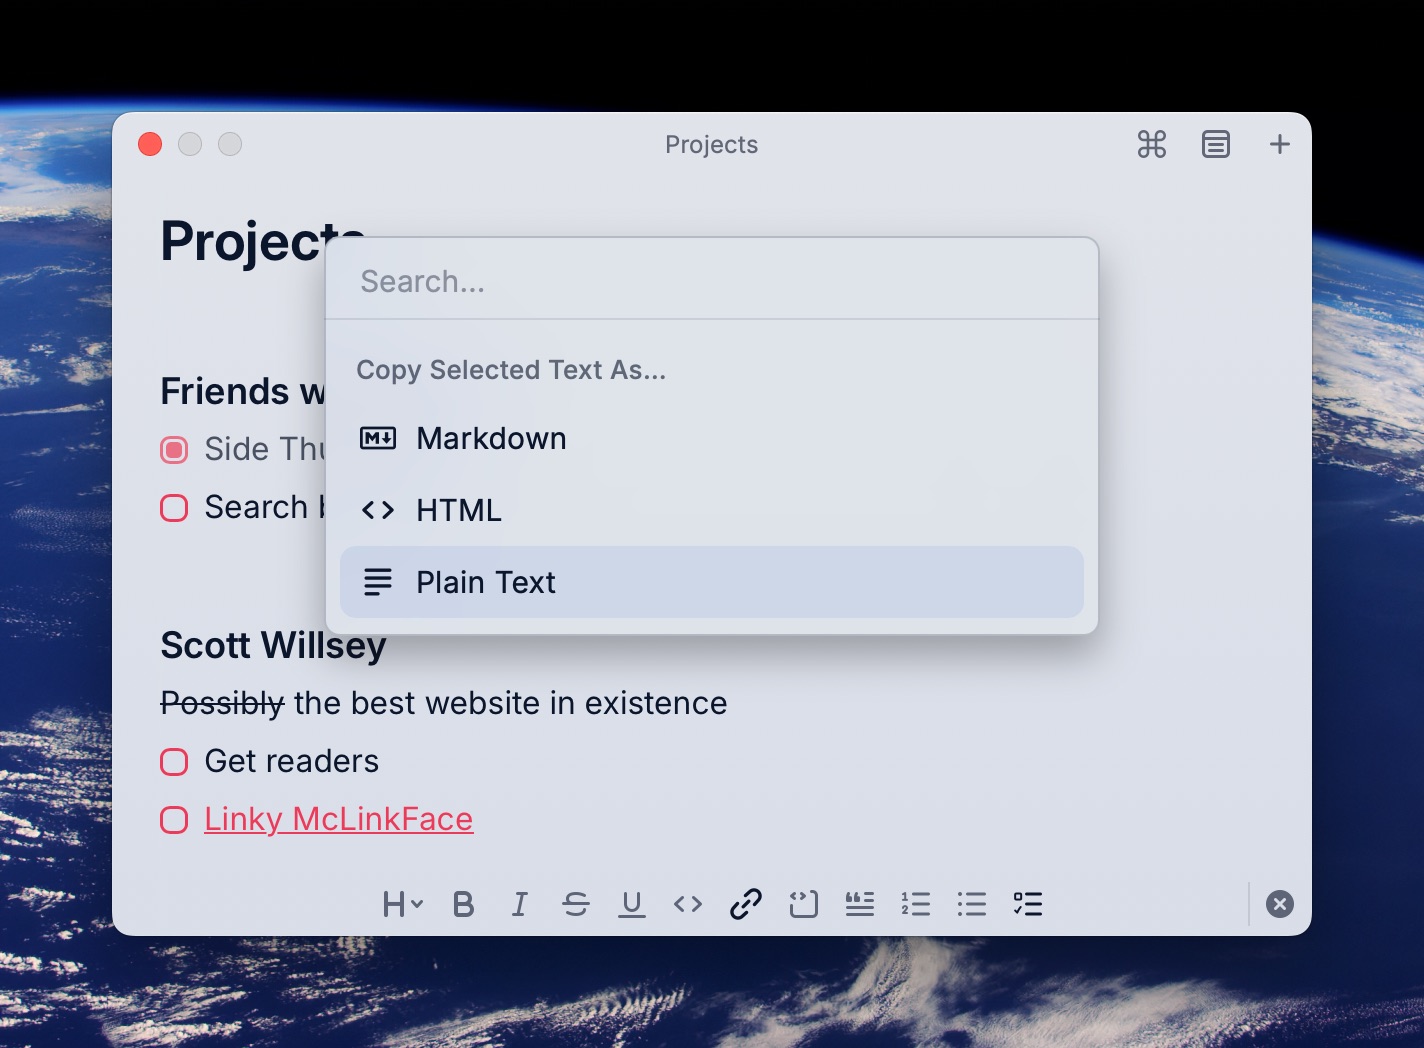
I did learn that there’s a way to at least copy the links that Raycast Notes insists on formatting into markdown back out of the note as plaintext though. Highlight the link, hit ⇧⌘C to pop up the “Copy Selected Text As” menu, and choose “Plain Text”.
Aside from little quibbles like that, I do use Raycast Notes all the time to capture quick info or keep things I need floating on my screen while I work. It’s very much a quick reference, context-based tool for me, and for that use case, I do appreciate it.
Just quit trying to make it into the Microsoft Word of Markdown editors, people. 😄