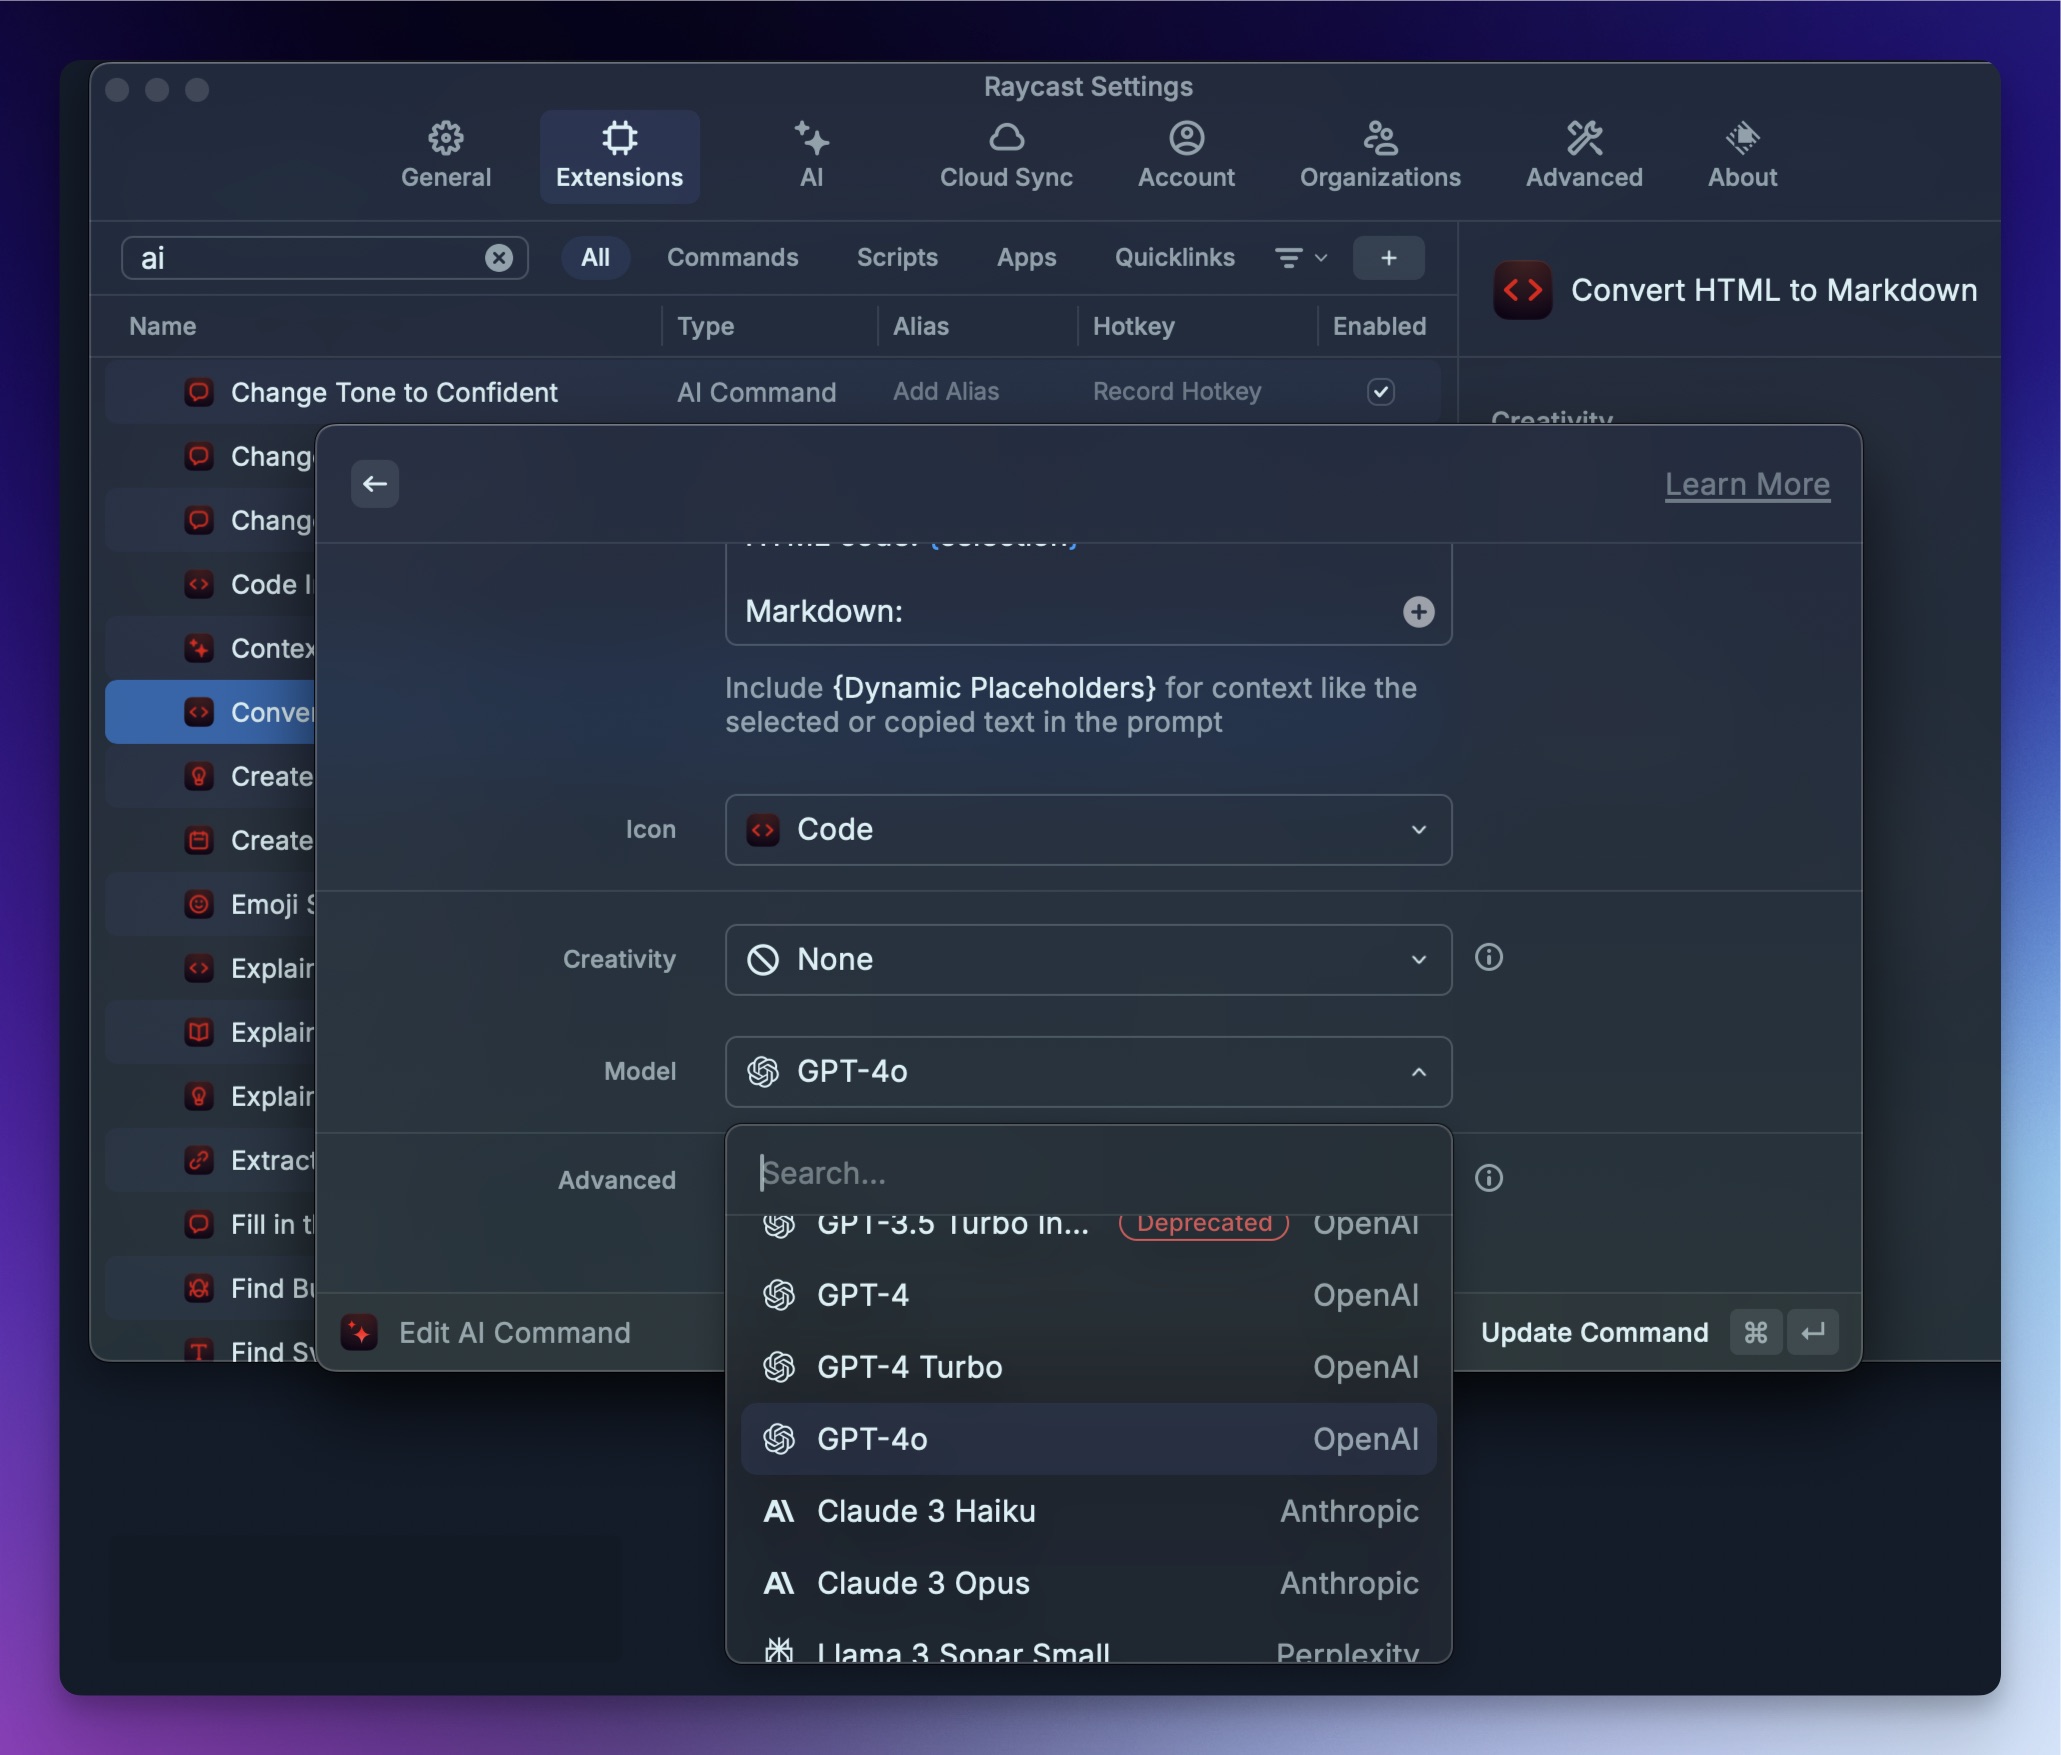
Raycast AI Commands (documented here in the Raycast manual) are really just prompts for the LLM to perform an action with specific instructions. You can also customize them to use specific models available to Raycast Advanced AI subscribers, so you could use Anthropic Claude 3 Opus for one thing, OpenAI GPT-4o for another, and so on.
The reason it didn’t occur to me that I might miss these? I never use them. I haven’t tried to incorporate them into my workflow and as a result I have no idea if I would benefit from them or not. I will definitely have to do some testing and find out if I’m missing a useful tool or if I never figure out a use for them.
One annoyance about them is also a side-effect of one of their main features – you will have to manually edit your AI commands to update to newer LLMs when it becomes useful to do so.
Again, this isn’t a lazy miss because being able to choose your model is a feature, but it can eventually become a maintenance chore as well.
You may be wondering “what are these good for?” Imagine you constantly write new regex based on text patterns. You might benefit from the Regex Generator AI command, which tells the LLM the following:
1
Generate a regular expression that match the
2
specific patterns in the text. Return the regular
3
expression in a format that can be easily copied
4
and pasted into a regex-enabled text editor or
5
programming language. Then, give clear and
6
understandable explanations on what the regex is
7
doing and how it is constructed.
8
9
Text: {selection}
10
11
Regex:
Let’s say I have some Markdown links, a subset of which looks like this:
1
## The Links
2
3
-[Hibiscus Tea | Traditional Medicinals](https://www.traditionalmedicinals.com/collections/all/products/hibiscus-tea)
4
-[J-BASKET BANCHA KAWAYANAGI TEA 48/8.00 OZ - JFC International](https://www.jfc.com/product/item/28211)
-[Emperor of the Fading Suns - Wikipedia](https://en.wikipedia.org/wiki/Emperor_of_the_Fading_Suns)
9
-[GOG.com](https://www.gog.com/)
10
-[WineHQ - Run Windows applications on Linux, BSD, Solaris and macOS](https://www.winehq.org/)
11
-[Whisky - Run Modern Windows Games on macOS](https://getwhisky.app/)
12
-[Run Microsoft Windows software on Mac and Linux | CodeWeavers](https://www.codeweavers.com/crossover/)
13
-[Run Windows on Mac with a virtual machine | Parallels Desktop](https://www.parallels.com/products/desktop/)
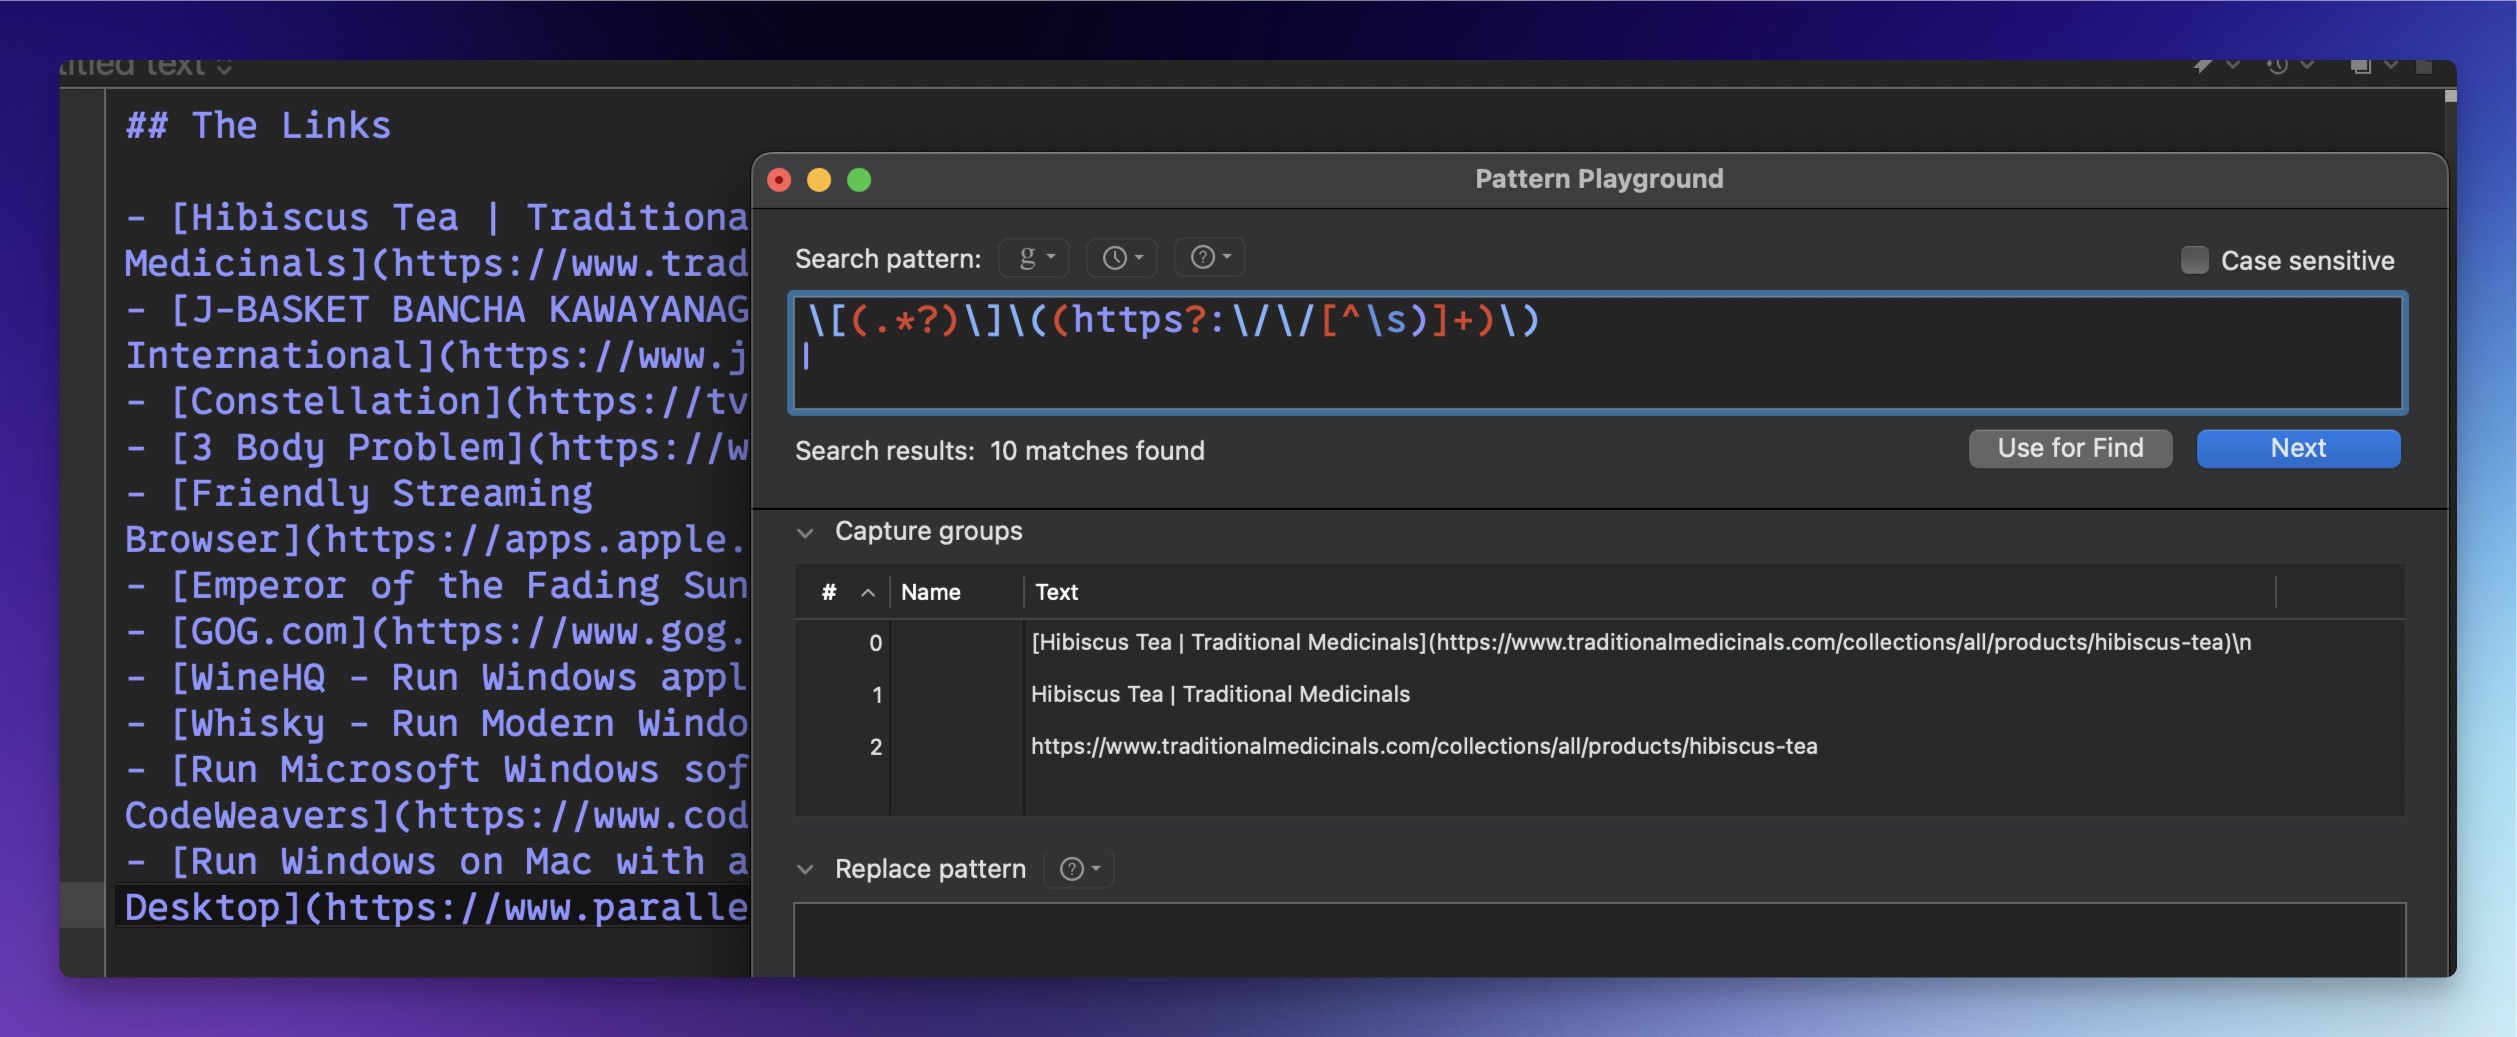
The Regex Generator AI Command comes up with this regular expression:
1
\[(.*?)\]\((https?:\/\/[^\s)]+)\)
Using BBEdit’s Pattern Playground, you can see in the Capture groups section of the window that it captures the entire Markdown link and also the link name as the first capture group and the URL as the second capture group.
It’s not a horrible result given the text I gave it. It makes me want to play with this specific AI command more on various pieces of data such as log files and see what it does.
Anyway, all this to say that there are some advantages that Raycast AI has in how things can be massaged and customized to provide desirable responses, and the way the Raycast developers have made it extendable and customizable by the end users too.
Interesting things are afoot at the company known as OpenAI. Apparently they’re in the Sherlocking business now, and their target is (unintentionally?) Raycast AI. I’m talking about an AI chat triggered by keyboard shortcut, with model selection, conversation history, contextual awareness and screenshot and image analysis, and more.
Sadly, I don’t have access to it yet – OpenAI is rolling it out to people gradually, even for those of us who have ChatGPT Plus.
Matt Birchler has a video overview of it, and I’m only going to pick one nit with Matt – Matt, how’d you manage to get access to it just by signing up as a newbie to ChatGPT Plus, while loyal old me who’s been handing over money for ages still can’t get it?!
My thoughts on this are that Raycast might feel some pain with respect to their $8/mo Advanced AI option at some point. It’s true that Raycast Advanced AI gives you access to several non-OpenAI models, but personally I never use them. Raycast has to keep changing their allowed token limits whenever OpenAI or one of the others makes changes, and sometimes it comes after customers asking why the token limits are still at the old limits instead of following what the AI model providers are currently doing for a given model.
The way I usually use AI in Raycast is absolutely as a replacement for other third party apps like MacGPT, FridayGPT, etc. I use the hotkey (^G in my case) to open the separate AI chat window, which then basically behaves like a separate app with its own sidebar, history of chats, copy and paste, etc, etc. I very rarely use Raycast Quick AI, which is basically typing something in the standard Raycast text input and then hitting tab instead of return to submit it to the LLM of choice. This means that, for me, the OpenAI ChatGPT desktop app could well replace the Raycast Chat app.
The benefit of most 3rd party apps over Raycast AI is that you bring your API key and get all the access you pay for already, whereas Raycast needs to provide their AI integration as a service and having people pay monthly for something they’re also paying for an API key for won’t work… except that’s what most of us using Raycast Advanced AI are probably already doing.
The official ChatGPT desktop app, on the other hand, doesn’t use an API key, but instead uses your ChatGPT Plus subscription. I do pay for this still, in addition to an API key. And while it’s true that the Raycast Advanced AI option costs less than ChatGPT Plus, and it’s also true that it pays for itself for me, it still doesn’t make sense to pay for overlapping services unless there’s a tremendous need to. If I can get all the benefits of the Raycast AI Chat functionality in a desktop app that is included in the cost of my ChatGPT Plus subscription, I very probably will.
Right now I just need to wait for the slow rollout to turn its Eye of Sauron upon me so I can give it a shot and find out for sure.
There I was, checking out Raycast’s updated website and looking at their tips videos, when I stumbled on the tip called Find Images by Text. Although I knew that Raycast would keep copied images in the clipboard history, what I did NOT know is that you can search those images not just by words matching the title, but words matching text IN the image.
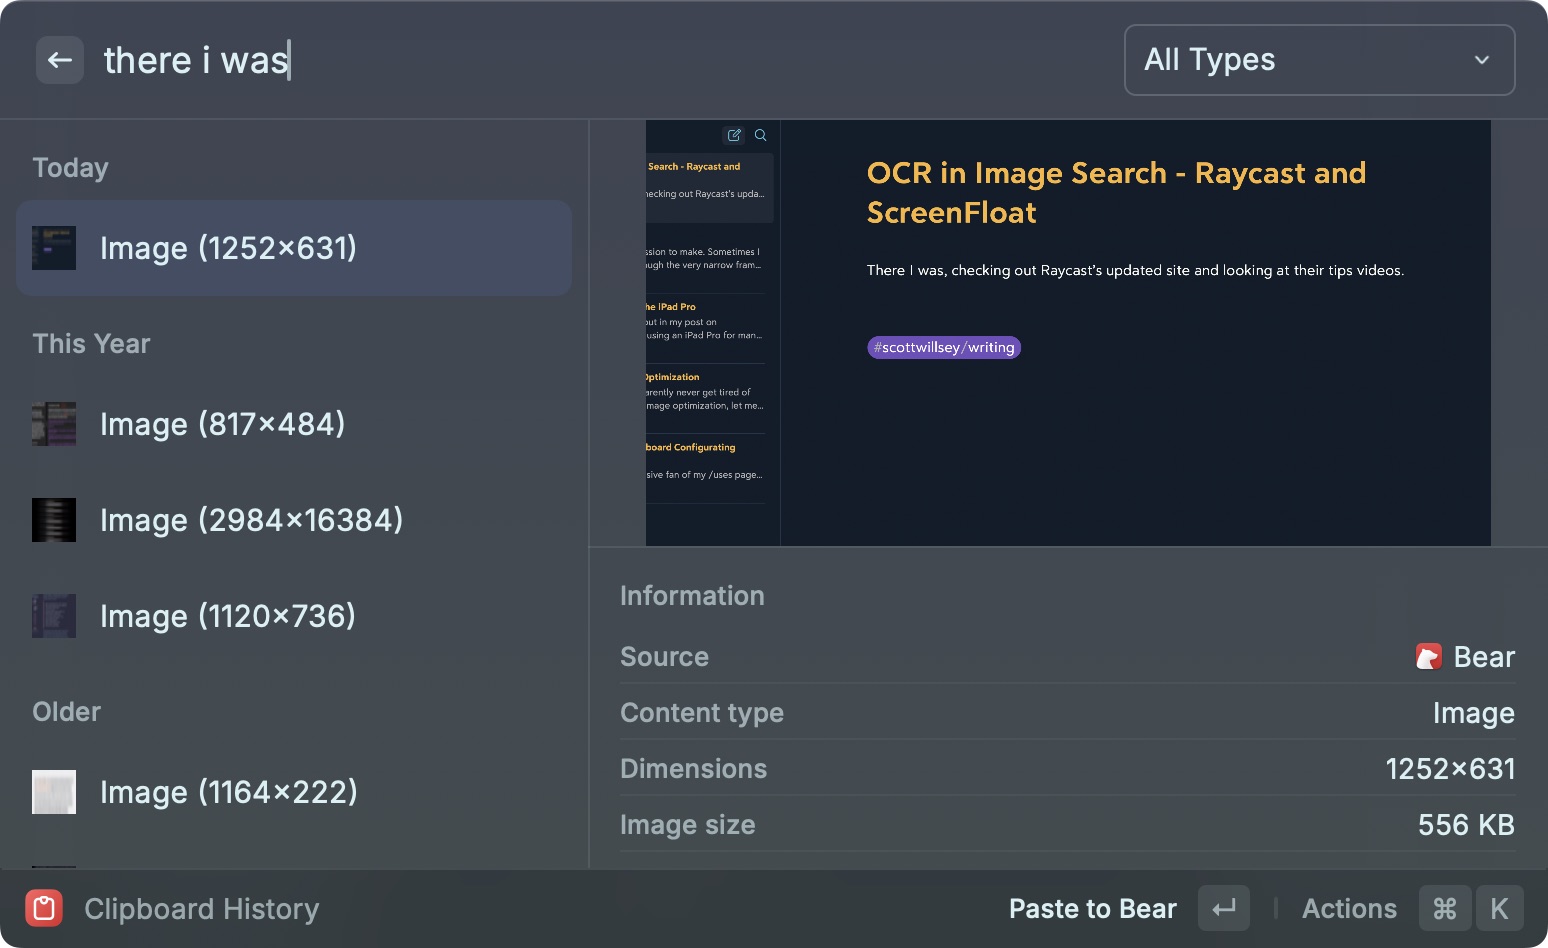
Example: I hit ⌘ Space (that’s Command Space) to invoke Raycast, type ch (my alias for the Clipboard History function), and start typing “there I was”. Look at the results:
The first result is a file called Image (1252x631), which is a screenshot of this blog post when I started writing it, taken with ScreenFloat and copied into the clipboard. Raycast sees the words “there I was” in the image and returns it as a match to my clipboard history search. Pretty cool.
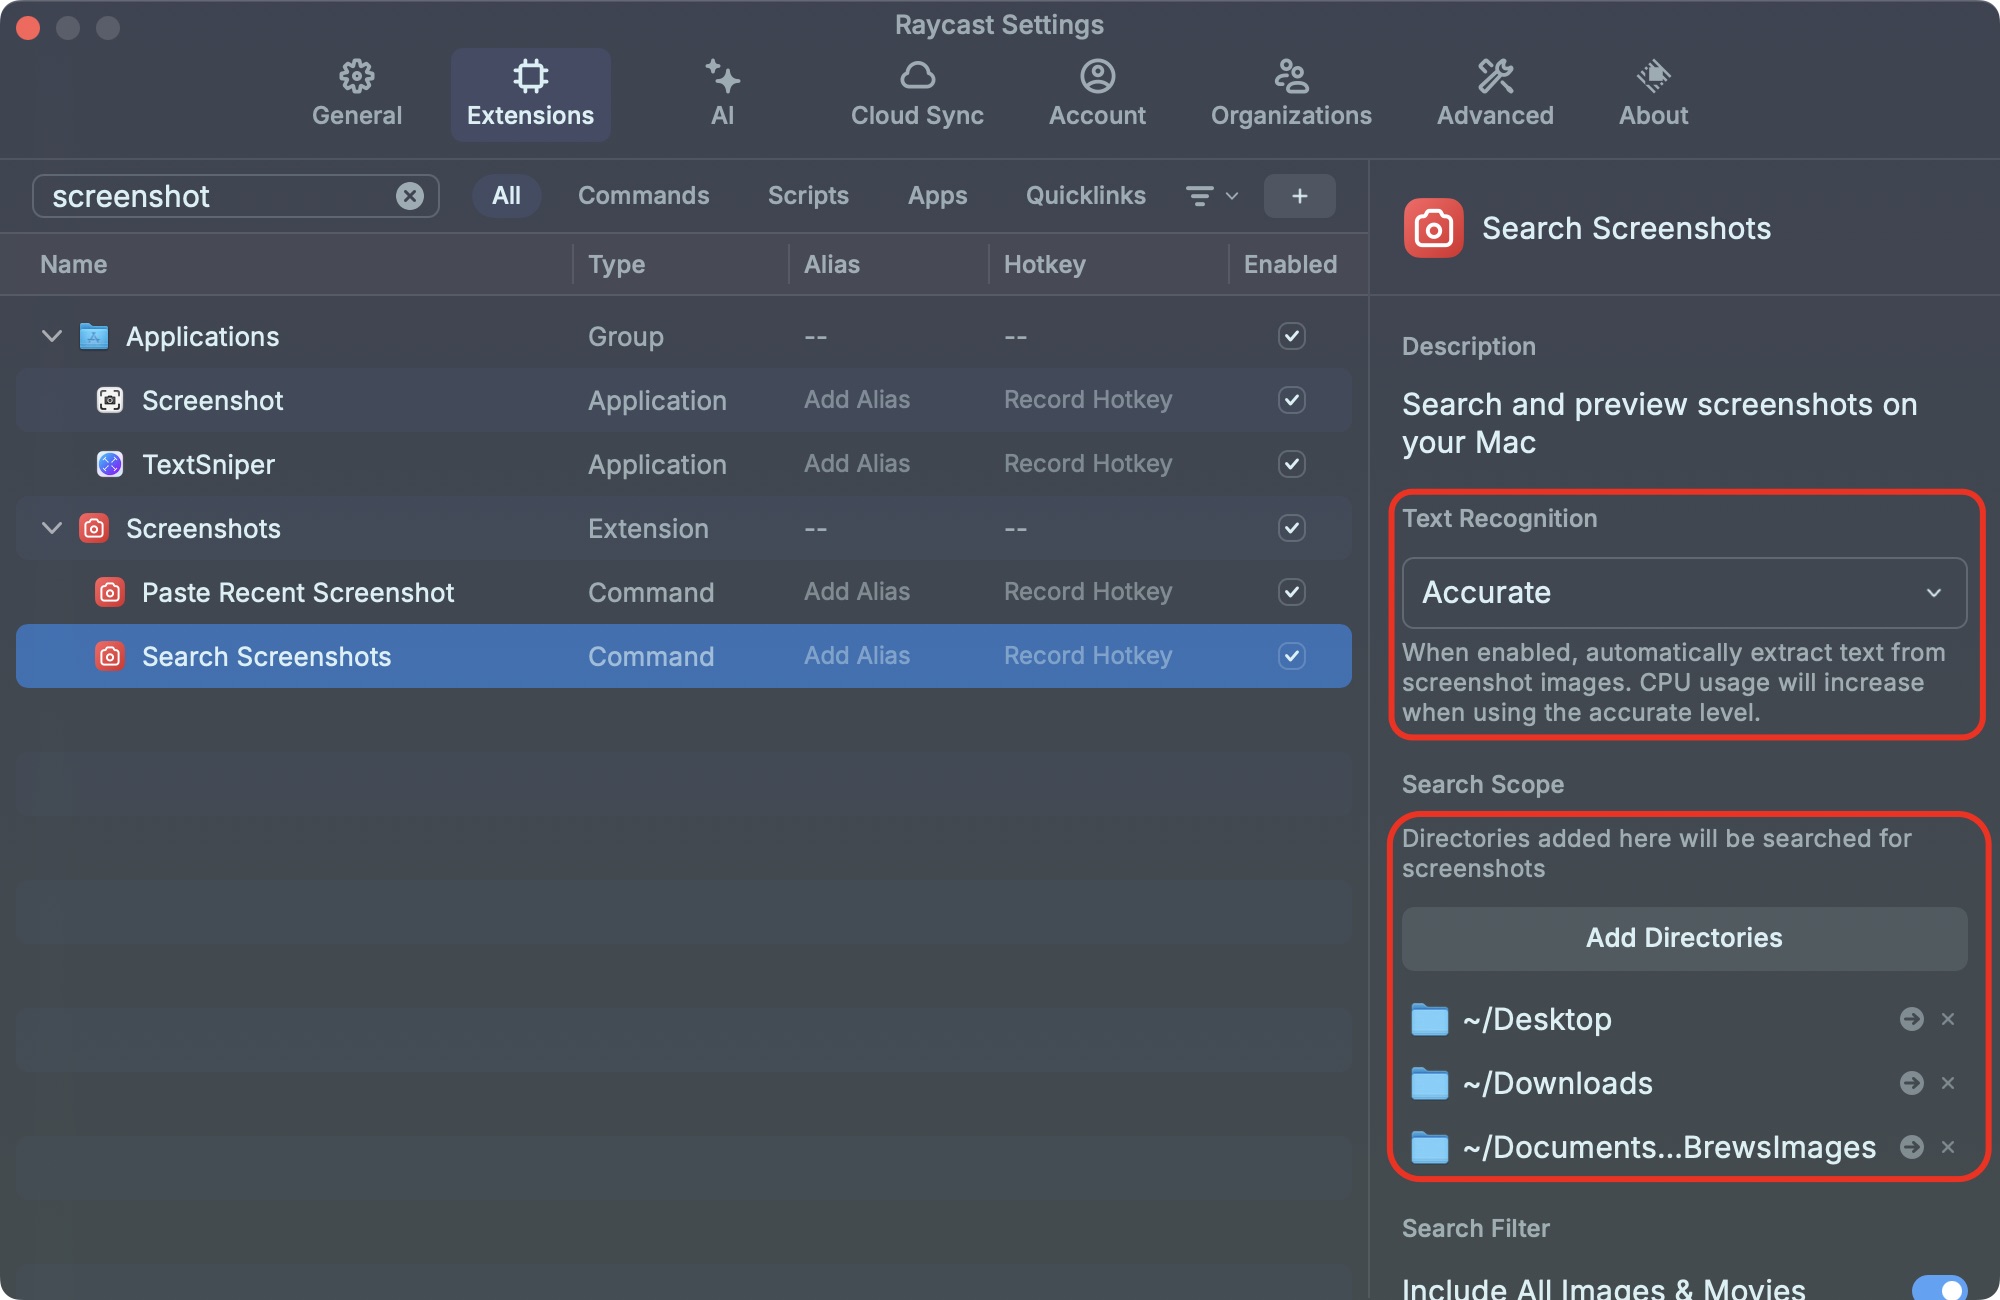
Raycast will also let you designate folders to search for screenshots in, apart from images in clipboard history, and you can apply text recognition to those search as well. Open Raycast Settings by toggling Raycast open and typing ⌘, (that’s Command comma), select Extensions, search for the Search Screenshots command, and then verify that Text Recognition is not disabled but shows one of the accuracy level options instead.
All that Raycast functionality is great, but since I’m using ScreenFloat to take my screenshots, what if I don’t want to have to copy an image into the clipboard or save it in one of those files to find it by text recognition? ScreenFloat has search by text recognition covered too.
ScreenFloat saves screenshots you’ve taken in the Shots Browser. You can open the Shots Browser with your assigned keyboard shortcut (⇧⌘1 in my case), hit ⌘F to start a search, and type the word “float”. The results are anything that has the word “float” in the image name, or anything that has the text “float” in the image itself somewhere.
You can also see from the image above that ScreenFloat names the screenshots with the name of the app that was being screenshotted.1 You can rename images at any time in ScreenFloat, of course.
This is all pretty amazing and handy, and it sure makes finding things on my Mac a lot easier than before I used either of these tools. I love great software like these apps, and I love developing systems that mesh with my brain and that I can use and remember instinctively.
As Peter said when I showed him the ScreenFloat text recognition search, “I really, really, really wish Notion would add OCR.”
TextBuddy is a macOS utility app I love that lets you process text in all sorts of interesting ways. I actually intend to talk about it in detail more some time, or more likely write several posts about it highlighting specific use cases. Today I learned about a feature of TextBuddy called Custom Links that I’d been woefully unaware of.
Custom Links basically applies regular expressions to any text in TextBuddy’s text window and turns matches for any of the regular expressions into clickable links based on your specification.
Huh?
It sounds more confusing than it is. Here’s an example that works perfectly, even if it’s not necessarily the best or only way to solve this problem. But it is a an instance of something that produces unhelpful link fragments that I want to convert to useful, clickable links.
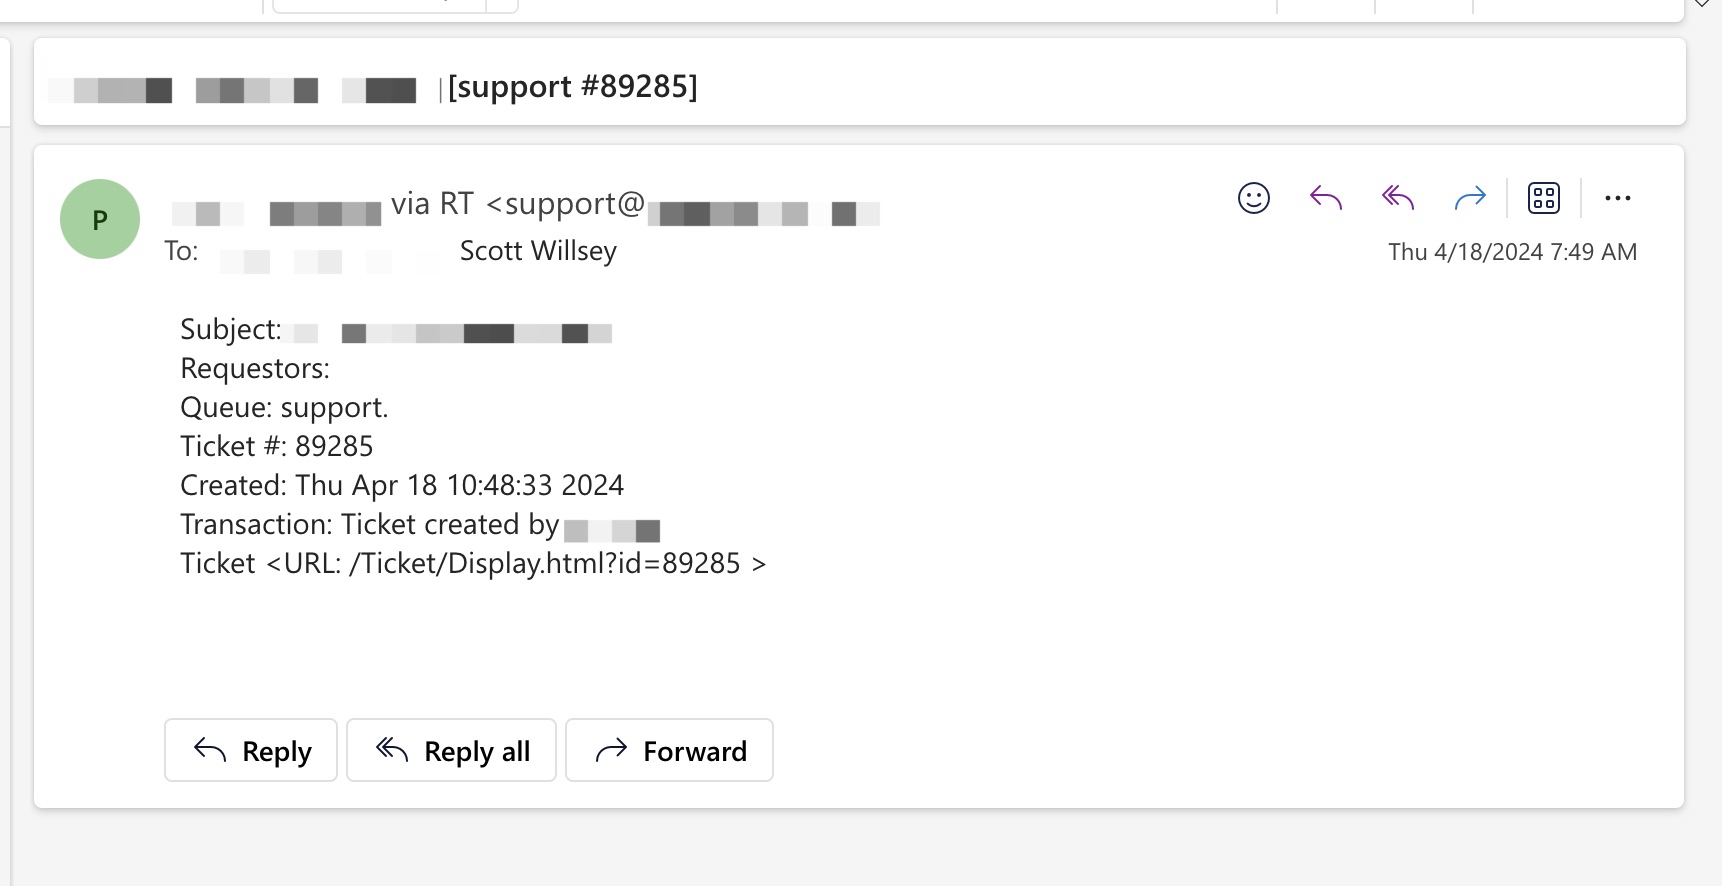
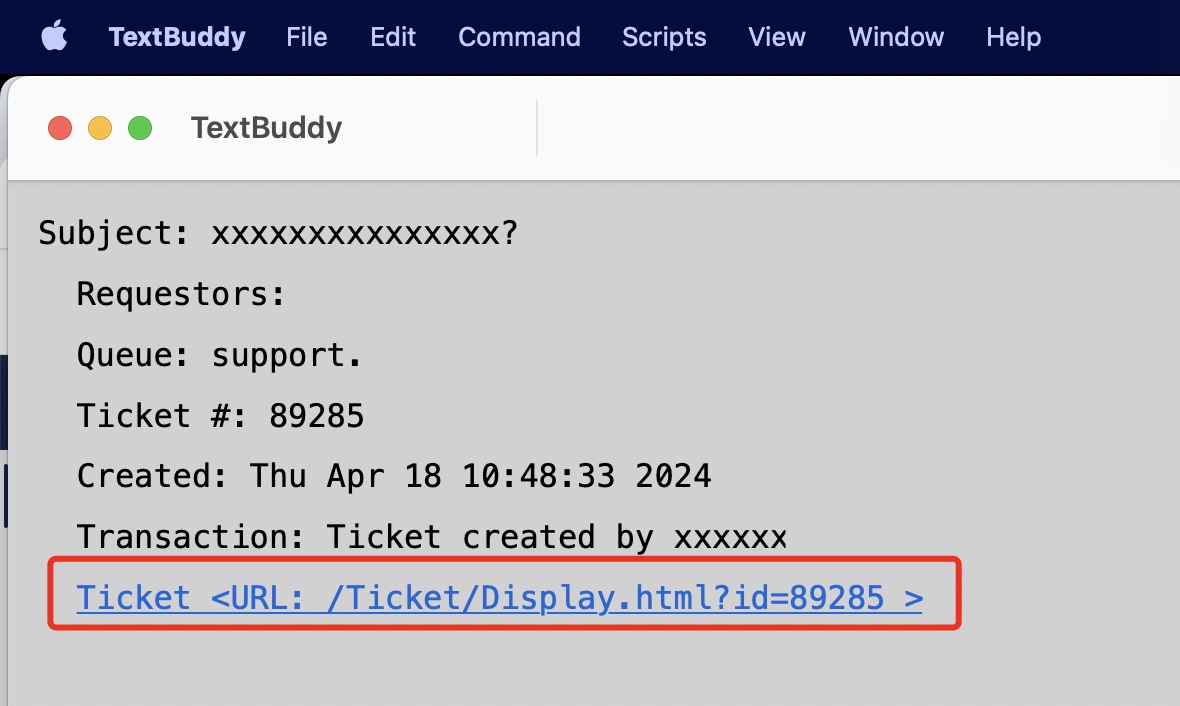
Let’s say you get emails from your ticketing system and they include links to the ticket in question that look like the following:
<URL: /Ticket/Display.html?id=89285 > is not a useful link, but if you add your RT instance’s domain name to it, it can be. That’s where TextBuddy’s Custom Links feature comes in.
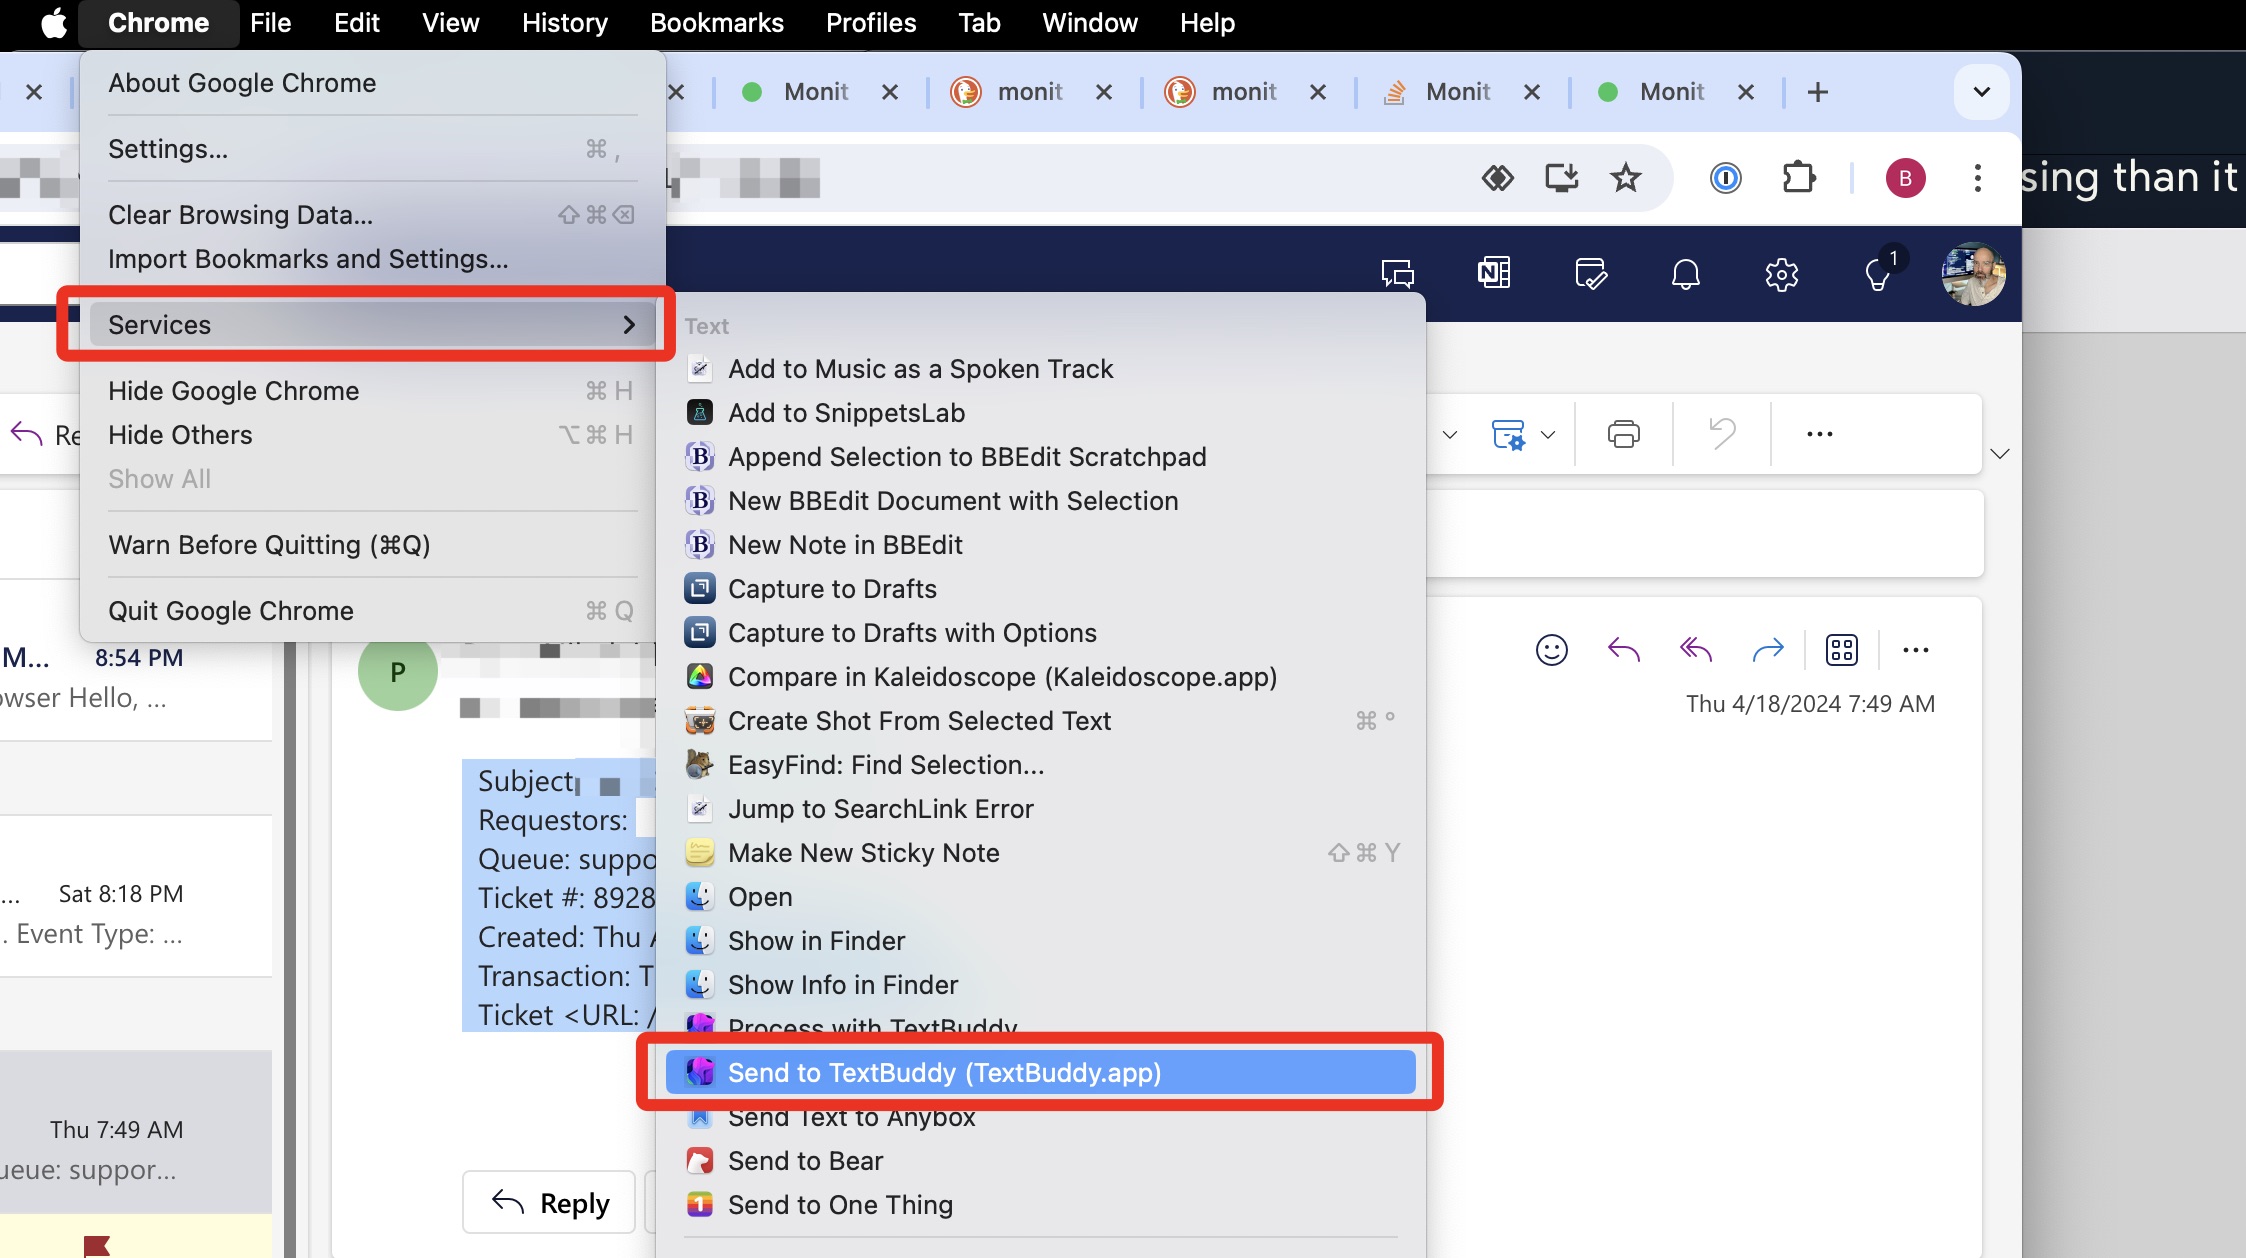
First of all, copying text from any app to TextBuddy is simple – just highlight the text, and choose Services - Send to TextBuddy from the app menu (the menu with the app’s name in it, like Chrome in this case) or right-click the highlighted text and choose Services - Send to TextBuddy.
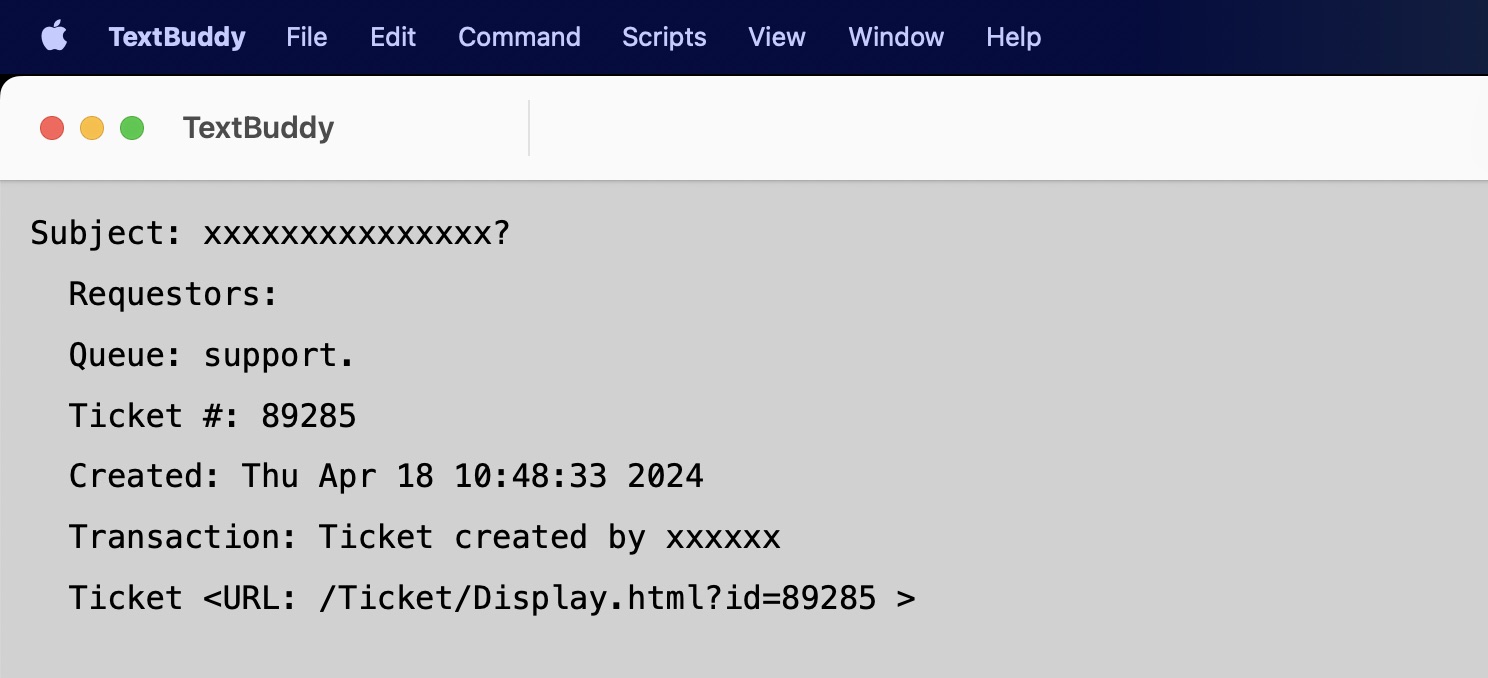
This results in the following text in TextBuddy’s text window in my case.
Yeah, that Ticket URL is still not helpful.
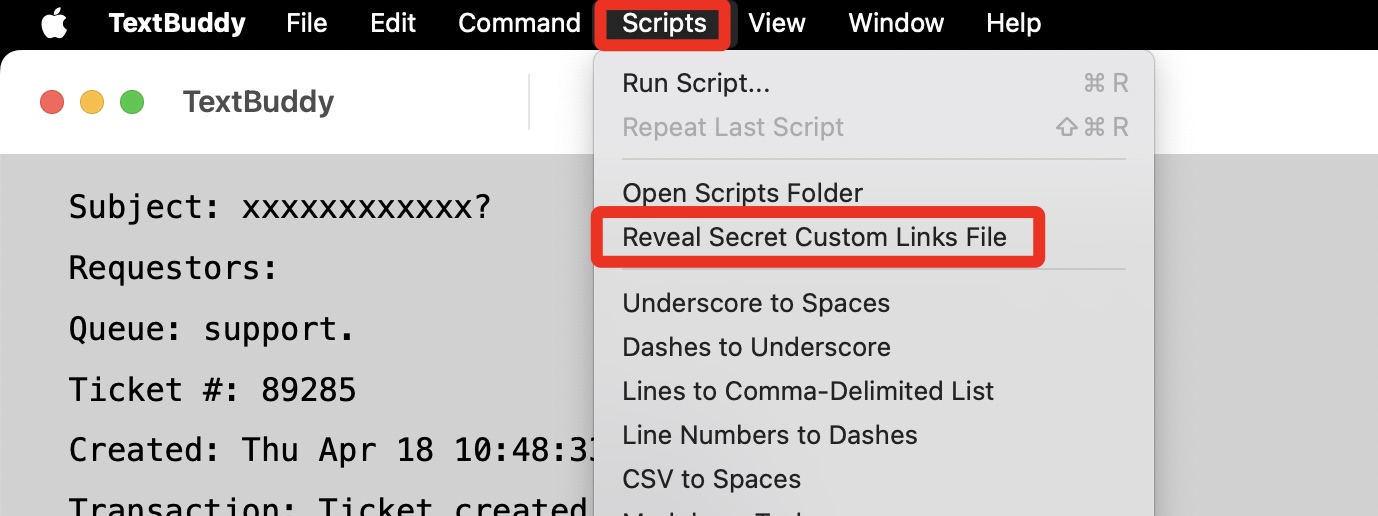
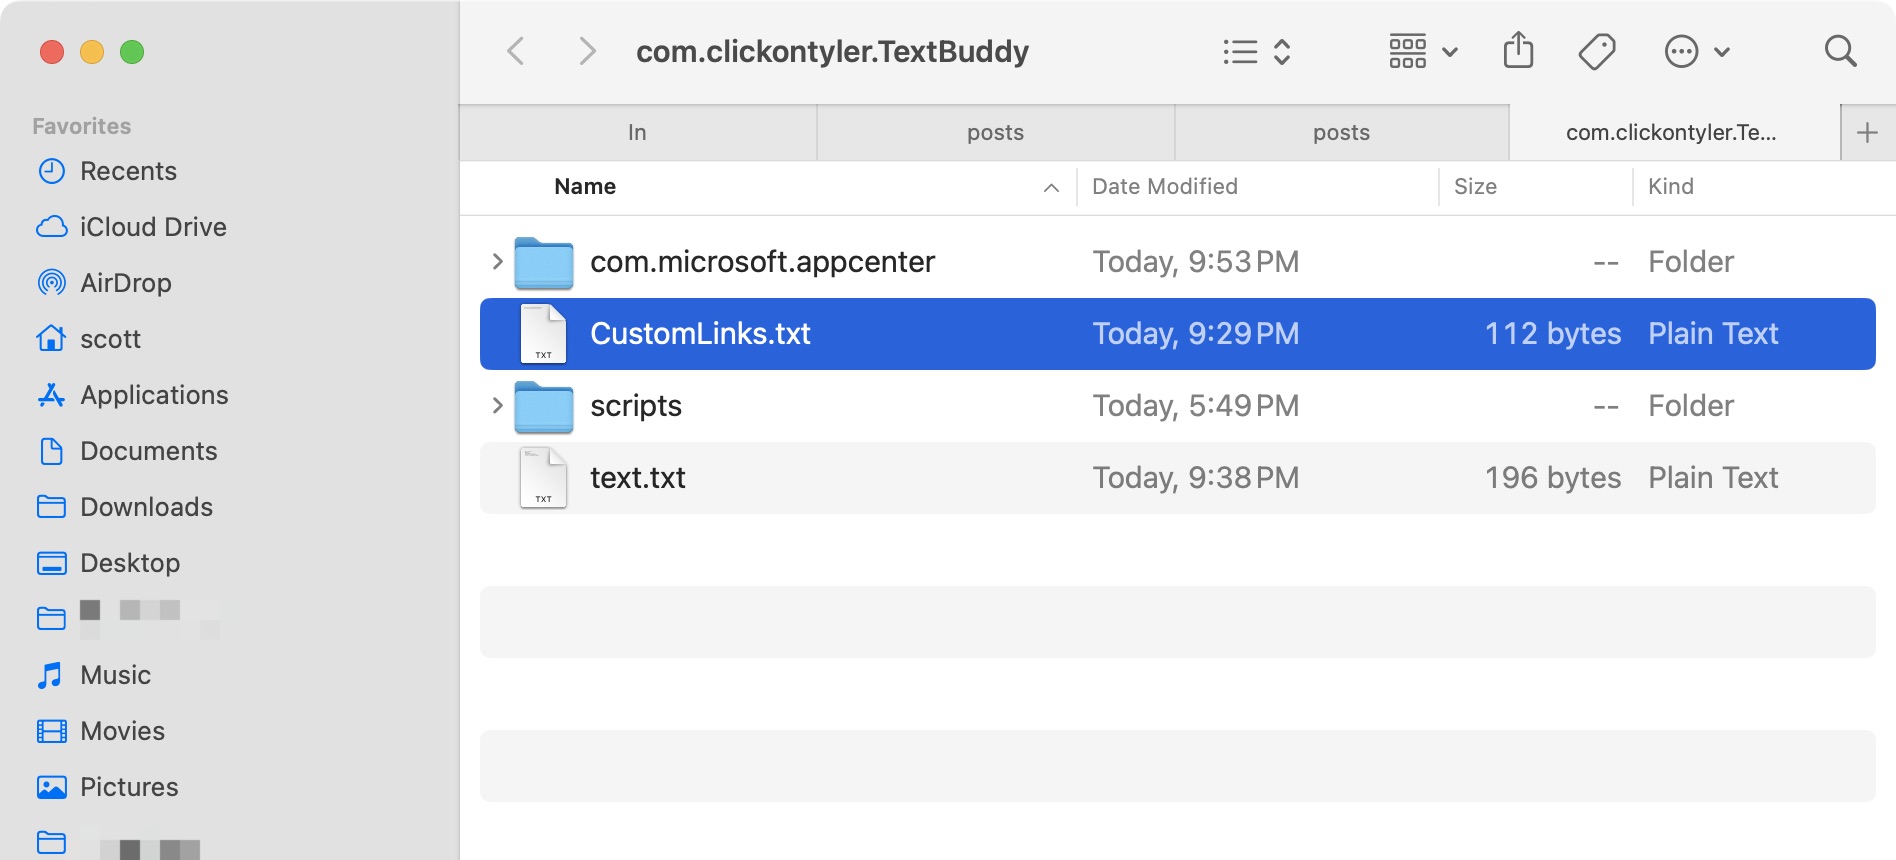
To set up the Custom Link, click the TextBuddy Scripts menu and choose “Reveal Secret Custom Links File”. This opens a finder window to ~/Library/Application Support/com.clickontyler.TextBuddy, revealing a file called CustomLinks.txt.
Open the file in an editor. If you haven’t added anything to it previously, it’ll be empty. This file should contain two lines per Custom Link – the first line for the regular expression and the second line to act as a template for the URL to create for the Custom Link. In my example case, I added the following two lines:
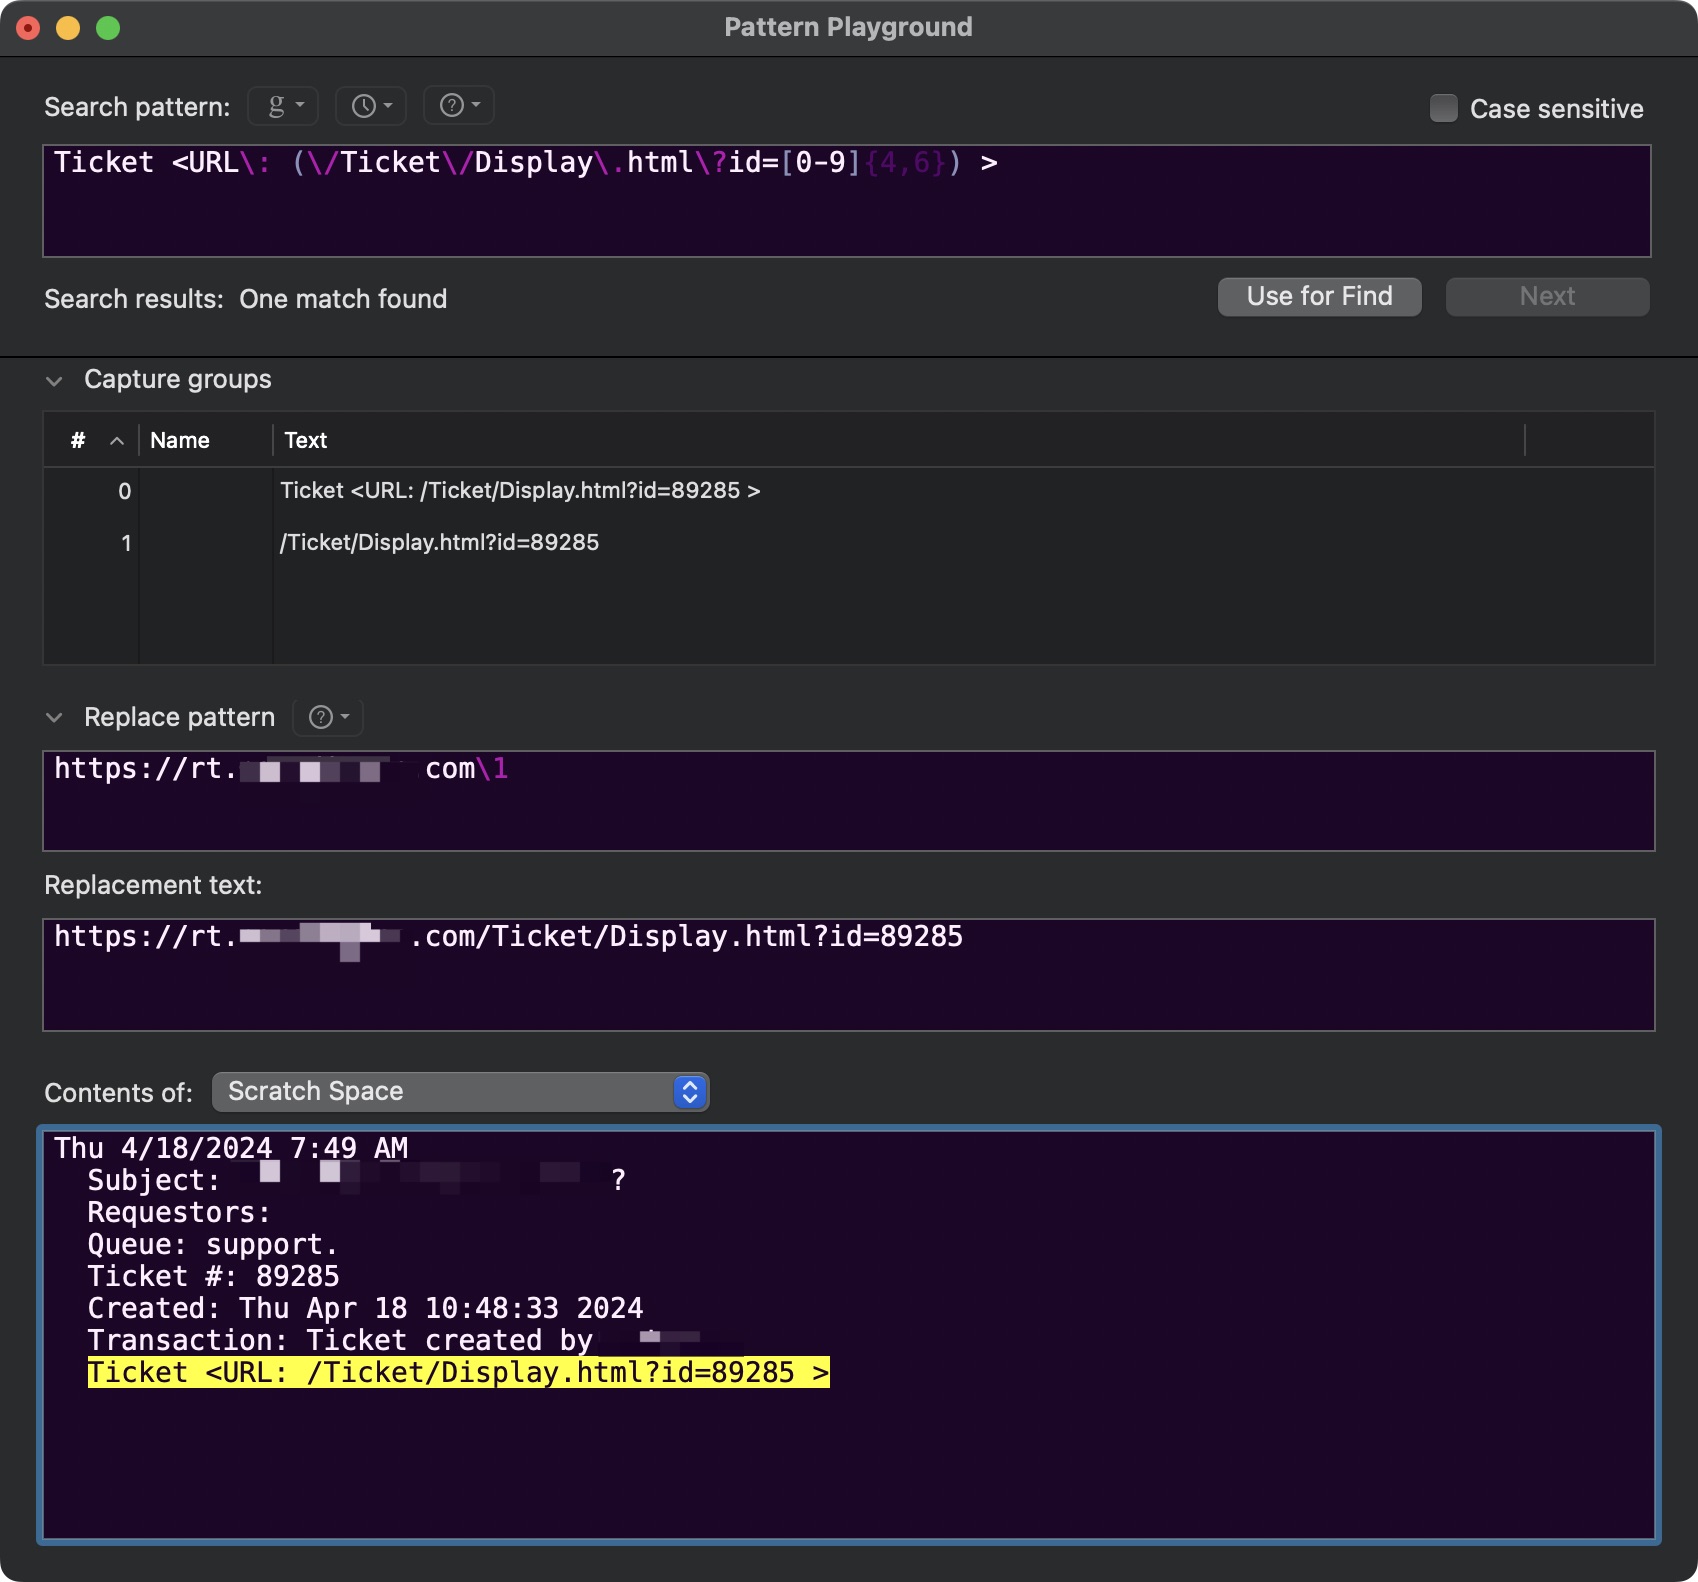
This looks for anything that looks like <URL: /Ticket/Display.html?id=12345 > , where 12345 can be any 4 to 6 digit number, and uses that number to create a URL of https://rt.domain.com/Ticket/Display.html?id=12345 from it.
I guess in retrospect I could have included everything from Ticket through the number in the capture group instead of just the number itself. Then I could have simplified the url template string. That method looks like this:
The change to the regular expression is subtle – I move the first parenthesis for the capture group from right in front of [0-9] to right in front of \/Ticket instead.
Once you have what you want, save the file so that your regular expression and URL template string can go into effect.
Now you can highlight the offending text in your email and choose Services - Send to TextBuddy from your browser’s app menu (the menu with the browser’s name, such as Chrome in this example) to get it into TextBuddy’s text window.
And thanks to the magic of Custom Links, although the link in the copied text LOOKS the same in TextBuddy, it’s now a clickable link with the correct URL as the target.
By the way, I tested my regular expression in BBEdit using its Pattern Playground feature. If you have BBEdit and you haven’t used this yet, you can find it in the File menu under “New - Pattern Playground”, or in the Search menu’s “Pattern Playground” option.
Well, this is a fun one from Adam Douglas. I knew most of these, but a couple are new. And that video? Definitely new to me. 😄
The system uptime can be a useful metric to determine when was the last time a computer or device was booted when paired with an issue or incident. By its self it is not always a vital metric, even though historically some wish to achieve the longest uptime possible. It all depends on the circumstances. No matter what your reasoning might be, let’s take a look at the definition of system uptime, the test environment, assumptions, the various methods used to obtain a GNU/Linux or Unix operating system’s uptime and finally the conclusion with a fun entertaining bonus.
If you’re the kind of person I imagine would find and read this, you’ve read a ton of words already on the concepts of small web, indie web, and personal websites. I’m not going to pretend that my post is the one you have been waiting for on the topic, but I do want to say a couple things about the inspiration I’ve received from some of these people.
I’ve had my own website for years and years in various incarnations. No one ever reads it, to the best of my knowledge, and (like my podcasts) I’m kind of shouting into the void. But I don’t care, and here’s why:
I love the indie web. I love the modern take on personal websites. They are about linking and sharing and going down rabbit holes in a way that the way USED to be about, but now with modern design and personal touches of whimsy. In a way, as terrible as the mainstream web has become, infected with an almost certainly incurable cancer of advertising-driven enshiteification (sic), the indie web, the small web, the personal web is better than ever. And it makes the internet better than ever too, if you just focus your attention.
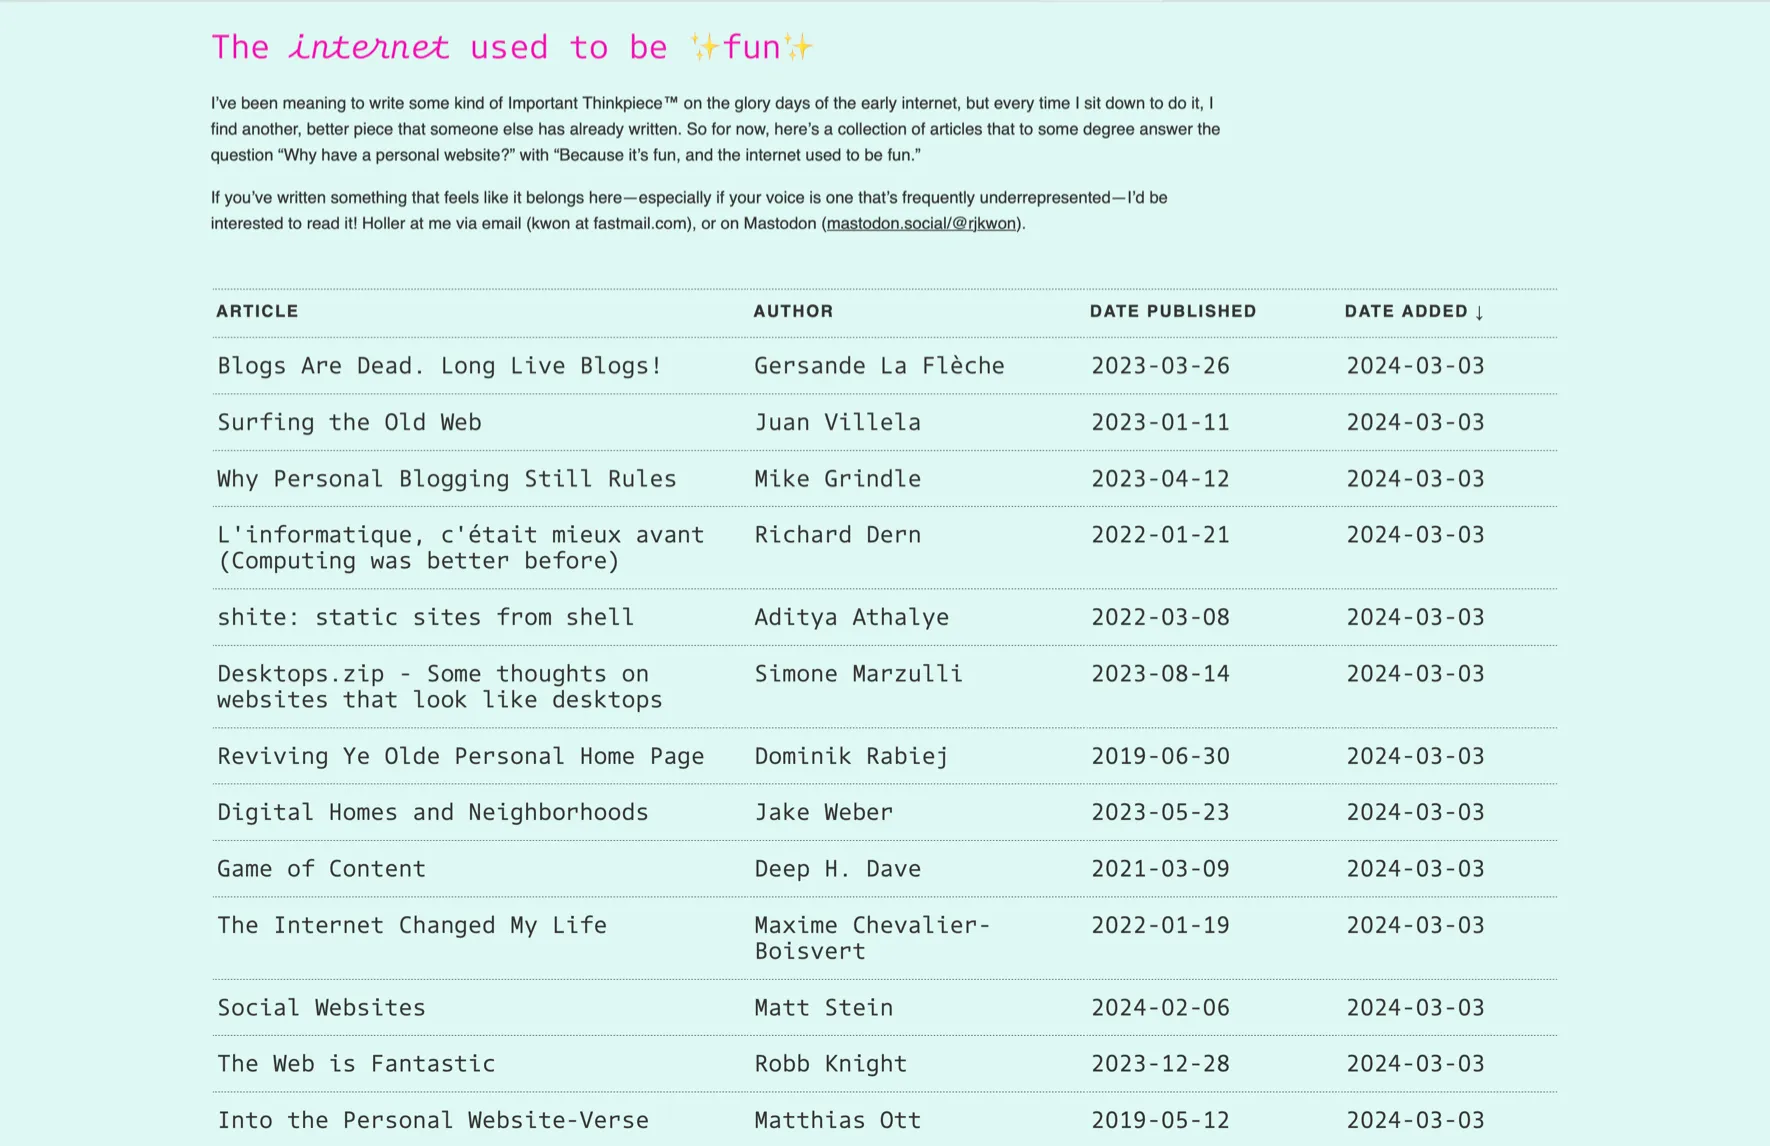
Nowhere is this better presented than Rachel’s The internet used to be fun project, which I’ve spotlighted in my current Cool Site Spotlight on my Links page. In case you’re a doubter, or you just haven’t noticed yet that many good people are actively trying to bring back the soul of the internet, Rachel’s got link after link of smart person after smart person talking about this trend and its importance.
And it is important, dammit. The web doesn’t have to be total garbage. The people that have ruined everything with advertising technology that makes the web impossible to read and allows bad actors to stuff it full of malware don’t care about you, and it’s time to stop caring about them. To hell with them and the dumb billion dollar horsey they rode in on. It’s time to focus on the good and @#$@ those other guys and their terrible way of making a living.1
Anyway, here’s to Rachel and here’s to all the sites she links to. Let’s all link to them, and let’s all link to each other.
Footnotes
I want to make it VERY clear that I wholly support and endorse small sites and podcasts that also make a living with sponsors, but who don’t employ user-hostile ad technology. I’m talking about the Six Colors and MacStories and Daring Fireballs of the world, stuff like that . Things you know with sponsors that don’t piss you off every time you visit them. ↩
Did you know my Links page has an ever-changing Cool Site Spotlight? I’ve mentioned it tangentially before, but I want to mention both it and my Links page specifically now because I think both are pretty cool.
I started my Links page in January of 2024 with the intention of making it a blogroll, but it’s much more than that now. For one thing, right at the top is a Cool Site Spotlight highlighting one site I’ve stumbled across that I think is unusually neat. I rotate entries out into the Cool Sites Archive section of the Links page as I highlight a new one.
Not only does this keep me interested and looking around me, it should serve as a good idea and interest generator for my readers too.
If the web is ever going to be cool again, this is how it starts: finding and linking to things that make it a better place.