At some point, sanitize-html started breaking when htmlparser2 was updated (and sanitize-html apparently wasn’t). I started getting the following compilation error:
My temporary solution was to pin htmlparser2 to version 8, which I didn’t love, especially since I have multiple Astro sites, and since it would be hard to know when an update would fix the issue.
However, after this problem persisted for awhile, I started wondering what was going on. Surely it must be affecting other people making Astro sites too, but I didn’t see any mention of it at all in the Astro Discord. I posted a question about it and got crickets until today, when a contributor named Armand responded with several helpful bits of information.
He went on to test my issue and pointed out that my code was calling the async function post.compiledContent() without await, and this was breaking htmlparser2 as it received a Promise object from sanitize-html, which was passing it on after receiving it from me:
I’m not 100% sure why this wasn’t breaking in htmlparser2 8.0 and prior, but in fact it WAS resulting in the expected content not being output at all. Instead, where the full-text content should have been for each post in the RSS feed, was an empty <content:encoded /> tag. So the fact that I was not awaiting the return result of the async post.compiledContent() already WAS causing me issues, and I hadn’t even noticed.
At any rate, by the time he informed me of how stupid I was (he didn’t phrase it that way, but I am), I’d already implemented ultrahtml and moved on.
The bottom line is, if you are doing full-text RSS feeds in Astro and you do use sanitize-html or ultrahtml, don’t be like me and send a Promise to things that want the Promise’s returned object instead.
I clearly need a change in 2026. It’s obvious no one cares about any of the things I write here, which is fine. It’s also clear that I don’t care about a lot of them anymore either, which is also fine. So the question is, what should I write about on this blog that I will continue to care about and that other people might care about too?
I think 2026 is going to be the year of honesty. That doesn’t mean I’ve been dishonest, far from it. It just means that I’m going to focus on things that actually matter to me on this site, in terms of technology, rather than coming up with topics that I think I should write about for some reason. Clear as mud, right?
This site has, in recent years, been solely focused on my use of technology, mainly Mac and web related. I doubt that’s going to change much. I don’t want to write about personal stuff or politics or Tonkatsu recipes here (even though writing about Tonkatsu recipes really is a winner in any situation). I think what I need to do is quit trying to write series about topics, like replacing Raycast with Spotlight, and write more one-offs. When I do write follow-up articles, I’ll try to handle it differently than making big official series of articles.
In fact, I’ve quietly rid the site of lists of series and all post frontmatter referring to series. It’s gone. I don’t need it. YOU don’t need it.
Maybe it’ll turn out I still have nothing of interest to say, and you still don’t care, and then I’ll just quietly quit posting and no one will notice or care. I don’t know. But mainly I think I need to figure out what I really enjoy writing about, in terms of technology,1 and do that.
Look, a new face! No, not mine, unfortunately for those who know me in person. The SITE HAS A NEW FACE!! It’s new. It’s all new. Or as Peter would say, “It’s the same. Exactly the same.”
It is much the same, but huge chunks of the layout have been reworked, the fonts are different, the colors are different, and I like it much better.
Below are some of the highlights.
Tailwind CSS
I spent a long time hating Tailwind CSS just for existing. It was one of those irrational tech biases and I kind of knew it. I didn’t know how just how much it was irrational though, until I took an example photo gallery that used tailwind and modified it for my Photos site.
What. A revelation.
Tailwind is nice. It’s so much easier to fix responsive layout issues, tweak things quickly, not get lost in huge global css files (although I still do have more in global.css than I expected).
Sidebar
I went from a single column view on all pages to having a sidebar again. The sidebar is more useful this time, including search and several good links, and it flows to the bottom of the page in responsive layout views. Along with this, I went to a wider max-width for the page since, let’s face it, we who care about our sanity and enjoyment of life all have high resolution monitors.
Speaking of typography, I got rid of the icons-only site menu. For one thing, the icons weren’t cohesive and I wound up simply not liking their look very much. For another thing, they do require work on the part of the visitor to decipher them, and that’s no fun. Now I use icons much more sparingly, and only as a visual garnish – no thinking required.
Enjoy
I hope you enjoy the look. I really enjoyed working on it. I am not a designer by any stretch, but I’m also an indieweb advocate and participant, and I think part of the charm of the indieweb is the non-corporate look of people’s personal sites. Long live the silly and unprofessional!
The Goal – Replacing Raycast with Spotlight and Companion Utilities
In Part 1 of this series on replacing Raycast with Spotlight, I explained that macOS Tahoe’s greatly enhanced Spotlight led me to replace Raycast with Spotlight plus a few additional apps and utilities. Raycast purists might be shouting already, thinking I’ve lost both my mind and the challenge, since this approach requires running more apps than sticking with Raycast.
Fair enough. But should I care? More important than having everything in one giant app is the user experience and the ultimate results. With that in mind, I will tackle this journey one use case at a time, comparing what I used under Raycast with what I use now for the specific need. This time, we’re tackling Snippets.
Raycast Snippets
I’m not going to lie, I wish Raycast would decide what they want to call their Text Expander: Snippet Management for Mac feature. Usually it’s referred to as “Snippets”, but on their website, they call it “Text Expander Snippet Management for Mac”, “Text Expander Snippet Extension”, and just plain “Snippets”.
I’m calling it Snippets. Screw those guys and their inability to pick one. 😄
Basically, Snippets are what they sound like: stored snippets of text. You can look up snippets in Raycast itself, or trigger them inline in your document by using keywords you can specify per snippet.
Raycast Snippets is really nice in the sense that it’s built into Raycast. They have a couple nice tutorials on YouTubefor using the feature, focusing on the ability to trigger them inline without having to open Raycast at all (just like a proper, uh, Text Expander tool.)1
Snippets in Raycast has some very nice features. Dynamic Placeholders are quite versatile and very powerful once you’ve thought through some use cases. They’re great for inserting the current date, placing the cursor wherever you want in the pasted text in the target document, or grabbing selected text from the foremost app and putting that inline in the snippet output. You can even include a snippet inside another snippet.
Thanks to its feature set, I figured that replacing Raycast Snippets would not be easy. Fortunately, someone else needed advanced snippets too, and they knew how to program.
Snippety for Mac and iOS
After looking at a few other options I won’t list here, I stumbled across an app I’d never heard of (and chances are you haven’t either). It’s called Snippety - Productivity App for macOS.
Snippety is powerful. It can do scripts. It can do inline text expansion. It can do automation-based text expansions. And it can do collaboration, with nothing stored anywhere except in iCloud.
Basic UI
Snippety operates on the “appear by triggering a keyboard shortcut” method in its most basic form. ⇧⌘␣ (Shift-Command-Space) pops Snippety open to show its various folders and snippets.
The folders on the left are optional categorization folders that you can create, delete, and edit. You can narrow a snippet search by selecting a folder to only return matching results from that folder. You can also use ⌘-1 through ⌘-9 to choose any of the first nine of them.
Snippet Use
Once you’ve found the snippet you want, you can highlight it and hit return and it will enter the snippet wherever the cursor is on whatever app you were using when you triggered Snippety to open.
Popping Snippety open and inserting things this way is great, but you can also use it as a text expander. Snippety lets you set a key for any snippet, which is a great way to search for them in the Snippety UI, but also works as a text expansion trigger when combined with whatever character you have set as the text expansion trigger in Snippety Settings.
Below you can see that I have a date snippet called Date YYYYMMDD which generates a datestamp for me with today’s date in the year month date format like this: 20251101. That’s 2025, month 11, day 1 (it is indeed the 1st of November, 2025, as I write this.) You can also see that I have a key set for it which is the word “dates” (standing for date short).
Because I have my Snippet Expander Trigger character set to be a preceding ”!” character, now whenever I type the string “!dates”, it expands out into today’s date written as YYYYMMDD. I used it above to show the output of today’s date written this way, which is 20251101. There, I just used it again!
Scripts
Ok, this is all great, but so far none of this does anything Raycast Snippets can’t do. That wouldn’t bother me, because the goal here is to replace Raycast with Spotlight and any macOS utility apps needed to give me equivalent capabilities. But in fact Snippety does go further.
In Snippety, you can run command line commands that run the command and give you the output as the snippet. For example, I have a snippet called “Transform URL to exceptions RegEx” which I use when I want to take a URL I’m given by someone and convert it into a specific regular expression that I put in a firewall block exceptions list. You can see the big long command in the snippet below:
Basically it takes whatever text you have selected in the foreground app and runs a Perl one-liner on it. The one-liner is a substitute expression. It takes the input url in the form https://scottwillsey.com and outputs the string ^https?://([A-Za-z0-9.-]*\.)?scottwillsey\.com, which is a regular expression I can use to add to a specific firewall’s exceptions list. Since I think everyone should have the ability to read scottwillsey.com all the time, I think this is a good thing to do.
Because it relies on having an existing text selection highlighted, I can’t use a text expansion, but I can select my URL, hit ⇧⌘␣ (Shift-Command-Space) to open Snippety, start typing the Transu2Reg key, and hit return on the snippet to transform my URL into the regular expression I want.
Conclusion
There are some idiosyncrasies to the Snippety UI that are minor annoyances to me, such as the fact that the UI isn’t really meant to remain open but still needs to be used to configure settings and manage snippets and folders, but those are minor. Overall I find Snippety to be an upgrade on Raycast’s Snippets feature, even if it does take a slightly different way of thinking to make best use of it.
Check it out at https://snippety.app if you’re in the market for a good snippet and text expander app, whether you’re coming from Raycast or not. I think you’ll wonder why no one is really talking about this app.
Footnotes
Total sideshow here, but holy cow how far the original has TextExpander fallen. I’m not even going to do it the favor of linking to it. You can take the time if you’re really that bored. ↩
The Goal – Replacing Raycast with Spotlight and Companion Utilities
In Part 1 of this series on replacing Raycast with Spotlight, I explained that macOS Tahoe’s greatly enhanced Spotlight led me to replace Raycast with Spotlight plus a few additional apps and utilities. Raycast purists might be shouting already, thinking I’ve lost both my mind and the challenge, since this approach requires more apps than sticking with Raycast.
Fair enough. But should I care? More important than having everything in one giant app is the user experience and the ultimate results. With that in mind, I will tackle this journey one use case at a time, comparing what I used under Raycast with what I use now for the specific need. First up: AI. Right up front I’ll just say that if AI is your main concern, I’m not going to convince you to get rid of Raycast with anything I say here.
Raycast AI
Models
I already know that Raycast AI alone is a factor that will deter many from leaving Raycast in favor of Spotlight. Raycast emphasizes AI integration, whereas Spotlight has zero AI integration whatsoever. If you decide not to use Raycast in favor of Spotlight, you will be looking for AI app and integration options. There are both advantages and disadvantages to this, which I will cover later.
With the free Raycast plan, you get 50 AI messages per month. The $8/mo Raycast Pro unlocks many more models from various providers and increases token quotas (though I can’t tell what the exact limit is). There’s also an Advanced AI add-on to Raycast Pro for another $8/mo (totaling $16/mo), which provides access to the best recent models from multiple providers.
If you want to use a wide variety of models from multiple vendors, you’re unlikely to switch to Spotlight plus a separate AI solution, since you’d have to subscribe to multiple model providers or APIs. There’s also value in spending $192 per year to access that breadth of models and capabilities.
Integration
Beyond model access, Raycast integrates AI right into its own UI. Quick AI can be invoked inline in Raycast, enabling rapid questions and answers. QuickAI can search the web, and you can also save and execute chat presets.
Furthermore, Raycast has an AI chat app that looks a lot like the ChatGPT or Claude Mac apps. It has chat history, model selection, and you can even switch models in the middle of a chat. It’s very well done.
Extensions and MCP
One area where third-party LLM integrators have often been ahead of companies like OpenAI and Anthropic is in extensions, MCP, and other methods for enabling integrations with services and local apps and utilities. Raycast is no exception.
Raycast lets you use extensions that are updated to work with AI simply by @ mentioning them. Their AI page provides an example: stating “@calendar block my day from 4 pm” to have Raycast AI update my calendar using the Raycast calendar extension. That’s very powerful, and presumably the number of Raycast extensions configured to work with Raycast AI will continue to grow.
Even more powerful is Raycast’s integration with MCP servers. Honestly, just typing this out makes me realize how big of a loss it would be to many people to have to dump Raycast AI. While there are likely hiccups with its MCP integration, MCP in general is fiddly, so it’s no worse than setting up MCP with Claude, and much better than setting it up with a ChatGPT account. The current state of Raycast AI is a big win for Raycast.
Caveats
There are some aspects of Raycast AI that I’m not a huge fan of. One stems from my aversion to constantly managing models. Some people enjoy choosing a different model for every task and comparing them ad nauseam. I don’t. I just want to get stuff done, and if a model can’t do the things I actually use LLMs for, I won’t use it.
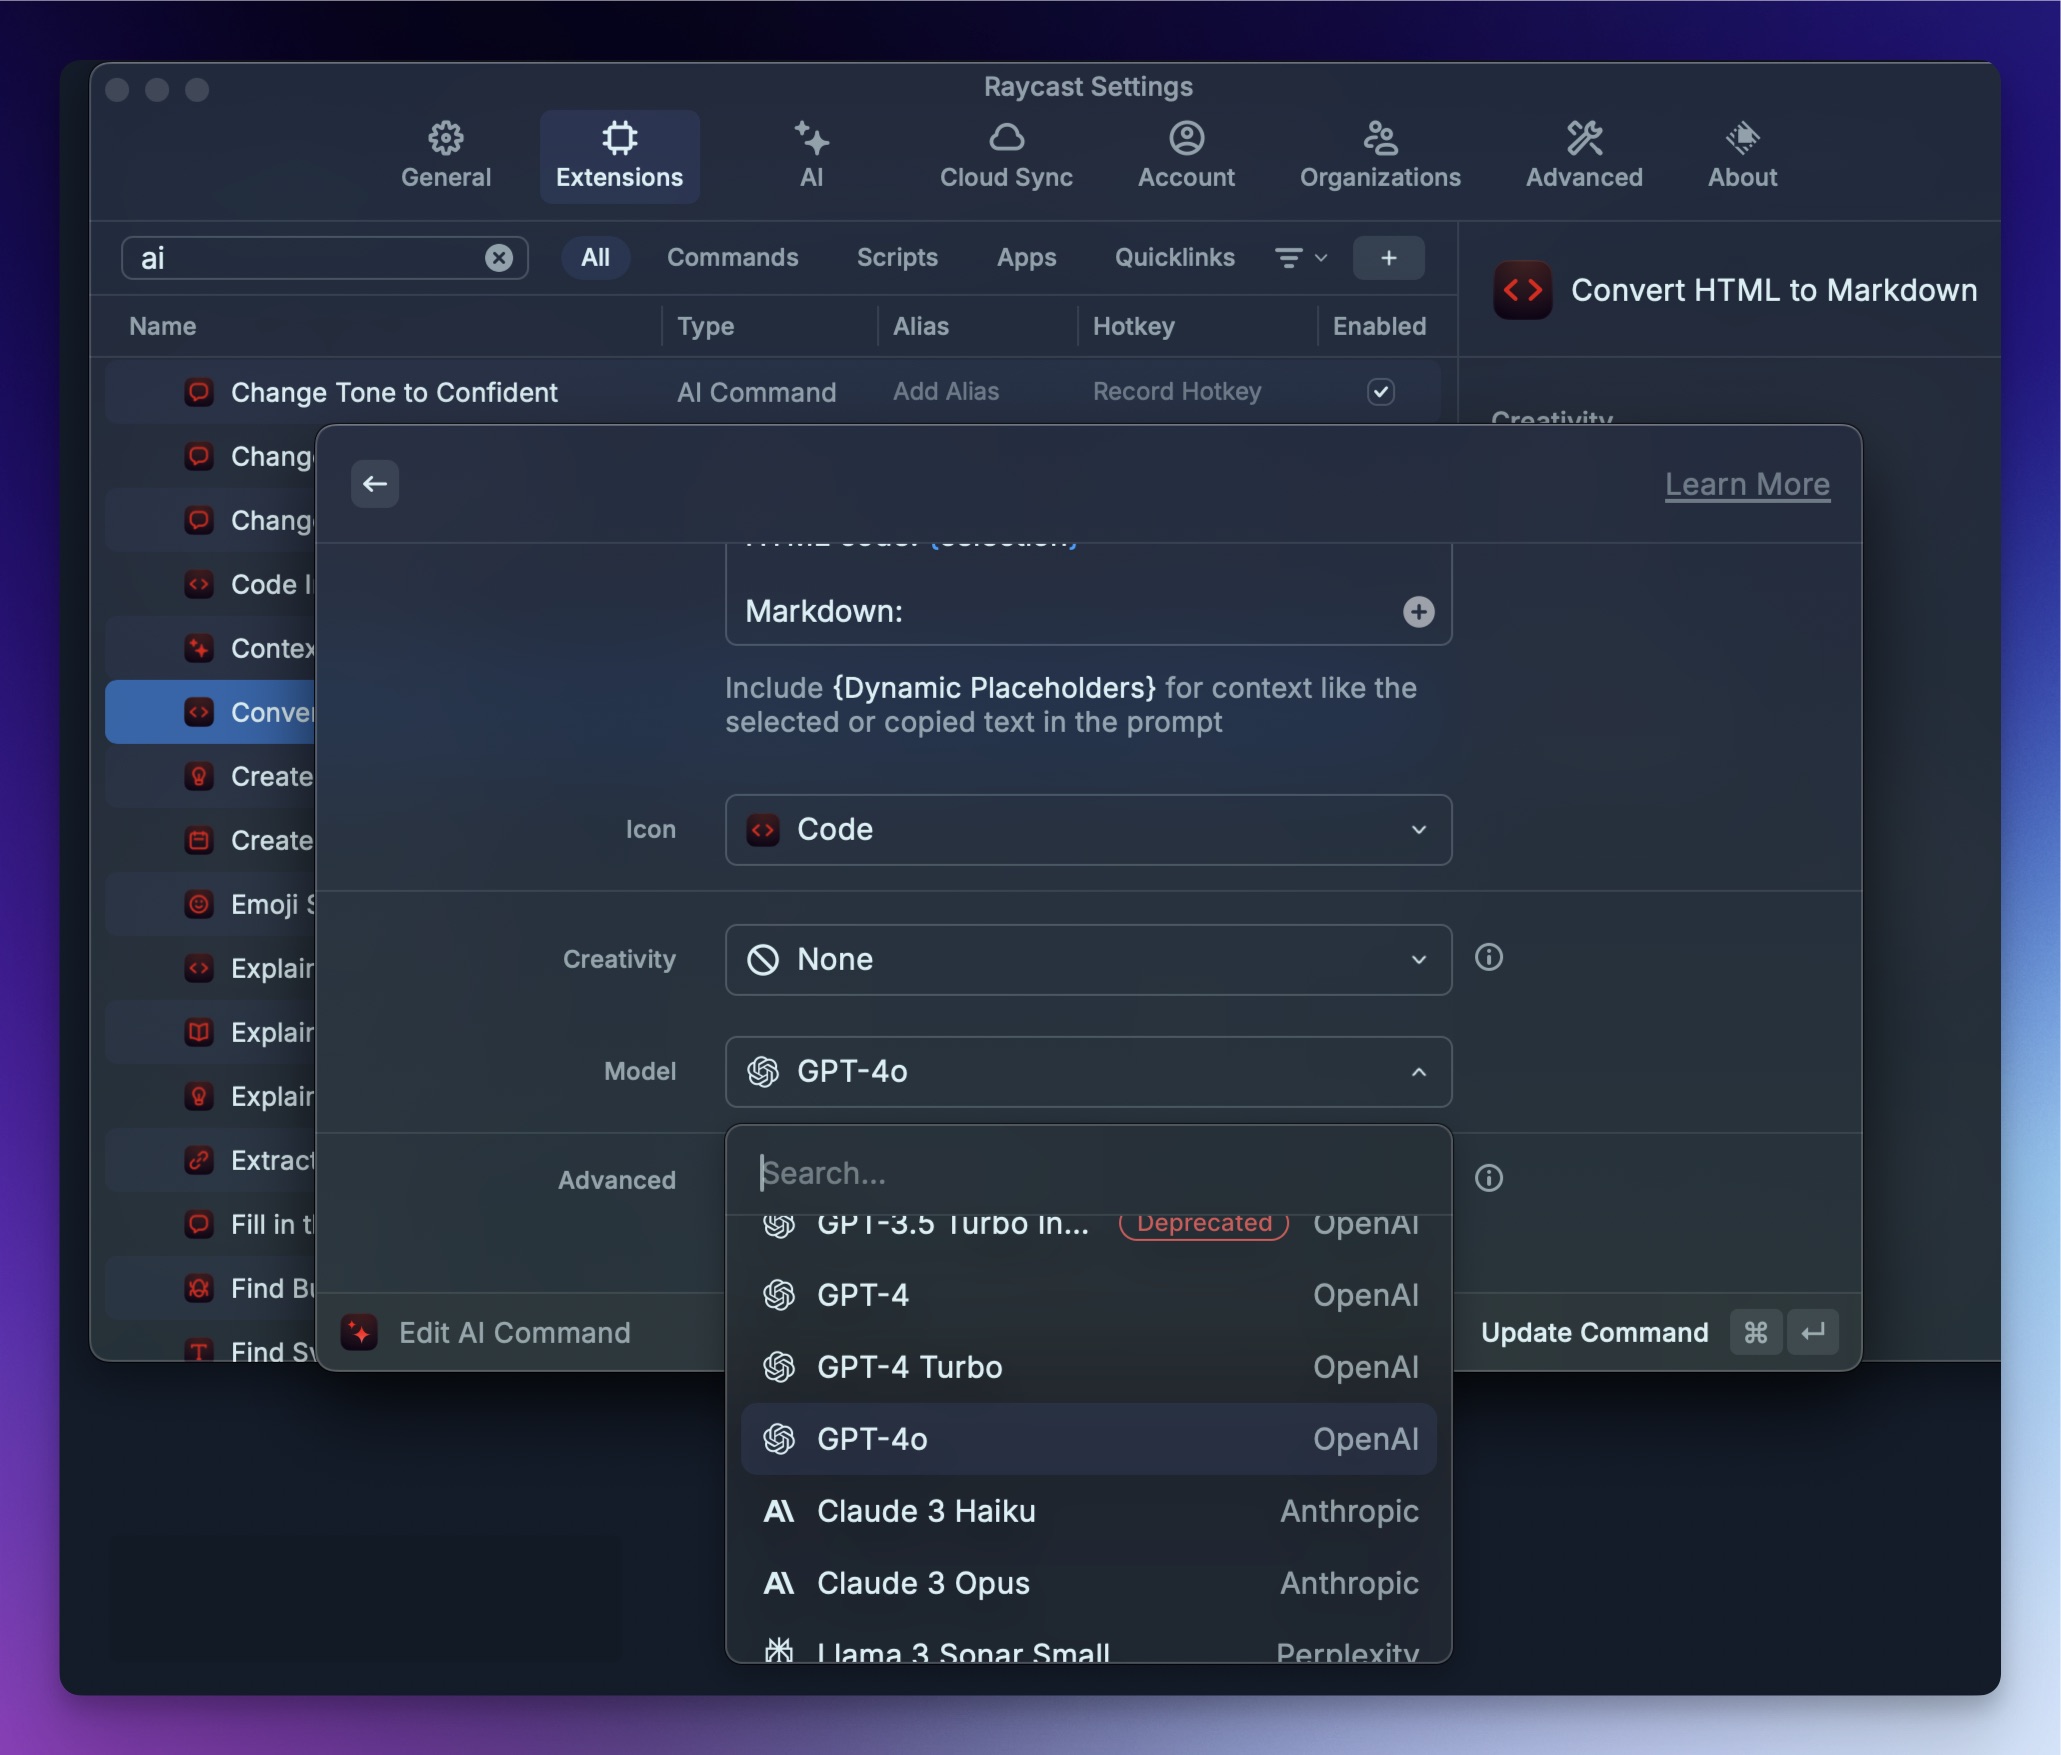
With Raycast AI presets and AI actions, you have to decide in advance which model will be used, and then you have to manually change the model for each preset and action whenever new models come out or you change your mind. It’s mind-bogglingly tedious and painful.
Here’s a screenshot of an AI command I was setting up last year. You can see that model choice is a setting, and that setting persists until YOU change it.
I don’t want to live having to manually manage and update AI models for a thousand actions, and I don’t think most other people actually do either.
The end result is that although Raycast AI is easier and more full-featured to get into initially than a roll-your-own solution or using Claude or ChatGPT, it also requires a substantial amount of maintenance and organization unless you just use it for basic AI Quick Chat and AI chat sessions. Raycast definitely needs to fix this, because they’ve created a management nightmare for AI power users.
Non-Raycast AI Options
If you’re going to ditch Raycast in favor of Spotlight, it’s very simple: you’ll have to find your own alternate AI tools. If you want access to tons of models deeply integrated with your tools and workflows, you’re unlikely to find something you like as well. It’s a simple test: if you want the most models possible combined with as many easy-to-use integrations as possible, keep Raycast.
If you’re like me and you want one or two of the best models with the fewest hallucinations, the ability to get CLI and chat tools in one plan, and as many integrations as possible, you can get by with a Claude.ai account, or possibly a ChatGPT account with occasional OpenAI API use.
As of this writing, the GPT-5 models (including the new GPT-5 Codex model) are much better and less annoying than Anthropic Claude counterparts. This is unfortunate, because Claude is a better product, even if it isn’t as good a LLM anymore. MCP integrations work the way you’d want them to, unlike the macOS ChatGPT app, which requires remote-hosted MCP servers only. Fortunately, OpenAI’s Codex CLI app doesn’t have this limitation on which MCP servers it can use, but that isn’t helpful for most ChatGPT sessions.
Right now I have both Claude and ChatGPT accounts, as well as an OpenAI API account that I make very little use of. The truth is, I haven’t really used Claude recently given the much better results I get from the current GPT-5 models.
If you’re wondering how I live without all the integrations provided by Raycast MCP and AI Extension support, the only reason it’s possible is that I never relied heavily on the extensions available when I installed macOS Tahoe and switched to Spotlight, and I’m pretty sure MCP servers weren’t supported in Raycast at that point. So I’m not really losing a lot in terms of AI use compared to when I was using Raycast. But this may not be the case for many Raycast users.
The Future
I think the future will bring more options for products and services that provide access to many models and workflow integrations, including improvements directly from companies like OpenAI and Anthropic. We are in the very early days of bringing LLMs fully into our operating environments, and a lot will change in the coming months and years.
For most people, the AI support in Raycast is going to beat the “bring your own” approach required by people not using Raycast on the Mac, and it’s not even close. Even considering the caveats above, Raycast AI is simpler to understand and use with your existing workflows.
Next time we’ll start looking at various Raycast extensions and how I’ve worked different tools into replacing them. Most likely I’ll keep it short and cover one or two extensions per post.
For years, Spotlight on the Mac has been a bare-bones app launcher and search utility. Sure, it could find files and apps and do some basic web searches, but there’s a reason third-party launchers like Alfred and LaunchBar have kept loyal fans for years, and why relative newcomers like Raycast has captured many more. Spotlight has never really given the ability to act on files or folders or perform actions on search result items like third-party launchers have.
With macOS 26, or macOS Tahoe, Spotlight surprised everyone by showing up packing an additional 15 lbs of muscle and some fancy new power moves.1 Spotlight can now perform tasks like sending messages or email from the Spotlight search bar, but it doesn’t stop there. It can search within an app – for example, searching within Safari will search its history and bookmarks, or searching within Notes allows direct note creation and more. Most importantly for me, it can run shortcuts and Shortcuts actions.2
Spotlight now lets you optionally narrow its area of focus with ⌘ key options – ⌘1 searches applications, ⌘2 searches files, ⌘3 searches shortcuts and even shortcuts actions, and ⌘4 searches the new, admittedly limited, clipboard history.
The part about shortcuts and shortcuts actions might not have leapt off the page at you, but in reality, this was an unexpected and very welcome gift from Apple to power users. This is the feature that made me decide to see if Spotlight could replace Raycast for me. I knew I’d need some additional apps to fill some gaps, but I’m already familiar with Mac power user utilities and was able to make a pretty good assessment of what that would look like.
Here you can see that hitting ⌘ Space to open Spotlight and then hitting ⌘3 to show actions results in Spotlight by default suggesting some actions and then beginning a list of actions that are available inside the Shortcuts app – without even needing to build a shortcut to run them. This is cool.
Here’s another example of some of the Shortcuts system actions now available right within Spotlight. Again, anything Apple or 3rd party developers make available to Shortcuts with app intents are now free to use from within Spotlight.
“Yes, yes, yes”, you say. “Spotlight sounds great. But how can it compare to Raycast, the Power User tool for Power User Power Users?”
Raycast – The Power User Utility Knife
Don’t worry, I’m not here to argue that Raycast isn’t powerful. It’s very powerful. It’s got tons of core features, tons of 3rd party extensions, thanks to its easily extensible nature, and it allows for simple integration of personally written scripts into Raycast Script Commands. I made use of this feature many times.
I knew if I tried this experiment that I would have many 3rd party extensions to replace. I also knew, though, that replacing my script commands wouldn’t be a problem – I’d just use the exact same scripts. This is the beauty of Raycast Script Commands. They’re just scripts, with some extra header comments designed for Raycast’s understanding and to allow it to pass in parameters. I can simply call these scripts through Shortcuts or FastScripts 3, or run them from the command line.
Another big Raycast feature that needs consideration is Raycast AI. Raycast gives access to a lot of current models, and provides features like AI prompts and presets, as well as quick AI (invoke in the Raycast search bar) and AI chat (a chat window with chats history and the ability to quickly switch models and copy answers, similar to ChatGPT, et al., on the web).
Next Steps
In my next post, I’m going to list some of the features, extensions, and script commands I used in Raycast and my assessment of how difficult they might be to replace, along with some initial ideas of how to replace them. After that, we can start looking at various specific items in detail, getting deeper into my past (Raycast) and current (Spotlight) workflows.
I think it will be interesting and instructive to show specific actions and use-cases with Spotlight, because explaining the basic premise of its new features doesn’t really help bring the possibilities to life in the same way.
Footnotes
I really had to think hard about how much additional muscle made sense there, as if the whole analogy made any sense whatsoever. ↩
I know “shortcuts and Shortcuts actions” looks like inconsistent capitalization, but “shortcuts” are automations made in “Shortcuts” the app. ↩